
To see if this custom-fit item will work for you please tell us what vehicle you'll use it with.
Thank you! Your comment has been submitted successfully. You should be able to view your question/comment here within a few days.
Error submitting comment. Please try again momentarily.
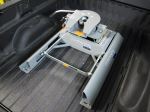
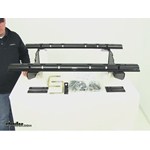
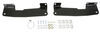
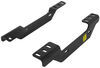
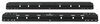
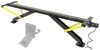
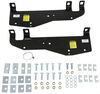
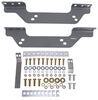
Custom brackets reduce the amount of drilling and time required to install your fifth-wheel trailer hitch. Brackets, base rails and hardware included.
Features:

California residents: click here
Videos are provided as a guide only. Refer to manufacturer installation instructions and specs for complete information.
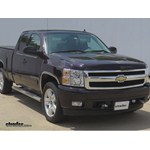
Today on this 2005 Chevrolet 3500 we are going to install part number RP50064-58. This is Reeses fifth wheel rails and install kit. The first thing we need to do is get the truck ready to install the kit. The first thing we did was remove the spare tire so we can get underneath the vehicle and install the hardware. We will also lower the exhaust because above the exhaust there is a heat shield and we need to move the exhaust out of the way so that we can cut the heat shield out of the way. We will look at the passenger side frame rail of the vehicle and this is the heat shield that goes all the way across. We are actually going to remove two sections of this. We are going to remove this section here from this hat channel as far back as we can because right here is where we have to have wrench access to tighten down parts. The second section we are going to remove is on this side of the hat channel, there are two right in a row, so we are going to cut across here and we are going to go all the way to the next hat channel up here and go across as well. 00:57
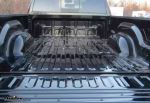
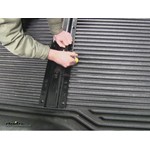
Next when you get into the bed of the truck we will measure out where to put the base rails. What we are going to do is measure the edge of the bed itself as described in the instructions and make a mark, do that on both sides, we will line up the rails with a mark and you want to measure left and right to get it centered in the bed. With the rail in the right spot we will mark out the holes we drilled. On the rail going towards the cab of the truck we are going to be using these two holes on the outside edge of the rail on both sides. We will find our center. We will drill out a pilot hole with a 1/ 8 inch bit. Repeat the same process for the remaining three holes. We are looking underneath the truck now and we can see the two holes that we just drilled out and we will hold the bracket up there and see how everything is going to fit into place. We will just line them up roughly so it looks like the bracket is going to be using this existing hole here and it looks like we can U-bolt it or we can bolt it into place here as well by drilling the hole out. 02:18
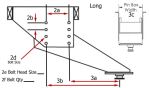
We have got the pilot holes drilled out, lets move the rail and drill out the holes and work our way up to 9/ 16. Now lets get back underneath the vehicle in the frame and we are going to start mounting the side frame brackets. We are going to set it on the frame for now and just line it up with the holes we drilled. What is going to happen is we are going to push it up to the bed and see which one of these three holes we are going to use. You can see we are going to be using this one right here so we can put our hardware into place. We are going to be using the 5/ 8 bolts and the flat washer, the large flat washer. Then we will use another flat washer and a lock washer and then the nut. Now the attaching point going towards the front of the vehicle we have got a couple of different options, one we can use the U-bolt assembly which will go around from the top and bottom, however sometimes you might have some lines in the back that might be hard to get around and you really cant get to it very easily. We will put the frame bracket up to the bed and line it with the holes as best as possible. We will use a clamp to hold everything together. We have got the bracket in the final position, we will take a 1/ 2 inch drill bit and we will use that to mark our center hole. We are going to drill out a pilot hole and then follow up with a 1/ 2 inch bit. 03:41
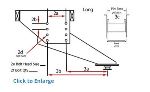
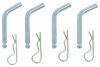
Next we are going to use a fish wire tool that comes with the kit and we are going to put it in the hole that we just drilled and route it out back and we are going to install a two inch block with a square hole, slide that on to the wire and then we will take the 1/ 2 inch carriage bolt and thread that in place and push it in and pull it on out. Make sure it is fully seated. Remove the wire pull. Snug that up finger tight for now and we should be just fine and we will take the clamp off. Now with the 5/ 8 bolt we will put the bracket back up to the bed and we will snug it down. At this point we can repeat the same process back over on the passenger side frame rail. Lets start installing the base rail. First we are going to install the lock and that will give it metal to metal contact from the top of the rail through the bed and onto the bracket down below. We will do that on both sides. Start installing the hardware for the base rail we are going to use this flat block with the round hole and offset and a lock washer and a nut. The next thing we want to do is place a second rail in the bed and we are just going to put it approximately in the right spot we will use the fifth wheel hitch that will be used with the truck. We will use that to position the second rail. Next we will use some pins to hold everything in place and then we will make sure that both rails are square with each other. What we are going to do is measure diagonally from one inside edge of the rail to the opposite rail and we get the measurements back and forth and we know that the rails are square. The same thing we did with the first rail we will mark and drill out the holes accept this time we will be using the two inside holes. 05:41
With the pilot holes drilled out we will remove the rail and just like before we will drill out the holes to the final size. This time we will not need the blocks on the top because the corrugation is going towards the top and touching the rail however we will have to use those in between the frame bracket and the bed underneath of it. Lets in the bolts. One other thing you want to look for is that when you put the bolts in there make sure they sit flat, if not you may have to loosen the frame brackets to get them to point straight. While we are here lets install the fifth wheel as well. Start working with the hardware on the bottom and slide the block and notch and just like the front one the block, the lock washer, and the nut. With all of the hardware loosely installed make sure the hitch is firmly in place and shake it around a little bit to make sure you have plenty of play to remove it. We will reinstall the pins and then we will make sure the blocks that are underneath the rails, make sure they are straight. Snug down these two bolts to the frame bracket. Check and make sure it still moves is a good sign. With all of the pins removed with relative ease we can torque down the bolts from the frame rail to the frame bracket. Once we have the base rails torqued down to the frame brackets lets tighten the frame brackets down to the frame. Torque down the frame brackets down to the frame. With all of the bolts torqued down our install is finished for the fifth wheel brackets. The last thing that needs to be done is to reinstall the exhaust, the tires, and wheels, and the spare tire. There you have it for part number RP50064-58.

Great product, fast shipping.
beats drilling holes,its the way to go
Bolted right in perfectly
product was easy to bolt up to frame
Fast shipping with great communication and updates. Highly recommended.
Products were excellent as expected, service was even better!!!
The bed rails and truck mount are of excellent quality. The order was shipped in a very short time.
Custom 5th Wheel bracketsThe custom brackets made for a quick installation with no drilling of the frame, only necessary to drill the bed floor to bold the plates in place.It was hard to get the nuts on the bolts over the gas tank, but I don't know how you could improve on this. The supplied helicoil wires made getting the large front bolts in the frame easy. Instructions were good and model/year specific. The price was great and the shipping was free and fast.
5th whel hitchseams good so far but wont try to install untill spring
Ordered a fifth wheel hitch on a Monday, not really expecting to see it for a week and it was at my door on Wednesday. Now to have weather accomodating enough to install it. I've been viewing the online videos and they helped make my decision to purchase and install myself.
The hitch was shipped quickly. All parts were there. Installation was went well with all parts aligning.
Elasped time from order to shipping to delivery was outstanding!
Tracking estimated delivery for the 8th, the product was here on the 7th. I will defintely be a repeat customer.
Worker great !! Bolted rite on to my 2004 Chevy 2500HD 1 Great product and easy to install ! Fast shipping and great price. Thanks again.
Sturdy. well designed kit. Installation on GMC truck was difficult but successful. Shipping was very quick.
Install was easier than I anticipated. The hardest part was tightening the rail bolts...limited access. If I were to do it again. I would get everything positioned then loosen the bed bolts, raise the bed slightly and tighten the bolts. Overall, I'm very pleased with this kit.
Was really easy to install, one thing that should be included is a short bracket to resecure the brake lines in their new location.
Excellet - Outstanding. Ordered and shipped on Tuesday deliverd on Thursday. Excellent easy to understand directions. All parts fit per directions. etrailer is a model complany that all others should follow. 2004 Chevy Duramax long bed.
Way to goThe quick install custom base rails made for a much easier install friend and I had the fifth wheel installed in about 3 hours minus the 45 minute dinner break. Easy to follow directions hardest part was reaching over fuel tank to tighten bolts. No holes to drill in frame only bed made it a snap. Would definetly suggest it to anyone.
This is a great heavy duty quality product. I installed the kit myself, however the video makes it seem easier than it is. In the end I was able to complete the install, however it significantly longer and required additional tools not listed in the directions. All in all I was very pleased with the product and service provided by etrailer.
I haven't had a chance to install the hitch but I can tell it's pretty beefy. UPS managed to destroy the boxes and yet everything came out without a scratch. Etrailer was outstanding on filling my order and shipping the hitch. I ordered it late Sunday and recieved an email promptly saying the order was received. It arrived at my house 3 days later and I was able to track it all the way. I would recommend using etrailer to anyone. Thank you.
This product was well designed and came all the materials that were required and additional for the various other vehicle installations. The installation was as stated, the only drilling was thru the bed floor. The hardest part of the install was being able to start the driver side rail bolts to the frame bracket. To many items in the way (fuel tank, brake controller, dual exhaust), but overall an excellent package. Took about 3 1/2 hours with two guys, a third would been helpful at times. 2008 Chevrolet Silverado LTZ 2500HD Diesel Crew Cab Short Box
I bought these quick install base rail plates instead of the universal fits all-fits nothing well angle plates that I had used on a different truck. Watch the video e-trailer has on line in the help section and the video is much better than the instructions that come with the plates.
My install went just like the video except the truck was only 2 days old so I didn't want to drop the exhaust or the fuel tank. It was tight between the fuel tank and the bolts that hold the rails in the bed but do-able.
The exhaust side was easier and I didn't have the exhaust tin shield like on the video but it was still tight but easier than the fuel tank side.
Using the measurements like in the video ALL the holes lined up like through the bed like they were supposed to with out any reaming of the plates or brackets.
The plates on the frame with the spacers worked great just like in the video and are worth the up charge of $$$ instead of using the universal angle supports.
With my Silverado being only 2 days old I was not going to drill any holes in to the frame for any reason to have chevy void my warranty so these bolt on plates using exsisting holes were the nuts!!!
I bought new bed rails for my fifth wheel as it would just have been to much of a pain to mess with the rusted bolts in the old truck.
All the hardware was there, every thing was packed waaaay too good, and it all came fast.
Who could ask for more
Eric Horn
Like a few of the other reviewers, I decided that the custom brackets for my 2005 Silverado 2500HD with 6 1/2 foot box was the way to go because I didn't want to be drilling and fitting the smaller brackets under there. Here's some thoughts. Yes, the spare tire really needs to come down - that took me about 2 hours, as I have never had it down before and had to keep referring to the instruction manual. Making measurements for the rail placement and drilling the holes in the bed was the easy part, as was using tip snips to remove a section of the heat shield underneath. The hard part was drilling the optional hole in the frame for the 1/2 inch bolt and fishing the bolt through on the drivers side (passenger side was an easy fish). I started with 1/2 inch hole for the 1/2 inch bolt - ended up drilling a 9/16 hole so the bolt would come through. Still, I do feel comfortable that this bolt provides extra security/rigidity to the brackets. The other hard thing to do was get the rectangular offset hole plate and lock washer attached to the rail bolts up by the fuel tank. Ended up hot gluing the lock washer to the plate because I was out of fingers to hold the pieces up there and thread the nut onto the bolt - ideally one would need to be part stretch armstrong and part contortionist. My total installation time was closer to 5-6 hours - but when it comes to something like this, I would rather be slow and thorough than fast and miss something. The kit contained everything needed and even a few leftover parts - so don't be concerned. Towed my new trailer home 2 nights ago and was pleased with the set-up and how it towed.
This is my first time pulling a 5th wheel but not the first time traveling in a RV. Looking at the installation kits for these 5th wheels was a learning experience! Not many places sell the Quick-Install Custom Base Rails and Installation Kit. Since this is my first time pulling I wanted the security of knowing all four bolts holding the Base rails to the frame were attached to bracket. I'm not the one doing the install, but from what I see, the time should be cut by 1/3 from the other way of installing the base rails. eTrailer was the only one of the 5 websites I checked that had what I was looking for.
Regards,
Robert G from MI
I was a bit nervous at first installing the rails that would eventually hold the weight of a 16,000lb camper, however after reading the instructions and looking at the quality of the parts, I felt alot more comfortable. The installation was very easy, and with the large side plates, I feel alot better knowing the rails and hitch are secured to the frame with more than those small pieces of L steel that normally come with the kit. Install only took me about an hour and the hitch is very solid!


Do you have a question about this 5th Wheel Hitch Rail?
Info for this part was:
At etrailer.com we provide the best information available about the products we sell. We take the quality of our information seriously so that you can get the right part the first time. Let us know if anything is missing or if you have any questions.


Gene P.
7/13/2013
Im going to install this kit myself I have looked under my truck and cant see why the heat shield needs to be removed. The install looks like a challenge but I think I can do it.