
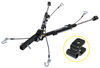
Roadmaster Direct-Connect Base Plate Kit - Removable Arms


To see if this custom-fit item will work for you please tell us what vehicle you'll use it with.


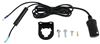
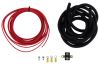
Get a secure, nearly invisible connection for flat towing! This heavy-duty Roadmaster base plate features removable arms, easy bolt-on installation, and integrated safety chain attachments for added security.
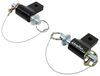
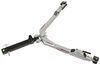
For those who love a polished and neat look on their vehicle when not towing, the Roadmaster Direct-Connect Base Plate Kit shines with its removable arms and twist-lock attachment. These arms snap effortlessly into position and, with a simple twist, lock securely, allowing for quick engagement and removal. When not in use, pull and twist, and the arms are out, leaving the brackets hidden and maintaining the vehicle's clean aesthetic.
Skip the hassle of welding with this base plate kit! The all-steel construction mounts directly onto your vehicle's frame, ensuring a straightforward installation. Designed with precision, the custom-fit guarantees that your vehicle remains unaltered yet equipped with a robust support system ready for your adventures.
Forget the worries of subpar fittings and unstable setups. The Roadmaster Direct-Connect Base Plate Kit promises a perfect match with its custom design specific to your vehicle model. This ensures that not only does the setup look integrated, but it also provides unwavering support for your journeys, no matter where the road leads.
Tired of unsightly hardware sticking out and accumulating grim? With an innovative hidden bracket design, once the arms are removed, these base plates sit nestled within your vehicle's grille. This doesn't just enhance your vehicle's aesthetics by keeping parts out of sight but also shields against potential scrapes and wear.
The base plate kit's black powder coat finish is a testament to it's enduring construction. This finish isn't just about a sleek look; it ensures significant resistance against corrosion and wear, even in challenging weather and road conditions. Trust in a product that doesn't just persist but performs under duress.
Tailored specifically for Roadmaster motor-home-mounted tow bars, this kit insists on compatibility without compromise. Whether using the Nighthawk, Falcon, or Blackhawk models, rest assured that this kit complements and enhances the towing experience, ensuring a secure and reliable connection for your adventures.

California residents: click here
Customer Satisfaction Score:
97% were satisfied with this product
3% of customers were not satisfied
Ratings & Reviews

Quick ship, just had it installed today
Have not installed it yet
Do you have a question about this Tow Bar Base Plate?
Info for this part was:
At etrailer we provide the best information available about the products we sell. We take the quality of our information seriously so that you can get the right part the first time. Let us know if anything is missing or if you have any questions.


Thank you! Your comment has been submitted successfully. You should be able to view your question/comment here within a few days.
Error submitting comment. Please try again momentarily.