bing tracking image

Trailer Wiring Harness Installation - 2008 Toyota RAV4

content loading

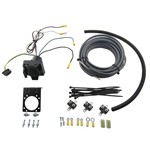
Products Featured in this Video


How to Install a Trailer Wiring Harness on a 2008 Toyota RAV4


Today on this 2008 Toyota RAV4 we are going to install part number 118412 from Tow Ready. The first thing we need to do is get inside the back of the vehicle and start taking apart the interior components. To get access to our wiring connection points we will actually be behind the tail lights. To get behind the paneling we are going to start in the middle. We are going to have to pull off this cover, we are going to take out this part. The next thing we have to do is take out these two side panels right here, one on each side. We are going to take off this threshold. It may require you to have a trim panel tool to help pop up the rivets. Next we are going to take out two access panels. There is one on each side to make the panel a little bit more flexible. 00:43

The next thing we are going to do is remove some fasteners for this panel right here. We are going to remove this tie down point and this screw right here and the bolt that is sunk in all the way in there. Hopefully we will get enough room where we can sneak the wiring underneath. We just need that much room right there. We are going to do the same procedure back over on the driver side. We are going to start working on our connection points for electrical. What we are going to do is reach inside this area right here and then we are going to go up to the tail light itself. Feel for the tail light and look and feel for the connection point that goes into the tail light and disconnect the back. At the very top you will feel for a button and push down on it and it will pop the wire harness off. 01:24

We are going to take our T-One connector and pull off the white wire a little bit from the ground. We are going to take this end and we are going to plug that into the back of the tail light. We will take the two remaining ends and just push those together. Now lets go work on our ground. Inside here is a body bolt that we can use as a ground. It is clean and it is galvanized so we should do pretty good. Just pull back the ground wire a little bit more. We can hide it like this behind the panel so we will be okay there. Lets find a place to mount our module box. We can adhere it to the back of the plastic body work too. Install it pointing down. With that, we can tuck our wires out of the way. When we take our 4-pole wire straighten it out. What we are going to do is fold it back up a little bit in nice long loops. We are just going to push it back inside the storage compartment. That is where it is going to stay when it is not in use. Now we are going to take the wire with the red and green colors and we are going to pass it behind the body work and out through here. We are going to take that same wire and work it back through on the other side of the plastic back up to the tail light. You are going to have to feel for a connection going directly to the tail light. Our wires that are going to cross are going to be covered up by the rear threshold. 03:22

The next thing we need to do is run this red wire up to the battery. We are going to do that using the provided 10 gauge wire that came with the kit. It may be tempting to connect up to the wire up to the 12 volt power supply out back but it is not a good idea. For one, part of the fuse rating is less than what the modulite can actually use. Really just stay away from that 12 volt power supply and just run this up to the battery. What we are going to do is run our black wire up to the engine compartment to the battery and we are going to run it from the inside out using the existing grommet that we see in the back compartment. Pull it out, put a slot in it. Take your wire and just push it out to the outside. Which is where we will pull it out. Then we will just push our wire through the grommet at the other end and we will push that back into place. Then we will take these two ends and use a provided butt connector to connect them together. We will push any remaining slack we have back out. With that we will tuck our remaining wires out of the way and safe and then we will start reassembling our interior components. We will put the back threshold back into place. We are going to run our wire up to the front of the vehicle and what we are going to do is stay away from anything that is moving or gets hot. We are going to stay away from suspension components and go all the way up to the front. There is a factory wiring harness. You can usually just follow that too. We are up to the engine compartment and we just pushed it up as far as we could, and then from the top, reach down and pull out the wires. 05:14

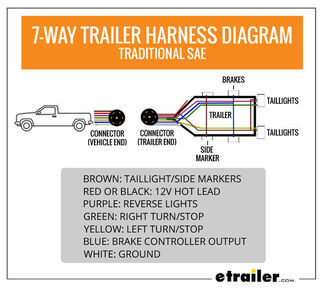
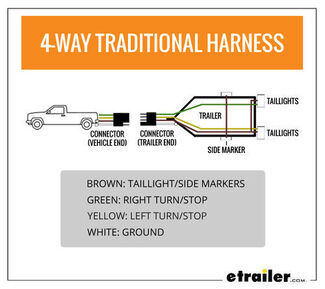
Make sure that we stay away from anything that is moving or gets hot. We will cut a little bit off, about right here, and then we will start connecting up our fuse holder. We have got our fuse holder and it is a loop so lets just cut it in half. We will put a ring terminal on one end and a butt connector on the other. We will connect this to our black wire. Now we are going to start getting our connection to the battery. What we are going to do first off is disconnect the ground. With the ground disconnected we can hook up our positive lead now. This is a cable to another device. We will stack ours on top of that. Make some zip tie connections to make everything neat. Now we can install the fuse. Now we can reconnect to the negative post on our car and that will finish our install. We are going to try out our light tester now. We are going to take the ground and go to the ground pole on our 4-pole flat. Take the probe and put it into your running lights so we know we are good there. That was the brown wire. Now we will go to the yellow wire. There is the left turn. Now the brake signal. Now we will do the same thing with the right turn. That was the turn signal. Now the brake and try it on the trailer. To do that all you need to do is pull out a little bit. When you shut the door on it, because the door seal is plenty thick, it will not hurt anything. We will pull out a little bit for now, shut the door on it. From here we can pull out what we need to get to the trailer wiring harness. It is that easy. When you are not using it put it back into the storage compartment, that is one less thing hanging out and getting dirty outside. With that, that finishes our install of part number 118412 from Tow Ready.


Ed S.

6/9/2014

What a helpful and good video. Thank you very much. Now my little red Rav4 can pull our small utility trailer, and be legal with lights!Keep up the good work, and yes, I bought the harness too!Ed in Nevada

Info for this part was:

Employee Joe V
Test Fit:
Joe V
Employee Rick A
Test Fit:
Rick A
Employee Zack K
Video Edited:
Zack K
Employee Andrew K
Video Edited:
Andrew K
Employee Joshua S
Video Edited:
Joshua S
Employee Kathleen M
Video Edited:
Kathleen M
Employee Mike H
Video Edited:
Mike H
Employee Cole B
Installed by:
Cole B

At etrailer.com we provide the best information available about the products we sell. We take the quality of our information seriously so that you can get the right part the first time. Let us know if anything is missing or if you have any questions.