
Tap Wrench Kit for Standard Pipe Sizes - Metric - 6 Pieces
(2 reviews)
Price: $10.14
In Stock
Tap Wrench Kit for Standard Pipe Sizes - Metric - 6 Pieces
Item # PT22FR
Our Price: $10.14
Orders above $99 qualify for Free Shipping
In Stock


- All Info
- Reviews (2)
- Q & A (0)
- Videos (2)
- Photos
Performance Tool Automotive Tools - PT22FR
- Tap Wrench
- Wrenches
- 10 mm
- 5 mm
- 6 mm
- 8 mm
- Performance Tool
- Metric
- Tungsten Steel
- Cuts and renews internal threads for metric pipe sizes
- Great for thread maintenance, repair work, and re-threading
- Wrench features dual holding jaws for large- and small-sized taps
- Movable T-handle with positive grip chuck provides additional leverage
- Tungsten steel for strength and durability
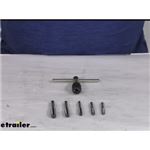
- Metric sizes: M6x1, M7x1, M8x1.25, M10x1.5, and M12x1.75
- Use the following drill bit sizes: M6x1 = 5-mm, M7x1 = 6-mm, M8x1.25 = 6.8-mm, m10x1.5 = 8.6-mm, and M12x1.75 = 10.2-mm
W8652 Performance Tool Metric Tap Wrench Kit - 6 Pieces


Video of Tap Wrench Kit for Standard Pipe Sizes - Metric - 6 Pieces


Videos are provided as a guide only. Refer to manufacturer installation instructions and specs for complete information.


Video Transcript for Performance Tool Standard Pipe Sizes Tap Wrench Kit Review
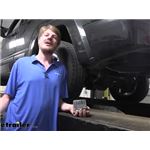
Hi there frustrated installers. Today we're gonna be taking a look at, and showing you how to use Performance Tools, Tap Wrench Kit. These are available in either a standard or metric configuration, depending on which you need for your job. We're gonna be showing off the metric today, since that's the most common sizes for weld nuts and hardware that's on your vehicle pre-existing. Standard's really great, if you're gonna be repairing and cleaning up anything that's aftermarket, a lot of USA made products are still gonna have standard threads, for those aftermarket components you'll be installing on your vehicle. This is a small six piece tap kit, that has your common sizes that you're gonna need out there.
For example, in our metric one here we've got M6, M7, and both of those are going to be a one for the thread pitch. We've also got an M8 at a 1.25 thread pitch, an M10 at a 1.5, and we have an M12 at 1.75 for the thread pitch. And again, those are the most common sizes for a lot of your hitch hardware out there, you're gonna be using this M12 and these M10 really often, the smaller ones you won't use so much for hitches, but they're still really useful for other projects you might be doing. Some examples could be, maybe you're putting airbags on your vehicle, and sometimes you reuse some of the weld nuts and things on that that's pre-existing on there, where if we're putting on some straps, or relocating some wiring and other things, and sometimes you gotta take out bolts or reuse weld nuts that are there, and they could be all rusted up, and you're gonna have a hard time sometimes with those older rusty bolts, so we've got all the sizes that we could ever want for it. In the standard kit, you're gonna receive a 1/4 inch tap with an NC20 for the thread pitch, a 5/16th with an NC18, a 3/8s with an NC16, a 7/16th with an NC14, and a 1/2 inch an NC13.
We also have our wrench here, this is what will allow us to insert our taps in there and give us the leverage we need to adjust it down and tighten it. Just simply slides in there, and then the clamp here as it tightens down, it squeezes the ears around it, which holds it in there secure. And I like the little handle down here, I like that it does slide in either direction, 'cause one of the things you're gonna find with taps in many cases, that bolt never breaks when it's right in front, it's always that bolt that's in a hard to get to spot. So when you go down to get to it, you put your wrench in here like this and you turn it, all of a sudden, Oh, you're you're hitting on one of the arms. We can slide it out to one side, get ourself as much throw as possible, maybe we'll hit something over there, but then it's freed up again on this side and we can continue.
So it's really nice that it has this for some of those tighter areas. This kit can also be used to tap your own holes so they can be threadable. Now when using a tap, there is a specific drill bit that is required to get the proper thickness, so that when you put your tap in there, it can remove the right amount of material and still have plenty of strength left for the threads. You can find charts like that, right on the product pages. So it outlines which drill bit you should use with that specific tap.
And in the event, maybe you we're able to get one of your bolts started in some project that you we're doing, and you started to run it down and all of a sudden it just stopped. You we're able to get the bolt back out, and you got yourself a tap kit to clean up the hole, but when you go to put the bolt back in you notice the threads are damaged on it as well, so you can't use this bolt anymore, where we can fix this as well, if we use a dye. We also have kits here from Performance Tools. It's a full kit that comes with taps and dyes, so that way you can use the taps to clean out the holes, and the dyes that come included with them, are gonna come in the same sizes, so that way the bolts that would threaden to those holes, you can clean those up as well. So you've got both sides, so you can get your components properly tightened and torqued down. Now we'll show you an example of one reason you would want this. Let's say you just purchased the hitch for your vehicle, and your vehicle similar to this one. This is a 2012, so it's pretty old, now we're about nine years old on this vehicle. And when we go to put the hitch up, the first issue we have is we can't get any of the bolts to actually go into the hardware that's located on the bottom of the vehicle. The weld nuts are all rusted up. You can see the weld nuts here, the condition that they're in, and I can't even get the hardware to start. If you try to thread it in there, it doesn't even want to grab, because there's just too much corrosion and stuff in the way. So we never gonna get this hitch installed in its current condition. We can resolve this by using our tap kit. The tap kit does have plenty of sizes in it. They're the most common metric sizes. So the bolts that came with our hitch on this vehicle, are going to be M12 bolts. And another important thing is the thread pitch of a bolt, and that's the spacing between the threads, and the bolt here that we have is a 1.75 thread pitch. Now, if you're unsure what the thread pitch is of your bolt in the size, there are gauges that you can purchase to tell you those things, you can get them at your local automotive store, but one of the easiest things you can do, since you've got the tap right here with you, you can hold it up to it, and see that it's the same diameter. And then for thread pitch, they should actually interlock with one another if they are the same thread pitch, and you can see there that there's no light shining through between the threads 'cause they interlock right into each other. If we we're to go down to a different tap size, this one only has a thread pitch of one, you could see that these threads are never gonna lock together. So, we've identified what tap that we're gonna be using, so we get the correct threads up in our hole there. We are gonna use a little bit of rust penetrate or lubrication, it just makes it a lot easier to use your tap. 'Cause these taps are made of an extremely hard, but brittle material, and it needs to be that way in order to cut threads into the metal. So if we look here we've got a small opening, that's for the square tip on our tap to go into, and then you just tighten this down, and that'll lock it in there. Now you can't pull it out, now it's nice and snug. The handle here does slide back and forth, 'cause sometimes you're gonna be in situations where the handle's gonna hit, and you can see here if we work, when we go to go into here, as we start it and work our way around, the handle hits, so we just turn it back the other way, and we can just continue working our way up in there. And it's important that you keep it straight, we're trying to get this to go into the threads that are pre-existing there and to clean those up. If you're using the tap, and it gets really tight on you, where you're all of a sudden, It's like, boy, that's snug. You don't want to force a tap. So we talked about how this is a very hard, but brittle material, it's very hard 'cause it needs to cut. But since it's so brittle, if you put an excessive force on it, and you twisting it down here in the bottom, you'll more than likely break the tap off inside there. And that's a really bad situation to be in because the tap is such a hard piece of metal, that it's really difficult to drill it out of there. In many cases, it's actually harder than your drill bits, sometimes special drill bits may be required. So just take your time, if you're going, and as soon as you feel any resistance, I got a little bit right there, we're just gonna back it up, 'cause that's gonna help get some of the dirt and debris that's binding up inside the threads, out of there. And then we can just go back forward, and you'll feel when you go back it's going to be easier the next time. And you just gonna kind of go back and forth like that. Whenever we feel resistance, we'll back it up a little bit, and then we'll go forward. And if you get to a spot where you back it up, go forward a bunch of times, and you can't quite get it to go, you always wanna be careful, you don't wanna break it, just go ahead and back your tap all the way out of there. Take some spray, and clean off all the threads, and also spray out the hole. 'Cause we get all that debris out of there, it's gonna make it a lot easier on us. So we're just gonna keep on going up until we've got all these cleaned out. You'll know you got it all cleaned out when the tap is nice and free going up and down, you're not cutting and removing any more rusty material out of there. So now we've got it all up in there, it's nice and free in every direction now. We can go ahead and back it back out. And this is what you're looking for, you're looking for something that's easy, that you can actually pick it out by hand. I mean, you've got this plenty clean, we can see all that material that we've removed. Gets stuck inside the grooves here, and that's where it's supposed to go. It directs it into these channels, so that way it can just fall out of there and not bind up inside the threads. We're gonna go ahead and spray it out one more time though, 'cause there is probably still some material up in there. And then we're gonna grab one of the bolts out of our hitch kit, and we're gonna make sure that we can get this thread in here. Before we couldn't even get it started. And it sounds a little rough, you can hear the noise, but it actually threads in very easy. I'm going in by hand without any issue. If you we're to thread this bolt in, take it back out and spray it one more time, it would be even easier to get out some of that material that was still left behind. We'll then repeat this for each of the remaining holes. And once we've got them all cleaned out, we're ready to begin our hitch installation. You have a lot of material that can be left behind afterwards. I do recommend getting this off of there before putting it away. We're just gonna use a little bit of spray to clean it out of there, and you can see it comes to clean very easily. And that completes our look at Performance Tools, Tap Wrench Kit.
Customer Reviews
Tap Wrench Kit for Standard Pipe Sizes - Metric - 6 Pieces - PT22FR
Average Customer Rating: 5.0 out of 5 stars (2 Customer Reviews)
by: Daniel 12/08/2022
Super helpful- service was spot on they anticipated my needs and responded with alacrity.
by: Marshawnda01/06/2022
Super fast delivery! It came a day early and got the job done. I love how it tells you who got the order together. I highly recommend ordering from here!! 10/10 recommend!!
2
2
See what our Experts say about this Performance Tool Automotive Tools
- How to Clear Rust from the Weld Nuts to Install the etrailer Hitch e98841 on a 2015 SorentoI linked an installation video below for the etrailer Hitch item # e98841. Around the 7:45 mark it will go over the process to clear out any rust. If these are the steps you have taken you may need to have the threads retapped. You can use the Tap Wrench Kit for Standard Pipe Sizes item # PT22FR to clear out the threads for the M10 bolts.
view full answer... - What Prevents Trailer Hitch Install Hardware from Threading into Weldnuts of VehicleI don't know what hitch you have so I can't determine what bolt size you have and therefore the correct thread tap but what you need to do is use a thread tap to clean out the threads so that you can install your hitch hardware. This is a very common problem unfortunately. You could start with the Tap Wrench Kit for Standard Pipe Sizes - Metric - 6 Pieces # PT22FR to determine your bolt size.
view full answer... - How to Clean Rusted Frame Weld Nuts to Install Trailer Hitch on 2013 Chevy EquinoxThe Draw-Tite # 36408 Class II hitch you referenced uses 4 M12x1.75 bolts to attach to the nuts welded into the frame. If they are corroded, and spraying them with a spray lubricant like PB Blaster and using a wire brush like one on a battery terminal cleaner like # DW00254 hasn't done the trick, you'll need to re-tap the threads. We offer a tap wrench set, part # PT22FR that includes an M12x1.75 tap. Before attempting to run the tap through the threads, be sure to hit each nut with a good...
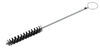
view full answer... - What Size Bolts Are Used To Install The etrailer Receiver on a 2009 Jeep Liberty? The hardware with our etrailer Receiver # e85AR for your 2009 Jeep Liberty is M12-1.75 thread. We do include this size in our Metric Tap Kit # PT22FR if you do not already have it. A Brush # 814092 will also help you clean out the threads with some cleaner solvent. I recommend installing the 4-Way # C56334 in the event you need to connect to the lights on a small trailer or add Auxiliary Lights # C53201 to a hitch mounted accessory.
view full answer... - Bolt for Hitch Will Not Torque DownIf a bolt will not torque down while installing a trailer hitch this means the bolt was likely cross threaded. There are a few options to fix this, the first would be drill out and then re-tap the hole with the next largest thread size using a kit like the Tap Wrench Kit for Standard Pipe Sizes part # PT22FR. The weld nut however could break when tightening down the new bolt so in which case the final option would be to drill the rest of the weld nut out and then using a spacer block like...
view full answer...
Do you have a question about this Automotive Tool?
Info for this part was:

Installed by:
Jeff D

Installed by:
David F

Video Edited:
Jacob T

Video by:
Dustin K

Written by:
Matthew S

Edited by:
Daron K
At etrailer.com we provide the best information available about the products we sell. We take the quality of our information seriously so that you can get the right part the first time. Let us know if anything is missing or if you have any questions.
Product Experts Available Now!
Call 1-800-940-8924
Thank you! Your comment has been submitted successfully. You should be able to view your question/comment here within a few days.
Error submitting comment. Please try again momentarily.