Battery Post and Terminal Cleaner - Wire Brush
- All Info
- Reviews (15)
- Q & A (0)
- Videos (1)
- Photos
Deka Electrical Tools - DW00254
- Wiring Tools
- Wire Brush
- Deka
- Cleans top posts of battery and matching cable connections
- Wire brush works well for cleaning out rusty weld nuts in vehicle frame - great for installing trailer hitches
00254 East Penn / Deka Wiring Battery Terminal Post and Clamp Cleaner
California residents: click here


Videos are provided as a guide only. Refer to manufacturer installation instructions and specs for complete information.
Video Transcript for Review of the Battery Post and Terminal Cleaner
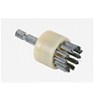
Today we'll be looking at our battery post and terminal cleaner by Decca 00:00:03, part number DW00254. All right, here's our battery terminal cleaner. We've got our post cleaner in here. It has a lot of teeth in here to get a good grip on your battery post. We also have our brush side. See this little notch here Twist it and you can see there's a groove that lines up with that notch that locks the top in place. We have our battery clamp cleaner.
It's got a nice screw edge to it so it pulls that dirt out of our clamp. The reasons you would need this is if you're having problems with your vehicle starting, things aren't staying on, they're flickering back and forth, that probably means your battery posts are dirty. That's when you want to get a battery post cleaner. Clean those off and you'll get a better connection. Now that I've shown you this cleaner, we can show you how it works on a vehicle. If you're cleaning your positive post and nothing else, I would suggest taking off your negative post if you have a dual battery setup. That way you don't have any chance of grounding yourself out. We'll get started.
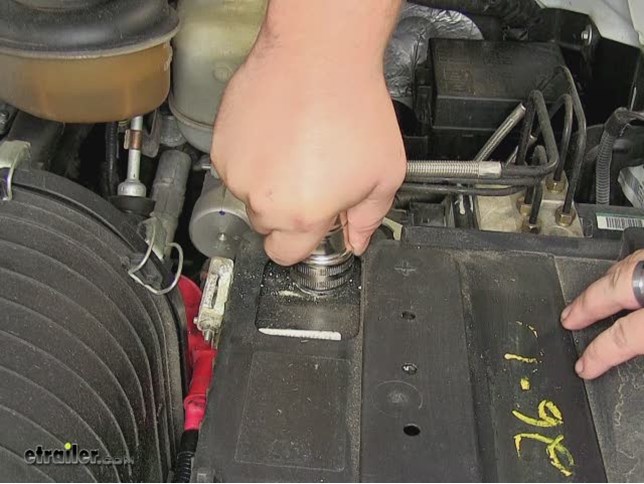
We'll loosen up our clamp. We'll remove it. Now we can take our clean. We've got the bristle brush side that fits over our posts. Just push it on and twist.
It gives you that nice, clean edge on it. You want to push it all the way down until it touches your battery and you can twist it back off. I suggest doing our negative post as well, so come over, do the same thing. Push it all the way down and give it a few twists. Now that I've cleaned the posts, we've got this unlock, you just have to twist it and it pops off. Set my cap down.
Come over here to our clamp. We'll do the same thing. The same twisting motion. Twist it as I push all the way through. If you can see there, it gives us that nice, clean copper look in there. You can also use the brush edge to kind of clean out any of the grooves but if it's really extensive, Decca 00:02:36 also has a battery terminal protection kit that comes with a cleaner spray and felt washers to protect your battery terminals. Now that I'm done cleaning our battery terminals, I can re-install everything and we're good to head down the road. That's our look at the Battery Post and Terminal Cleaner, part number DW00254.
Ratings & Reviews
4.7
15 reviews
So far so good. Took approximately an hour to install, including unpacking the hitch and cleaning out the weld nuts. While potentially possible to install on your own with strategically placed supports, it's more realistic to install with two people, even if one of them is just lifting, steadying, and holding the hitch in place while you do all the work. Everything lined up perfectly. Didn't even need to put the van up on ramps. Trimmed the plastic fascia on the driver side as shown in the video instructions and worked like a charm to reinstall.
Test fit our bike rack (which is our primary intended use) and everything fit snuggly. So far, very happy with the purchase.
THE TERMINALS WERE DELIVERED IN A TIMELY MATTER AND I AM SURE THEY WILL ASSIST
ME IN THE CARE OF MY AUTOMOBILE.
THANK YOU
I ordered a trailer hitch and several other items that I needed for the install from etrailer. I will not get a chance to do the install for a week or so; but I have to comment on the delivery. My package arrived in just a few days. I get lots of items shipped to me; but just the care that was taken in the packaging really impressed me. The smaller items all came neatly packaged in a separate box within the shipping container. All items were securely packaged so there was no shifting or rattling. The outside box was heavy cardboard with a perfectly placed lifting handle. I've checked all the items out and everything is there, and the quality of all the products is excellent. I have no doubt that I will be pleased with the outcome of the install itself. Very impressive so far. I will likely be ordering more products from this company in the future.
I used this to help clean weld nuts for a trailer hitch. The threads on the weld nuts have seen 9+ years of dirt, debris, snow, salt . . . and it showed. This terminal cleaner wire brush was one part of getting the job done. (WD40 and a tap were the other parts.) Once clean, the hitch went right on.
Did a good job of cleaning out the threads before installing the mounting bolts for my hitch.
Kathy in customer service took great care of me, made sure I got all the correct products for my vehicle. Was patient with me as I went back and forth getting measurements. I saved a 1000 doing the work my self.
I had a local garage install the hitch and there were no problems.
The battery terminal brush was on sale so I bought an extra one to keep in the car!
Just get your stuff here!!!!
No BS with these guys!
Excellent all around.
Ventura
I was able to clean up very very dirty weld nuts perfectly with this cleaner.
Awesome!
Did it's job. Get some WD-40 and that helps too.
Looks very good. Haven't used prod. Yet
See what our Experts say about this Deka Electrical Tools
- Cleaning Out Weld Nuts to Install a Trailer Hitch on a 2006 Toyota SiennaIn all likelihood you will not have to tap the holes on your 2006 Toyota Sienna to get the hitch bolts to fit. Usually the issue is that the weld nuts on the vehicle will get packed with grime and corrosion and all you will have to do is clean them out. You will need some spray lubricant such as WD40 and a wire brush or battery terminal brush such as # 814092 or # DW00254. Spray the weld nuts with the WD40 and let them soak for about 15 minutes. Then go at the holes with the wire brush...
view full answer... - Cleaning or Tapping the Weld Nuts on a 2006 Honda Pilot to Install Curt Trailer Hitch, # 13328The weld nuts on your 2006 Honda Pilot could just be so compacted with grime that they appear to be thread-less. I recommend giving them another good cleaning using the lubricant like you did before, and a stiff bristle wire brush like # DW00254. You may have to do this several times. I have linked a video of this process below. If you still cannot thread the bolts in, even after a thorough cleaning, you may have to tap the holes to re-thread them and clean them out. I would use this...
view full answer... - Mounting Bolt Size for Draw-Tite 76170 Class III Hitch for 2019 Honda OdysseyThe Draw-Tite Class III hitch, part # 76170 installs using 6 M12 1.25 x 35 bolts, so you'd need an M12x1.25 tap. Before trying to chase the threads, you'll likely have success just giving the threads a good scrub with a spray lubricant like WD-40 and a battery terminal brush like # DW00254, as the vehicle isn't very old at this point and likely won't have a ton of road crud and corrosion built up in the threads. We go to great lengths to ensure our products arrive to you in good condition,...
view full answer... - Difficulty Threading in Bolts to Install Class III Hitch on 2016 GMC TerrainWhat you mention is pretty common. In areas where salt and other corrosive chemicals are used on the roads in the winter, corrosion and other goop can get built up in the nuts that are welded up into the frame to receive the bolts. An easy way to clean those out would be to use a round profile wire brush along with some spray lubricant. The brush on a battery terminal cleaner like # DW00254 works very well. Spray a bunch of the lubricant up in there and give each nut a good scrub. In some...
view full answer... - Solution for Trailer Hitch Install Bolts that Seem too Big to Thread InDue to the age of your vehicle, there is an excellent chance that there is a significant amount of corrosion and road grime built up in the weld nuts in the frame of your Chevy Equinox. This build up is what is preventing the bolts from threading into the weld nuts. The best way to clean the threads is to use a spray lubricant and a wire brush like that on the battery post and terminal cleaner, part # DW00254. In some extreme cases, the corrosion is bad enough that a thread tap the same...
view full answer... - What to do if Bolts Don't Fit on Draw-Tite Trailer Hitch for 2012 Toyota CorollaWe can help you with this issue, which is actually pretty common on vehicles that have a few miles on them, such as your 2012 Toyota Corolla, and the bolts that came with the Draw-Tite Trailer Hitch # 24913 are the correct size. What happens in older vehicles is that open weld nuts (bolt holes) will amass some corrosion in them which will make it seem as if the bolts don't fit, when really, the bolt holes just need to be cleaned. I have attached a link to a help article that goes over...
view full answer... - The Bolts Are To Short To Install My Curt Hitch # C13513 On My 2008 Kia SorentoWhat you are experiencing when trying to install The Curt Hitch # C13513 onto your 2008 Kia Sorento is that the weld nuts are packed with corrosion and/or road grime. This happens on any vehicle that has seen at least one winter. You will need to clean out the weld nuts so the bolts can be properly threaded freely. I would recommend spraying some lubricant like WD-40, and using a Wire Brush # DW00254. Doing this will take some patience. I attached a few helpful links below that will help...
view full answer... - Hardware Included With Curt C13146 Class III Hitch Won't Thread into Nuts Welded into FrameThe M14-1.5 x 40 bolts are the correct bolts to install the Curt # C13146 Class III hitch on your 2016 Honda Pilot. It's pretty unlikely that you received the incorrect bolts, I've only seen that happen a few times in my almost 15 years here. What is MUCH more likely is that corrosion and road grime have built up into the attachment points that have the M14 nuts welded up into the vehicle's frame members. The dirt and corrosion build up in the threads of the nut and prevent the bolts...
view full answer... - How to Clean Out Weld Nuts on a 2006 Toyota Matrix to Install a Trailer HitchYou would not use a tap to clean the threads. A tap would be used to cut new threads. To clean out the weld nuts on the vehicle in order to install a trailer hitch you will just need some WD40, a wire brush like # DW00254, and a little elbow grease. I have included a link to our FAQ article and a video on cleaning out weld nuts for hitch installation.
view full answer... - Mounting Bolt Size for Draw-Tite 76031 Class III Hitch Install on 2017 Nissan PathfinderThe Draw-Tite Class III # 76031 hitch installs using six M12 x 1.25 x 35mm CL 8.8 bolts, 1/2 inch flat washers and lock washers. If your Pathfinder has been used in the rust belt where chemicals are used on road surfaces in the winter, there's likely some road grime and corrosion in the nuts that are welded up into the frame that accept the hitch mounting bolts. Before attempting to install the bolts, It's a good idea to spray each hole thoroughly with a spray lubricant like WD-40 and...
view full answer... - Draw-Tite 75776 M10 Bolts Won't Thread Into Nuts Welded Into Frame of 2017 Hyundai Santa FeYou're correct, the Draw-Tite # 75776 hitch uses M10 x 1.25 x 30 bolts to attach the hitch to the nuts welded into the frame. It's extremely rare that the wrong hardware is sent out with a hitch, I've only seen it happen once or twice in almost 15 years here. It's certainly a possibility but what's much more likely is that you have road grime and corrosion built up on the threads of the nuts that are welded up into the frame member which is preventing the threads from catching. This is...
view full answer... - Trailer Hitch Bolts Will Not Fit into factory Weld Nuts in FrameThe weld nuts on your vehicle will likely have to be cleaned out. Over time the threads can get packed with gunk and make it seem like the bolts are too large when really they are not. Use a spray lubricant such as PB Blaster and soak the weld nuts. Let them sit for about 15 minutes and then scrub them out with a brush such as # 814092 or a battery terminal cleaner such as # DW00254. You may have to do this a few times depending on how gunked up the threads are. I have included a couple...
view full answer... - Troubleshooting Bolts Not Threading On etrailer Hitch For 2018 Kia Sportage EXSorry to hear that your bolts won't thread for your # e72TR installation. What you can do is use a M10 x 1.25 thread tap. The holes aren't always perfect but this will allow you to get the bolts that came with the hitch installed. I would not try to use a smaller bolt since it may not fit right, or at all, and you want your hitch to be secure. You may want to give cleaning another try before you go this route. I have attached a helpful article with a video that outlines this process using...
view full answer... - Trailer Hitch and Wiring Recommendation for 2012 GMC AcadiaThe trailer hitch I recommend for your 2012 GMC Acadia is the Draw-Tite Class III Max Frame Round Tube Receiver # 75528 because it offers a greater towing capacity at an economical price for you. This hitch will also offer a more streamline look for your Acadia when it is exposed than the square and boxier framed Curt hitch. We have found that the original fascia cover on the 2012 models of the Acadia is not able to be reinstalled after an aftermarket hitch is installed. Other customers...
view full answer... - Bolt Holes are Too Small for Trailer Hitch Installation on a 2007 Hyundai Santa FeWhat you are most likely experiencing is weld nuts on the vehicle that are packed with corrosion and/or road grime. This happens on any vehicle that has seen at least 1 winter. What you will need to do is clean out the weld nuts so the bolts can be threaded in freely. We have some helpful links that I have included that will help you clean out the weld nuts. You will need some spray lubricant like WD-40, a wire brush like # DW00254, and some patience. I have included a link to a video...
view full answer... - Correct Hitch Mounting Bolt Size for 2006 Kia SedonaThe hitch for the Sedona does use M12 x 1.25 bolts. What you describe is a very common issue. Once a vehicle is more than a couple years old, road grime and corrosion can build up on the nuts welded into the frame which makes it difficult to get the mounting bolts for the # C13345 started, making you think you have the wrong installation hardware. This is especially common in the Midwest and North where ice melting chemicals are commonly used on roads in the winter. I'd recommend using...
view full answer... - How to Clean Rusted Frame Weld Nuts to Install Trailer Hitch on 2013 Chevy EquinoxThe Draw-Tite # 36408 Class II hitch you referenced uses 4 M12x1.75 bolts to attach to the nuts welded into the frame. If they are corroded, and spraying them with a spray lubricant like PB Blaster and using a wire brush like one on a battery terminal cleaner like # DW00254 hasn't done the trick, you'll need to re-tap the threads. We offer a tap wrench set, part # PT22FR that includes an M12x1.75 tap. Before attempting to run the tap through the threads, be sure to hit each nut with a good...
view full answer... - Hitch Bolts Seem Too Large for the Weld Nuts in the Frame on a 2000 Toyota CamryThe bolts provided with the Draw-Tite Trailer Hitch, # 36336, are the correct bolts for your 2000 Toyota Camry, see instructions link. You are most likely running into corrosion from road grime and salt since your vehicle has some age. We have help videos, see links, that detail how to go about cleaning the vehicles weld nuts for installing the hitch. You may find that a weld nut will break off when trying to install the hitch, despite your best efforts, if this happens we have a video...
view full answer... - Replacement Anode for Suburban RV Water HeaterIt is possible that there could be some corrosion or even simply some built-up sediment within the threads of your water heater that is making it tough to get the new anode rod threaded. You can try gently cleaning the threaded receptacle in the tank with a nylon bristle tube brush # 814092 or a wire brush # DW00254 to remove any accumulated rust or grit that could be blocking the threads. Sometimes it can be hard to get your hand in the right place the start the threads if there is also...
view full answer... - Cleaning Weld Nuts to Install Trailer Hitch On 2012 Toyota CorollaThe Curt Class I Round tube Receiver Hitch # C11265 uses 4 M12-1.25 x 30mm hex bolts. These bolts come with the trailer hitch. I only recommend using the included hardware to install the # C11265 trailer hitch. Typically any vehicle that has seen a winter will need the weld nuts cleaned before installing a trailer hitch. We recommend using a lubricant and a wire or nylon brush to clean the weld nuts. Several of our installers like to use the Deka Battery Post and Terminal Cleaner - Wire...
view full answer... - Installation Bolts for Curt Class III Hitch # 13594 on 2013 Chevy Captiva Seem Too LargeIt's not uncommon for the weldnuts to get full of road crud and surface corrosion that would prevent the bolts form starting easily, especially in places that get a lot of snow in the winter. I wouldn't recommend forcing the bolt, because doing so could break off the weldnuts, which would not be good. I'd recommend using a digital caliper to confirm that you received the correct bolts. They should be M12-1/75 X 35mm. What are you using to clean the weldnuts? I like using a wire brush...
view full answer... - Cleaning Trailer Hitch Installation Weld Nuts in Frame of 2015 Toyota RAV4Since the nylon brC13406 hitch installed, the next thing I'd try is giving those threads a complete soaking in a spray lubricant like Kroil, WD-40 or PB Blaster, and giving them a good scrub with a wire battery terminal brush like what's included with # DW00254. Spray the threads down, let it sit for a few minutes then give it a good scrub. You might need to repeat this procedure a few times. If that doesn't do the trick, you'll need to bust out the nuclear option by using an M1 x 1.25...
view full answer... - Trailer Wiring issues with 2004 Chevrolet TahoeOn your 2004 Chevrolet Tahoe, since you aren't getting power to the trailer connector running lights, it is most likely a blown fuse. The fuse you will want to check first is the TRL PARK fuse which is located in the fuse box under the hood of your Tahoe. This is the fuse for your trailer running lights. If you want to check all your other fuses for the trailer and tow package, I'll give you that list. According to the owners manual for your vehicle, they are found in three different...
view full answer... - Cleaning Threaded Holes In Frame Of 2016 Nissan Murano To Install Trailer HitchThe installation bolts should be M12 x 1.25 x 30, a hardware store should be able to confirm that the bolts you were provided are that size for you, but it's probably not necessary. In the almost 14 years I've worked here, I've heard of less than a handful of cases where the incorrect hardware was included in a hitch kit, so it's incredibly likely that there's still some rust and debris up in the frame nuts that are preventing your from getting those bolts to thread. Even though your...
view full answer...
Do you have a question about this Electrical Tool?
Info for this part was:


At etrailer we provide the best information available about the products we sell. We take the quality of our information seriously so that you can get the right part the first time. Let us know if anything is missing or if you have any questions.


Thank you! Your comment has been submitted successfully. You should be able to view your question/comment here within a few days.
Error submitting comment. Please try again momentarily.