
To see if this custom-fit item will work for you please tell us what vehicle you'll use it with.
Thank you! Your comment has been submitted successfully. You should be able to view your question/comment here within a few days.
Error submitting comment. Please try again momentarily.


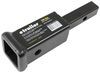
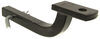
This fully welded, corrosion-resistant vehicle trailer hitch receiver is perfect for your light-duty towing needs. Draw-Tite's Tested Tough guarantee ensures that this hitch exceeds industry standards. Drawbar sold separately.
Features:
Specs:
Draw-Tite's Tested Tough program provides testing standards far superior to those outlined by the Society of Automotive Engineers (SAE), the go-to source for engineering professionals.
Each Draw-Tite trailer hitch receiver undergoes extensive fatigue testing and static testing with the ball mount that is either supplied or recommended for use with that particular hitch, thus ensuring results that are applicable to real life use. Fatigue testing is also conducted on hitches rated for use with weight-distribution systems.
In addition, Draw-Tite performs static testing on a simulated automobile, as opposed to the rigid fixture used for SAE testing, resulting in a more true-to-life scenario.
At etrailer.com we're committed to the products we sell, and to our customers. Our experienced and knowledgeable staff are available via both phone and email to address your questions and concerns for the lifetime of your hitch. The technicians at etrailer perform hitch installations on a daily basis, making them a valuable resource for do-it-yourselfers. The one-on-one, personal service you'll receive comes straight from an expert in the towing and automotive field. We've installed it, we've wired it and we've towed with it, so whatever your question, we can answer it.

California residents: click here
Videos are provided as a guide only. Refer to manufacturer installation instructions and specs for complete information.
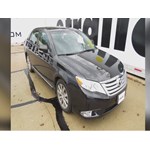
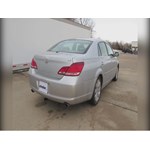
Today on our 2011 Toyota Avalon we'll be installing the Draw-Tite hitch, part number 24870. Here's what our hitch will look like once it's installed. Next I'll give you a couple measurements to assist you with selecting accessories for your new hitch, such as a ball mount, bike rack, or cargo carrier. From the center of the hitch pinhole to the outermost edge of the bumper is 4-1/2". From the top of the receiver tube opening to the ground is 12". We'll now go ahead and with the installation. Now to begin the install of our hitch we're going to need to lower the exhaust.
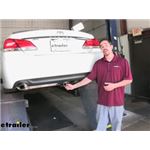
To lower the exhaust we'll need to remove the rubber isolators, two behind each muffler, and one just forward of the rear axle. However, before we remove them we'll want to put a safety strap underneath to help support the weight of the exhaust once we remove the rubber isolators. To assist in removing the rubber isolators from the metal hangers we'll spray each one with a spray lubricant and then use our pry bar our pliers to remove the rubber isolator from the metal hanger. We're going to go ahead and remove the rear four rubber isolators completely from the vehicle as we will be removing the exhaust hanger bracket from the frame also, as the new hitch will take its place. With our passenger side done I'll move over to the driver side and repeat the same process. Now that we've removed the rubber isolators from the metal hangers we can go ahead and use a safety strap to safely lower the weight of the exhaust.
Now we've got one more hanger that will need to be removed. Behind the muffler on the passenger side we're going to remove the hanger from the frame. To do that we'll just remove the two bolts that help secure it. Next we'll go ahead and remove the rear exhaust hanger from the frame. To do that we'll remove the three bolts that secure it.
We'll set the hardware and hangers aside as they will not be reinstalled. There's the passenger side; we'll move over to the driver side again and repeat the same process, keeping in mind the removal and installation process of our hitch are the same. Now with the hangers out of the way we'll need to remove the heat shield. Each heat shield is secured with three fasteners. Once the fasteners are out we'll go ahead and set the hardware and heat shield aside as we will reinstall them once the hitch is in place. Next we'll need to remove the tape covering up the weld nuts on the side of the frame.
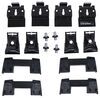
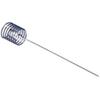
These weld nuts will become the attachment points for our support brackets. Using a flat blade screwdriver I'm just going to get underneath it and then remove it. We'll go ahead and discard the tape as it will not be reused. Now once the tape's off on the outboard side we can install the support bracket and hardware. To secure the support bracket to the frame we're going to use the 8mm bolt, split lock washer, and flat washer. We'll have two per support bracket going into the frame at the two weld nuts. Now with our weld nuts exposed we'll clean them out before we install the new hardware to make sure they'll go nice and easily. To clean them out we'll spray each one with a spray lubricant and then use our 1/2" nylon tube brush, part number 814092, to thoroughly clean out the threads of the weld nut that will built up with rust, dust, dirt and debris over time. Once we have the weld nuts cleaned out we can even take one of the new fasteners, thread it into the weld nut to make sure it will go nice and easily. Our hardware will go through the new side bracket and into the weld nut. We'll install our fasteners finger tight at this time. Now with the passenger side installed I'll move over to the driver side and repeat the same process. We'll need to remove the tape covering up the weld nuts. These weld nuts will become the attachment points. Using a flat blade screwdriver I'm just going to get underneath it and then remove it. Now it's a good idea to get an extra set of hands to help you hold the hitch while you install the fasteners. Next, using the same hardware as we did for the support brackets - the 8mm bolts, split lock washer, and flat washer - we're going to put our hitch up into place and secure it to the inside weld nuts, two on each side for a total of four. Again, we'll install our fasteners finger tight until we have them all in place. Next we need to attach the support bracket to the hitch. We'll use the new 10mm bolt and flat washer, going through the hitch and then through the support bracket. On the outside of the support bracket we'll install a split lock washer and then a nut. Now with the driver side we'll repeat the same process on the passenger side. Once we have all four fasteners installed finger tight we'll go ahead and run them down. once we have all the fasteners tightened down we'll go ahead and torque to specifications as indicated in the instructions. Note, because of the tight tolerances it may require a crows-footed wrench in order to torque down the forward upper fastener on the outside. Now with everything tightened and torqued to specifications we'll go ahead and reinstall our exhaust heat shield. Now with our heat shield reinstalled we're going to put the exhaust back in position utilizing the new exhaust hangers on our hatch, and then the old hangers that come off of the muffler. Once our exhaust is back in place we'll go ahead and remove our safety strap. That does it for the install of our Draw-Tite hitch, part number 24870, on our 2011 Toyota Avalon. .

The product is of a good quality. Etrailer has provided very good video instructions without which the installation would of been very difficult. If you planning on installing it yourself, be advised, it won't be easy due to the design of the Avalon itself. The access to the frame where the hitch is being attached to is very limited and it will require patience and right tools to get it done. Also, the bolts that come with the hitch are not metric for some weird reason. To sum up, it's a good quality product but, it's a pain to install it.

I am. Very happy with my hitch. It was pretty easy to install although I payed my mechanic to do so. Great quality! I use for my tww e-bikes. They helped me a lot with my selection and would definitely buy from here again
The hitch was a perfect fit on my Toyota Avalon and the customer service department was excellent to work with.
Great product and customer service! Perfect fit
Great hitch very well made, fit my Toyota Avalon exact. Very easy to install, instructions were very detailed and clear.
Would certainly not have reservations about buying another of your products.
Product is fine, but it came without mounting brackets. Eventually one set of mounting brackets arrived and I installed it. A month or more later a second set of mounting brackets arrived. So the product is fine except for the snafu's involved in getting all the parts.

Robert W.

4/7/2018
As I think I said back then, the first shipment came without important mounting hardware. Eventually that came and I installed the hitch which has been as good as anyone might expect from a trailer hitch. Several months later a second package of the missing hardware arrived- I have that in my garage if anyone is interested. It did not speak well for the shippers whoever was entrusted with packaging the product. It was more time consuming than it should have been.
I ordered a Draw-Tite Sportframe Trailer Hitch for my 2005 Toyota Avalon, a hitch ball, a drawbar with a 3 1/2" rise and the wiring kit necessary to connect my car to a 4 prong trailer connection. The tutorials were great and along with the instructions included made the installation fairly easy to install everything myself. The prices were the best I could find on all the items and everything shipped fairly quickly and arrived in good time. I use all of these products together weekly to pull my boat and enjoy various lakes that are available in my area. I would highly recommend this website and it's products and have ordered other items since my original purchase with satisfaction.
I bought the Draw-Tite trailer hitch after talking to a co-worker who just got one for his car and put it on himself.
I went to eTrailer.com and located the hitch for my Avalon. What sold me was the detailed video- the instructions were very clear. I felt confident I could install it myself, even though it required removing both mufflers.
It took me a bit longer than the video, but I expected that.
Sam G. did a great job going through the purchasing process.
They sent hitch out quick but they left two brackets out that hold muffler on the hitch had two brackets on it but the other brackets weren’t in box didn’t find out until the installer was putting it back together
The hitch showed up 2 days faster than etrailers said it would be here! That is always a win for etrailers!
The hitch is very well made and good quality. The online video describes the steps in detail and anyone with decent mechanical skills will be able to complete the installation quickly. I did not have any issues at all with the install on a 2012 Avalon.
Total install was well under 1 hour, so a simple process. Maybe 45-50 minutes.
Installation stretched my limits, but we will blame that on the car and on my narrow limits. It is a tight and clean install. Has worked flawlessly this past year. I used it just yesterday to haul junk and brush about 100 miles for disposal. I would definitely buy this hitch again.
The hitch was more solidly built than the way it appeared in the illustration on line and that was a plus. The finish was excellent and we experienced no problem attaching it to the car, fit was perfect. One more thing had no missing hardware and installation instructions were clearly written and easy to follow.
Hitch fits as it was designed and installation was rather simple. The hitch when we received it was missing two of the brackets but I contacted etrailer and they got the missing pieces shipped to us within one day. Thanks again.
Very easy to install and very sturdy for sure. I have a Toyota Avalon and the rack that I currently have has my bikes hanging too low so I will be purchasing a new rack. I'm happy with my purchase.
This is a very well built product fits beautifully. I have now been able to install the Receiver hitch as I have received all that was missing.
Easy to install and still holding up well with no issues after using it with my OneUp bike rack for over a year.
Very well made product overall. Not too hard to assemble especially when watching the video. Took about 3 hours doing it by myself. My only complaint was two of the large bolt going to the main beam stripped when applying the suggested 42 foot pounds of torque. Other than that I would recommend this product.

Jenny N.
10/29/2021
I will have our customer service team reach out to you. The hitch manufacturer prefers to have the hardware that comes with the hitch to be used in the installation.
Installed according to instructions with 1 exception - required cutting welded tab on channel. Good solid product.
product works well. installs as expected - no problems. A+++
(etrailer is an excellent company, BTW. reliable and responsive.)
The hitch fit my Toyota Avalon like it was supposed to, drawtite are built right!
The hitch came complete with instructions. Watched the install video first. The install went as directed and looks great. Quality product with a great price from a trusted dealer.
Little bit extra labor but we’ll worth to mount bike rack
The product arrived on time as advertised. The included instructions were clear and correct. I took me about 3 hours to complete the job but I was working on the ground and didn't have access to a hoist.
Hi, in his day and age when quality control usually takes a back seat, I must say " excellent job " on the trailer hitch. It fix like a glove. Did the install in my garage, with no help from any kind of a lift !! Job was completed in about 1.5 hrs, only due to working off the floor.
We will be using the hitch for a bike carrier while traveling across the US on our retirement trips.

Frank
7/24/2014
How is the trailer hitch installed on the 2008 Toyota Avalon. Do the mufflers have to be moved.

The hitch is well built and easy to ins tall.
Do you have a question about this Trailer Hitch?
Info for this part was:
At etrailer we provide the best information available about the products we sell. We take the quality of our information seriously so that you can get the right part the first time. Let us know if anything is missing or if you have any questions.


Victoria H.
3/8/2025
I'm happy to hear everything worked out perfectly for you Basil! What are you planning to mount onto your hitch?