
To see if this custom-fit item will work for you please tell us what vehicle you'll use it with.


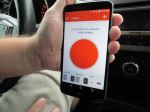
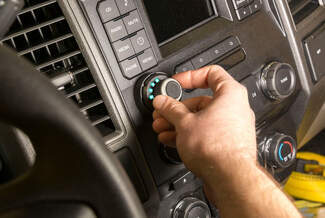
You can stick the control knob to the dashboard, plug in the module, and your brake controller installation is done with no drilling and no hardwiring. The knob is large and easy to use, while the main unit is out of sight behind the dash.
Features:
Specs:
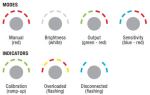
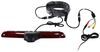
The Spectrum puts control of your trailer's brakes at your fingertips and, with bright LED indicators, you know what your brake controller is doing at a glance.
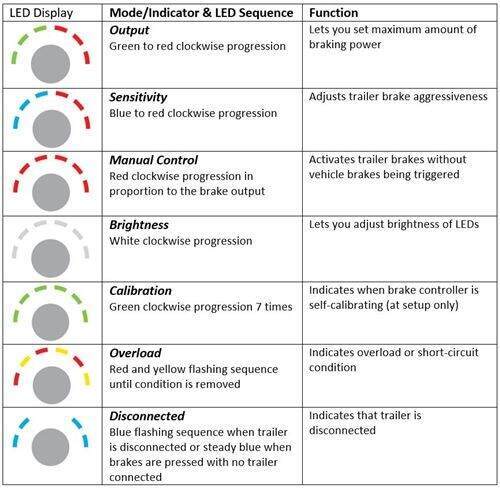
You can adjust all of your settings using the control knob. To switch between modes, press the control button in the center of the knob. Each mode has its own distinct LED display with several different colors and patterns to eliminate any guesswork as you cycle through.
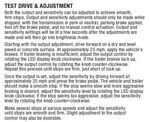
Output: Braking output is the maximum amount of power that will be applied to your trailer's brakes. How much braking output you need is determined by the weight of your trailer; a heavier trailer will need more power to bring it to a stop. You want to go as high as you can without the trailer brakes locking up.
Sensitivity: This controls the aggressiveness of your trailer's braking, meaning how quickly the brakes reach the set output level. This is a great adjustment to make when you're towing a heavy load and the trailer will need more umph to bring it to a stop so it doesn't push your vehicle forward. If your vehicle takes too long to come to a stop, increase the setting. If it stops too abruptly, lower the setting. You may also need to adjust the sensitivity based on your own preferences, or when the trailer load or road conditions change.
Manual Override: The manual override activates just the brakes of your trailer, great for stopping sway or controlling its momentum in an emergency. To engage the manual override, press and hold the button on the control knob.
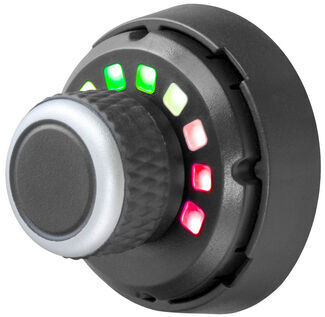
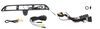
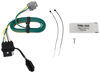
The Curt Spectrum comes in 2 pieces: the main unit and the control knob. Because the only part that you need to be able to access is the control knob, the main unit can be mounted out of sight and out of the way. You don't have to worry about banging your knee on a bulky brake controller or interfering with your vehicle's lower airbags.
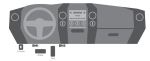
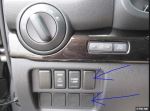
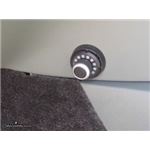
The dash-mounted control knob can be installed in any convenient spot that's easy for you to see and reach. This can be a blank switch panel, an open spot on your center console, or wherever there's space on your dashboard. The knob sits flush against the dash, so you don't have to worry about finding enough clearance behind the dash. You can use either the included screw to mount the knob, or the adhesive pad for a drill-free installation.
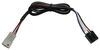
Once you've decided where you want to put the control knob, you'll need to find a good place to install the main unit. Your only restriction is the 4' plug-in cable that has to be able to reach between the main unit and the control knob. Thanks to the 3-axis accelerometer, the main unit can be positioned at any angle or position. No matter how you install it, the unit will sense the direction of travel and its orientation.
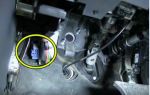
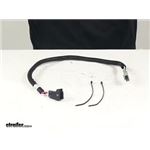
The included custom-fit adapter plugs into the port on your vehicle's built-in brake control wiring harness, which you'll find in the wiring panel underneath your dash, to the left of the steering column, near the emergency brake pedal. Once you're plugged into your factory port, just plug the other end of the adapter into the main unit. No hardwiring needed!
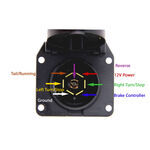
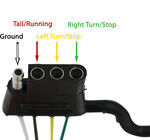
Note: If you don't already have a 7-way plug at the back of your vehicle, take a look at our exclusive 7- and 4-way brake controller installation kit (ETBC7 - sold separately).
Proportional braking means that your trailer brakes mimic your tow vehicle's brakes. If you slam on the brakes in your vehicle, your trailer brakes will activate with the same intensity; if you brake lightly, your trailer brakes lightly too. The trailer's braking is in proportion to your vehicle's braking. This saves wear and tear on the tires and the brakes on both your vehicle and trailer.
The Spectrum uses an internal 3-axis accelerometer to sense how your vehicle is braking so it can send the right amount of braking power to your trailer. It measures the inertia of your tow vehicle and activates the trailer's brakes to ensure that your trailer slows at the same rate. The result is uniform braking across your towing setup. No push-pull action - just smooth, proportional braking every time.
 Alternate Instructions
California residents: click here
Videos are provided as a guide only. Refer to manufacturer installation instructions and specs for complete information.
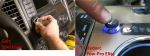
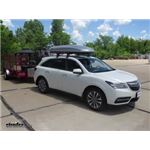
Speaker 1: Today on our 2016 Acura MDX, we're going to be installing Curt's Spectrum trailer brake controller, part number C51170. To help us to complete this installation, we're going to be using Curt's universal wiring adapter for Curt trailer brake controllers, part number C51515. This is what it's going to look like when your brake controller's installed. You're only going to be able to see the control knob and its indicator LEDs. The control module and all the wiring is going to be hidden away inside your vehicle.What's really great about this brake controller compared to others on the market is its remote mounted control knob, because many brake controllers, you're limited to the location where you can mount it because of its large size. They also have many orientations in which they need to be mounted.
Since the control knob is so much smaller, and it can be remotely mounted anywhere, it really opens up the options for you. And, since it's just the control knob with the LEDs, it's much more pleasing to the eye, so it'll look great installed in your vehicle as well.With this brake controller, you can pull a trailer that has up to four axles. It offers highly responsive smooth stops using a triple axis motion sensing accelerometer. It's compatible with both low voltage and pulse width modulated systems. It's also compatible with ABS and cruise control.
There are several modes for customizing its operation to your specific vehicle and trailer. Here, we're on our brightness mode, which allows you to adjust how bright the knob is. If you have it mounted in a higher location, where it's kind of hitting you in the eye, you can turn that down so it's not so bright at night. Or you can brighten it up during the day if it's in a dim location and you're having a hard time to see.To switch modes, you'll simply press on the button. We're now in our output mode, with green being the lowest output, red being the highest.
The higher the output, the more voltage is sent back to your trailer to apply the brakes harder. We'll press the mode again, and now we're in our sensitivity mode. This mode affects how sensitive the proportional accelerometer is going to be when applying the brakes on your trailer. And lastly, we have manual mode. This mode is accessed by holding down the knob and rotating it.
Here, you can manually apply the brakes on the trailer. Just press the button, and that'll apply the brakes. Twisting the knob will allow you to adjust how much.When your trailer becomes disconnected, it will flash blue on each side of the knob, and when you connect your trailer, it flashes green, indicating its initial setup and calibration so it's ready to go. The wiring harness between the remote mounted control knob and the control module measures 48 inches, so it'll give you a wide variety of locations where you can mount your control knob quite a distance away from its control box. And when comparing this to other remote mounted control braking systems, such as ones from Redarc, this one can be completely drill-free, as it's attached with adhesive pads, and the wiring can be just just away down the seam. No drilling is required, so you don't have to worry about affecting any of the panels inside your vehicle.Now, before you decide to install a trailer brake controller on your vehicle, you do want to make sure that you've got yourself a seven pole connector. This vehicle's already got one installed. If you don't have a seven pole connector on your vehicle, you can install one with part number ETBC7. This will come with all the wiring and the seven pole connector to get it installed on your vehicle.Here, we have everything that comes included with our kit. We'll have our brake controller module, our remote mounted module control knob. On our control knob, we already have the sticky pad mounting bracket. Also included is a screw mount bracket that can be clicked onto the knob. We have the connector end that we'll place over here. Two different sticky pads; one round with a sticky pad knob, and one square for our module. You'll also receive a bolt and jam nut if you decide to go with the screw-mounted option.We'll start by assembling our connector for our remote-mounted control knob, so we're going to be looking at the back side of the connector here. You can tell it's the back side because this is where you have the little release tab there. We'll start with our white wire. The first hole is going to be empty, and the second hole is going to use the white wire, so we'll slide that in. Make sure it goes all the way in until it clicks. Next to our white wire, we'll be using the green wire, and we'll insert that until it clicks. Give it a little tug to make sure. After that, we'll have our brown wire, then the blue wire, the black wire, and finally the red wire. The last hole will also be empty, so we have an empty hole on both the outer edges.Once you've got all the wires fully inserted, close the connector by snapping it in place. This is the Curt adapter wire. It's already been wired into the vehicle. This wire's going to allow you to quickly plug in your Curt brake controller module. This is wired in using kit ETBC7. There's a total of four wires. The black is power, the white is ground, the blue is your signal that goes back to your seven way connector, and the red is the brake controller signal from your brake pedal. We'll now plug in our module. We're going to leave that just down here for now. We're going to tie it up later, but before we do, we're going to get our other wires run over towards it so we can get everything nice and neat.Now you need to find a suitable location to mount your brake controller remote-mounted control knob. This can be placed anywhere you'd like, as long as the wire's long enough to reach, so some options, you could place it here. Your remote mounted control knob will click right into this bracket. This bracket uses the two holes, the center one to drill out a hole to poke your wires through, and the one towards the outside using a crushable nut and screw to hold it in place. This way, it'll be nice and secure and mounted permanently.You could mount it on the other side. For our vehicle here, we're going to be mounting it down below right here, and this way we can use the sticky pad mounted option and we don't need to drill any holes in the vehicle, and we can just tuck the wires down the seam. Go ahead and peel back one side of the adhesive pad for the round option. Place it on the back side of your remote mounted control knob. Then wherever you're planning on mounting it, you're going to want to clean that off with some alcohol. That'll make sure we have a good adhesion so it'll stay stuck, nice and secure. We'll peel back the adhesive backing on the other side of our round adhesive pad, and we'll stick it right where we had planned on putting it.Now you can hide your wiring. We're just going to run it down the panel. Once you've got your wires hidden and run over to your module, go ahead and plug them in. Next, you need to find a mounting location for your control module. It needs to be mounted to a solid surface. We're going to use the sticky pad provided with our kit. Place that on the back of the module, peel back our adhesive backing. There's the location, we're going to be mounting it behind our dash.We mounted our control module here behind our steering shaft up on the front firewall. We then zip tied up all the excess wiring up out of the way, so it can't be seen, completing our installation. Now that we've got it fully installed, you'll want to park your vehicle and your trailer on level ground and plug in your seven pole connector. The module will automatically calibrate itself, so it's ready to go. All you need to do now is adjust the sensitivity that matches the load of your trailer. And that completes our installation of Curt's Spectrum trailer brake controller on our 2016 Acura MDX.


Do you have a question about this Trailer Brake Controller?
Info for this part was:
At etrailer.com we provide the best information available about the products we sell. We take the quality of our information seriously so that you can get the right part the first time. Let us know if anything is missing or if you have any questions.


Thank you! Your comment has been submitted successfully. You should be able to view your question/comment here within a few days.
Error submitting comment. Please try again momentarily.