
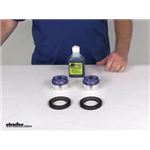
Kit converts existing trailer hubs from grease to oil. Fits 5,200-lb and 6,000-lb axles. Includes oil caps, seals, and oil.
Features:
Videos are provided as a guide only. Refer to manufacturer installation instructions and specs for complete information.
We're gonna be converting our system over from electric drum brakes to electric over hydraulic disc brakes. And when we do this, we're gonna be using Kodiak XL Prolube Kit for 5,200 to 6,000 pound axles. Alright, now we've got a disc, our rotor here to assemble before we go to put it on. This kit here's what we're gonna be using to convert it over to a oil bath system. So this is the oil that we're gonna be using that comes in the kit. You also get new caps, so we're not gonna be using the ones that we've removed here.
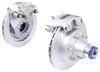
We're gonna be using these. Now I will say that with this kit and what I've found especially with these particular rims that we had removed on this one, these stick out further than what the other caps do. And the center caps on your rims may contact the cap here. On the ones that we've got here, they will contact the cap. So just keep that in mind, you may have that issue at home if you have the exact same type of looking rims.
The seals also come included in this kit and it's necessary that you have these seals if you're going to oil bath these, there are a special seal that's different from this type of regular grease seal. So we're gonna be using these. So we're just gonna open this up here so we need the oil first, so that way we don't go together completely dry and we also need to grab our seal outta here 'cause that's gonna go on right after we put our bearing in. So we grab our oil out there grabbing one seal. We'll set these, let's give it a side over there.
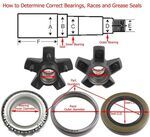
Now we're gonna grab our new bearing here, exact same numbers we had before two, five, five, eight, zero. So it's gonna drop right down inside of there. I don't wanna go just in just yet, I always like to put a little bit of oil on it, so that way it's not going in completely dry may have to remove the seal from the top of the bottle there. So I'm just putting a little bit of the oil on there. Kind of spinning it around, trying to help, let it seep in.
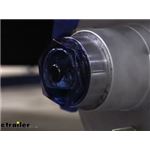
There we go. And then I'm gonna kind of rub it into my fingers a little bit try to get it around those rollers and onto the inner race inside of there. And that's pretty much good enough. We just trying to prevent any dry contact And then we just drop it by on in there. Make sure you put the right way. We want the smaller diameter end to face towards the inside of the rotor. And now we can grab our seal and we're gonna drive that in. And with this, I like to put a little bit of oil on the seal as well just to help it drive in a little bit easier. So we're just gonna put a little bit here on the backside. We don't need nearly as much with this. Just kind of run your finger around it. It just helps it slide in easier. All right, and then after you got that lubed up, you'll set that on there, and then you'll drive it in. Now I would recommend using a seal driving kit. We've got 'em available here at etrailer but I'll show you a couple of methods that you can use if you don't have that kit. All right, so if you don't have a seal driving kit you can take a block of wood like this that extends all the way across and we can use that to drive it straight down. cause ideally we wanna drive this straight and you don't wanna go crooked. So as you're driving it in kind of pay attention if you got a spot that rises a little bit, try to counteract that. And now you guys at home that probably have mechanical and have serviced here Break Assemblies before, replace bearings and seals. Normally once you get the seal drove in there flush with the back, you think, okay, I'm done. I got a little spot here that's still raised I gotta get, but usually when you get it flat, you think, hey, I'm done. But actually on these disc brake conversions it needs to be driven in further than flush. So we're gonna get it flush first. So we're just about ready to slide this onto here but to prep ourselves a little bit we're gonna clean up some of our old hardware here. So the nut, the washer and the retainer, go ahead and get all those wiped down, we want those to be clean, we don't wanna transfer any of our grease over. And then this is our outer bearing. I just wanted to show you, it is a different size than the one that we took off has the same inside diameter but it's a little bit thicker, heavier duty bearing, and this is a one, five, one, two, three. This is the appropriate bearing that matches up with our disc brake rotors. So it's important that both components, everything matches up that this inner diameter is gonna be compatible with our spindle, and that the rotor is gonna be compatible. The race inside the rotor is gonna be compatible with the rollers here on the bearing. So it comes pre-installed with the race on the disc brakes, we don't have to worry about any of the races. We just gotta make sure that this inner diameter's gonna be appropriate here, and that's what this bearing does. This for us, it's the appropriate size. We're gonna put oil on this one as well, 'cause we don't wanna put this one in dry too. So we're gonna get all those things prepped real fast get that stuff cleaned up, get this guy oiled, and then we'll grab our assembling so we can slide it on. All right, so we got all of our parts prepared here. We're now gonna grab the rotor assembly, actually real quick before I grab the rotor assembly, I'm gonna put just a dab of oil on my finger, and I'm just gonna, put just a little bit here on the spindle. This will just help the parts slide together a little bit easier, when we go to slide that on here. Some of these newer parts stuff up it's such a tight tolerance. If it doesn't go perfectly straight, it's ever so slightly cocked, you can get into kind of a binding situation. So this just helps minimize that. Now we're gonna grab our assembly and we'll slide it into place. And you wanna be careful when sliding it in, we don't wanna nick the seal on anything. So we're gonna try to be very careful, to line up the hole and slide it in, so the game of operation don't touch the sides, and this is what we we're talking about, that bearing kind of little stiff. The newer bearing so you might have to push it up just a little bit there. Kinda, we've got that slid on, we'll take our new bearing, we already got that prepared and oiled, slide that in place. Cleaned up washer will go right behind that, and then we'll take our nut here, thread it into place, and then after we get our nut on there, we're gonna use the nut to ensure that this is a fully seated. So grab your channel locks, got your cleaning and grease off at the end of those, and just go ahead and tighten this down. We're gonna tighten this fully, this isn't where we're gonna leave it in the end again, we're just trying to make sure we've got all of our components fully seated. And I like to just kind of spin the rotor assembly with it just to make sure everything's kinda sliding and falling into place. All right, so that felt like the end there, put a little bit of extra hump on it, just to make sure that everything is fully seated, it should feel kind of stiff here when you give it a little bit of a turn, you don't wanna turn it too much. That's what we're looking for. We know we are fully seated now. Now we're gonna back it off, and it should be fully loose, to where you can turn it by hand, and we're gonna turn it just until it touches my hand, just like that. And that's where we kind of want our bearings to be set that way they don't have like a preloaded pressure on 'em that's causing 'em to grind together, they've got the freedom they need to ride what we don't have excess play in there, that can cause any damage from the components moving around. That's right where we wanna be, should feel nice and smooth when you turn it. Our retainer will go on next. And sometimes you have to turn the nut just a little bit left or right here, to get the retainer to go back on. You see, there's a flat surface here, it lines up with the flat surface on the spindle, and then these guys here, by laying on a flat surface, or one of the corner edges will go in between, these two little prongs. So we're just gonna see if we can get it to line up, and push it in place there. And again, every now and then you gotta turn the nut just a little bit in order to get it to the right position that's gonna allow it to go all the way on. Looks like we're pretty close though. When you get it real close like this, you're almost all the way down, but it's stuck, you can usually just take your screwdriver, and the palm of your hand and just tap it in the rest of the way. Just like that, there we go. Alright, we've got our retainer on there. So at this point now we are, we would be putting yield cap on, and filling this up with grease, if we we're doing grease, we oiled our bearings where we put 'em in, I would've packed them with a bearing packer with grease before that, as you are doing grease, make sure you packed those bearings first, when we we're doing the oiling portion of the bearing and then now you can fill that up, and put your cap on. But we're gonna be changing over to that oil bath so, we're gonna grab our new caps here from our oil bath kit. Grab the cap out there, unscrew the end of it there. We'll set this aside for a minute. I'm gonna grab our oil once again, I'm gonna put just a little tiny bit on here just to make it easier to get it to insert, running around the edge there a little bit. Alright. And now we're gonna drive this into our rotor assembly. And this part here is a bit of a challenge just because this is such a tight fit, it needs to be a very tight fit, or else our oil would leak out. So we're pressing this basically into our assembly, so I'm just kind of getting myself lined up. You're really gonna have to get a good whack at it to get this thing to go into place, so kind of move a few things out the way so you gotta go drive at it. We're gonna use our wood block once again, kinda get it lined up on there. If you can I like to start with the hammer by itself and see if I can get it to just kind of grab enough to hold itself on there. It just makes life a little bit easier, staying on there by itself. Sometimes you can, sometimes you can't, you know, we'll just see, that seems pretty decent. We'll now drive it into place with our block of wood here. All right, that's pretty decent. Give her a spin, make sure that it's fully seated all the way around, and that all looks pretty good. We can now take that cap that we had. We're moving a minute go, I like to put just a dab on my finger, and just smear it around the seal, that can just help prevent any like nicks and cuts on your seal. We don't wanna get it on all the threads if we can avoid it. I mean, it doesn't really matter its gonna be worth anyway, but I'm just trying to get a little bit on the seal just to make sure it slides in without any tears or cuts. Now we're gonna go ahead and fill up our rotor with oil, or again if you're doing the grease, you wanna make sure you grease 'em. We're just using our screwdriver to help us pop out this little center cap, it's really, really tight in there. And then we'll open up our bottle, the end just barely will fit in there. You kind of gotta be able to twist a little bit and then we can fill that on up and spin it to help it kind of work its way throughout the system. And put just a little bit more in there, grab our cap here and put that on. Now it may look like we're slightly overfilled, but the oil, the thickness of it, it takes it a while to kind of work its way through the system because of its thickness. It's not like water it doesn't fill in the gaps a hundred percent immediately, there's some air pockets and things that get in there due to the thickness of the oil, that just makes it take a little bit longer to kind of settle. There we go. Stack back on there. So you can see the face of it. There's a fill line here, it's kind of a dotted line, we're a little bit above the fill line right now. But as you spin this thing and as it sits here that oil's gonna work its way through all those little cavities, getting all the air worked up to the top and stuff. So that way it'll settle down and it will likely end up being lower than the recommended fill line. So this is kind of something I would recommend is let it sit overnight, and then the next day recheck it, and top it back off then. And that completes our installation of Kodiak XL Prolube Kit..

Easy product to install
seals look like a very good seal will put them in tomorrow
good, easy, fast dealings!
Great customer service from etrailer and especially from the CSR rep. Donna P. thank you.
I wish you could adder just the cap instead of the kit; however, the caps worked great

Awesome
So far so good. Just installed and looks good.
Kodiak XL ProLube Kit has preformed very well
Great product even though it didn't fit my trailer, my fault.
Do you have a question about this Trailer Bearings Races Seals Cap?
Info for this part was:
At etrailer.com we provide the best information available about the products we sell. We take the quality of our information seriously so that you can get the right part the first time. Let us know if anything is missing or if you have any questions.


Thank you! Your comment has been submitted successfully. You should be able to view your question/comment here within a few days.
Error submitting comment. Please try again momentarily.