
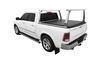
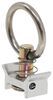
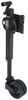
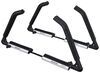
Yakima BaseLine FX Roof Rack for Naked Roofs - JetStream Crossbars - Aluminum - Black - Qty 2


To see if this custom-fit item will work for you please tell us what vehicle you'll use it with.


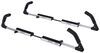
This aerodynamic, flush-mount roof rack lets you carry gear and cargo on your vehicle while maintaining a clean, factory look. Crossbars work with channel-mount and clamp-on accessories. Installs on your vehicle's naked roof.
Features:
Specs:
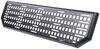
 Alternate Instructions
California residents: click here
Videos are provided as a guide only. Refer to manufacturer installation instructions and specs for complete information.
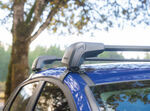
Hi, everyone. Aiden here with etrailer and today we're gonna be taking a look at and later be showing you how to install this Yakima BaseLine FX roof rack kit on our 2020 Chevrolet Silverado 1500. Now this option for Yakima is a really good choice if you care about the appearance of your vehicle and you don't want the roof rack to look to aftermarket. And the reason for that is that this is a flush mounted roof rack, meaning the bars up top are gonna end in these towers here at the end. So you don't have any crossbar that's gonna stick out beyond your roof line. It's gonna give it a much cleaner look over overall.
And this kit from Yakima particular is newer for them and I think it just looks really nice, a lot of clean lines, you don't really see a whole lot going on because everything's under these covers and hidden away. And if you only ever plan on carrying one or two accessories up here and you don't need as much room, these kind of kits are great because the overhang kits, they do give you more bar space to attach accessories. But if you're only ever carrying something like a basket, maybe a box, maybe some skis and snowboards up here and you're not really combining multiple accessories at any given point, then this is really all you need. And plus, with the Silverado being a bigger truck, these do have a good amount of bar space anyway, even though the crossbar doesn't overhang to the side. Now you can clamp accessories onto these bars really easily because they're very friendly to most clamps.
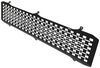
And you've also got a channel up top with this rubber weather strip. So if you wanted a channel mountain accessory, you just slide it into that big gap in the middle there, move it to wherever you want on your rack and you could attach things that way too. So it's pretty versatile. You've got plenty of room underneath your roof line here for clamp on accessories. So whether they've got some jaws or maybe even a hand knob underneath, you should have enough room to not make contact with your roof.
And if you did want to remove this, it's pretty easy to access all the hardware just by removing this end cap, squeezing the two tabs there. And all the hardware for your clamps are underneath this cover where they can be locked away if you do choose to pick up the optional lock kit here to replace this plastic core. This will attach to your vehicle through this fit kit, which is a rubber pad custom fit to match these contours on your roof line and a custom fit clamp that will match up perfectly into your door jamb here and your door will just close around that. Keeping a good tight weather seal while not damaging the vehicle. One of the things on the Silverado that you may wanna watch out for is your antenna up here, but luckily it sits well below the line of the roof rack.
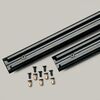
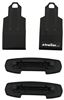
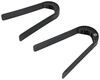
So even if you've got an accessory, like a box that tapers down towards the front and rear, it shouldn't make contact with that. And with the weight capacity, the rack is rated for 165 pounds. Now you wanna check what your owner's manual says for your roof. More than likely that's going to be the limiting factor. So if you're looking to carry heavy things with your truck, that's where you start to explore ladder racks. This is gonna be more than enough though for something like a box, a basket or a kayak. As far as your install goes though, this kit is going to be a little bit more involved than others just because Yakima puts in a lot of adjustment points for their towers. It can be a little bit confusing at first when you crack open the instructions and you see all the measurements listed, but we're gonna help break it down and walk you through the whole process right now. Wanna get your parts laid out. Your crossbar is gonna come pretty much completely assembled like this, and your fit kit is going to have the rubber pads and clamps. Tools included will be this torque tool that you can use to tighten down all the different bolts we have in our towers here. But you wanna provide your own flathead screwdriver and you can use the flat roll tape measure that comes in your kit or you can just grab a tape measure of your own. We're gonna start by taking off the end caps, by squeezing the tabs up top, flipping the whole bar over and attaching the rubber pads to the base of our feet here, just lining up the shape with this cutout here and pressing that into place until its seats fully all the way around. On the underside of each tower, there's gonna be a small hash mark. We need to measure between each one of those and depending on the vehicle fit, that measurement will be different. So for your Silverado, look into the instructions, find what's labeled M3, and that measurement will be the distance between those two hashes we need to find. To get that set up, we need to take our torque tool and loosen up the screw closest to that hash mark and pull this tower out a bit because we need to widen them by a fair bit. I'm gonna start right there on each side. Once you've made some adjustments, break out that tape measure and do your best to get that lined up to both those dots to that M3 measurement in our instructions. When you're happy with the position though, you can go ahead and leave those loose for right now because we need to reference one more thing about the pitch of these towers and that pitch is going to correspond to where this screw here is positioned. So right now it's kind of in the middle, but I can push the tower forward and back and kind of align it a little bit more with the edge here or here. Now the tower position for our front crossbar is going to be in the forward position, but for the rear it's gonna stay centered. So just go ahead and tighten that screw down until your torque tool clicks. The second screw back from that first one we adjusted is going to adjust the toe. Loosen that up, and whether we push this forward or back, it's gonna change the angle that this tower sits. Again, just reference the measurement in your instructions, but for our rear crossbar here, we want it centered up so we can just leave it as it is. At this point, we can take our assembled crossbar to the roof and loosely set it in place. Now it can be helpful to have an extra set of hands here, but if you've got a good pair of running boards, you might be able to do it on your own just fine. And we want to space these out properly. There'll be an M4 measurement in your instructions that gives you the distance from one crossbar to another and an M2 measurement that tells you from the windshield to your front crossbar. So find those, break the tape measure out and make sure that those measurements are the same on both sides so that the bars run parallel to one another. I want to grab our flathead screwdriver because these gray covers on the towers need to be twisted to the unlocked position here and opened up. That's gonna reveal two screws. We need to loosen up one for our clamp in the middle and one that's going to adjust the angle of the clamp. So we want these loose right now so that we can physically get our clamp in place. And I like to loosen that first one up quite a bit out of the box. The one that adjusts the angle should be pretty loose already, but doesn't hurt to give it a few turns. From there though, you are gonna take your clamp rubber side facing in and feed this end with the hole up through this small slot until it hooks in to this barrel here. You'll feel it once it clicks in, just give it a pull and make sure it doesn't come out. Go to that angled bolt up top first as I tighten it up though, watch as that clamp angles down and eventually makes contact with the side of the roof there. Do that on both sides before we go any further. Once that's making firm contact on both sides now we can turn our attention to these drive bolts for our clamps. And you'll see as I tighten this up, it's gonna pull itself closer and closer to the door jamb there until it sits flush. Once it just touches, I'm gonna stop and switch over to the other side, do the same thing and go back and forth tightening them evenly until I hear the torque tool click. Once everything's tightened down, just push that gray cover back in and twist that core up top to lock it. Or if you chose to swap these out to proper locking cores, use your key to do that and then take your covers, line up these bottom tabs with the slots here and push that back into place over each of the towers. They can be a little tricky to line up, but once they are properly lined up it should feel like it goes in pretty easily just like that. And I always like to give things a good shake test to make sure that I didn't accidentally leave anything loose. Overall, the install on this kit isn't too bad. Yakima does have a few extra steps to adjust angles and things on the towers than other brands do, but the end result is a really nice fit and I think a really nice looking roof rack on our 2020 Chevrolet Silverado 1500. My name's Aiden, and thanks for watching.


Do you have a question about this Roof Rack?
Info for this part was:
At etrailer we provide the best information available about the products we sell. We take the quality of our information seriously so that you can get the right part the first time. Let us know if anything is missing or if you have any questions.


Thank you! Your comment has been submitted successfully. You should be able to view your question/comment here within a few days.
Error submitting comment. Please try again momentarily.