
To see if this custom-fit item will work for you please tell us what vehicle you'll use it with.
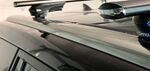
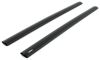
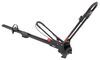
This sleek, aerodynamic roof rack provides space to carry gear on your vehicle. Crossbars with push-down rubber strips in top channels work with channel-mount and clamp-on accessories. Installs to fixed mounting points on your vehicle's roof.
Features:
Specs:
 Alternate Instructions
Videos are provided as a guide only. Refer to manufacturer installation instructions and specs for complete information.
Hello, neighbor, this is Curt with etrailer, and today, we're gonna take a look at the Inno Aero Roof Rack, and we're gonna see how it fits and how it installs on our 2025 Chevy Trailblazer. A roof rack is a great way to get that extra gear on your trip with you that you either don't want riding in the car with you or simply just won't fit. The Trailblazer does have a decent amount of space, but if you're driving with three other passengers plus their luggage and whatever else you're taking with you, you're gonna run outta room really quickly in the storage area back here, plus a roof rack is a great alternative to using your hitch for extra cargo. Cargo boxes, cargo baskets, and trailers, they all end up giving a much bigger footprint to the vehicle and gonna make it more difficult to maneuver and to find parking, so being able to store things up on the roof, using roof baskets, platform racks, cargo boxes. There are bike racks available, awnings, watersport carriers, all sorts of things that could go up on your roof, making it easy to get everything to and from your trip. This is an aero-style bar, and what that means is that it's got aerodynamic shape, wider in the front, narrower in the back.
This is gonna be a much quieter ride than your traditional square or round bars because it's gonna be a lot less wind-resistant and it's gonna reduce vibration. There's a push-down weather strip with a T-track up top for your T-mounted accessories, and you've got some overhang here that you're gonna be able to use with some of your clamp-mounted accessories, so you do have room up here to put cargo side by side, because of this overhang. The thing that you do wanna keep in mind, though, is that these bars do have a 165-pound weight limit; however, even with that, you do wanna double-check your owner's manual. Find the vehicle's rooftop weight capacity. Whatever number is lower, that's gonna be the limit of what you can carry up here.
This roof rack uses two different sizes of bars. The bar in the back is gonna be a 45-inch bar. The bar in the front is gonna be a 48-inch bar, so technically speaking, we are limited to the smaller bar. We've got about 45 inches of bar space to be able to utilize, and the reason is Inno likes symmetry a lot, so rather than have two bars that are the same length with different amounts of overhang, they like to see the same amount of overhang on both the front and the back bar, and that's what creates that symmetrical look that Inno is always trying to achieve. Now, on the roof here of our Trailblazer, we have a flush rail, and on that flush rail, there are fixed mounting points, which means that we don't really have any freedom to move these bars further apart or closer, so we're gonna go ahead and take our first measurement, which is going to be our crossbar spread, so if we go from the center of one of our bars to the center of the next, we are just a hair under 28 inches, and for me, that's actually a good place to be.
Every rooftop accessory has a minimum and a maximum crossbar spread that'll allow you to use it. 28 inches puts you kind of right in the middle of that, so you shouldn't have a whole lotta problem finding rooftop accessories that fit this crossbar spread. The other thing that we're going to take a look at is going to be our crossbar height; how much height is this adding to our vehicle And with the way that this roof kinda contours, this bar up front is just a little bit higher up, coming in right above 4 1/2 inches of extra height, so if ya add that to your vehicle height and your rooftop-accessories height, you'll get your overall vehicle height so you could be sure that you have roof clearance. One of the things to keep in mind, too, is that we've got this antenna back here, and if you are carrying something longer up here, it might interfere with that antenna. You should be able to unscrew that antenna if you need to or, if you're mounting things side by side, maybe get it through the middle.
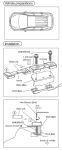
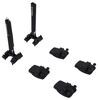
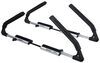
We don't have them here at etrailer, but there are several antenna options out there that could be shorter that you could plug in instead so that you could have clearance for all of your cargo. The other thing we're gonna look at is the clearance underneath the bar. Underneath the bar, we've got about 3 1/2 inches, 3 3/4 inches really, on the back bar, and on the front bar, we do have about 3 1/2 inches, so if you have a sunroof or anything like that, that's the kind of clearance you can expect from your front bar up here. Now, I'd mentioned the fixed mounting points when it comes to installation. Stick around, and I'm gonna show ya exactly how we got these on the roof of our Trailblazer today. The first thing we need to do is put our mounting brackets up on our flush rails on our Trailblazer, so that will be this piece right here that's found in our fit kit along with the cover for it, and we're gonna have some bolts that come prepackage with a washer and a lock washer along with this tool right here. Now, before we get it up there on the rails, there is a part that we need to get out of our tower, as well, so we're gonna go ahead and take our tower and grab our key. I'm gonna unlock it and remove that tower cover, and what we'll find underneath here is this knob, and there's a little lever in the back right here. So we need to loosen this knob up, and we need to pop this lever upwards, like so. It's gonna loosen this clamp, and we'll be able to take this piece out right here, so the parts that we're gonna need to go up on that rail to start with is going to be our mounting bracket, the cover for it, our base clip, and two of our bolts. On the inside of your rail up top here, you're gonna find these preset mounting locations, and they're threaded to receive our bolts. Now, it may be that you get up there and there are some plastic plugs on 'em. If you take a flathead or if you have a trim tool, go ahead and pop those out, and you can hang onto 'em if you ever think you're gonna take this off, or just go ahead and discard 'em, but I'm gonna take my mounting bracket, line it up with the bolt holes there. And then I'm gonna take one of my bolt-and-washer sets, and I'm gonna just kinda get that bolt set to get us started. Once I get them both started, that is a slotted bolt hole. You can move it back and forth a little bit. It's not that much. You get maybe a quarter inch either way. But it's very, very important, I think, to move it all the way forward or move it all the way back, and whatever you do on the passenger side, you want the mounting bracket across from it to be exactly the same. We already put the driver on. That's moved all the way forward, so I'm gonna move this all the way forward. That's gonna ensure that they're gonna be directly across from each other. Our bar is gonna end up being parallel, then, to the bar in the back, so I'm gonna take our Allen tool, and I'm gonna go ahead and get this tightened in. Now I'm gonna take the piece that we took out of our tower. It's gonna be right here. What we'll see is on one end we've got this kind of open cavity, right here. We've got this tab right here, facing up. The tab is going to go to the inside of the vehicle. This open spot here will be to the outside. As far as, you know, going this way or this way, we want this open-cavity part of it to be facing upward, so we're gonna put that on there. But before we do, we're gonna take our bracket cover, and we're gonna put that in place over it. Set it on top. And then we're gonna grab two more bolt-and-washer sets, and we're gonna thread that in as well. Now, with our brackets mounted, we're gonna come back to our crossbar here, and we're gonna turn it over on its underside, and what we'll notice back here on each end are these slots, and we've got these tabs that we can depress, so we're gonna start by going ahead and just depressing that tab, and when we do that, we can slide this all the way over and expose this full cavity right here. In that cavity, we want to fit these tabs into right here. One of the things we have to make sure that we do is. If we open up this lever in the back, that actually loosens these, and it's gonna help us slide it under there and into that T-track, so with that being lifted up, and just kinda separate that a little bit, we're gonna drop it down right into that cavity and slide it over into place. Once we do that, that tab will pop back up, and now it's locked in. We're gonna go ahead and repeat that on the other side of our bar. With both of our towers attached to the bar, we can go ahead and get it up onto our roof. When we're putting this on, we wanna make sure that the wider part of the bar is facing the front of the vehicle and the narrower part of the bar is facing the rear of the vehicle. So I'm gonna get this up into place here, and it might be that I need to maneuver it a little bit. But once I get it into position, what's going to happen is this front end here, this wide kind of almost-blade part, is gonna drop right into this slot on the front of the bracket that we put in, so if I get this into the right position, it'll drop in just like that. With both of our towers clamped in, with this lever positioned all the way down, like it is, on both sides, we have the freedom to maneuver our bar back and forth a little bit, and what we need to do before tightening it down is make sure that we have an equal amount of overhang on both the driver and the passenger's side, so grab your measuring tape. Find a spot on here, and just measure to the end of your bar for where it's at. Double-check the other side, and just align it until both sides match. Once you have your overhang set where you need it, this lever underneath here, go ahead and close that, and clamp it down into place, just like that, and take this knob here, and just tighten this up until it's snug. You actually get two different Allen keys. The one we've been using is a really long one. They're both the same size here, so they fit the same bolts, but the shorter one is what you'll need in this particular spot, just 'cause it's kind of a tight spot, but there are through-holes in this knob that you can use to help to get this tightened down all the way. Just stick it all the way in, and just keep going at it until you get these tightened down to where you can't really tighten 'em down anymore. In your foot packet, you're gonna find these four long foam blocks, just like this. The purpose of these is to go into this slot right here. Just as far in as you can. If you end up with any excess, go ahead and trim that off. We're not doing a permanent install today, so we're not really gonna be using this, but the idea is it's gonna cover up this gap underneath, keep air from blowing in and across there and therefore making a lot of noise on the road as you're going, and particularly on the front bar, it's pretty important because if you're driving with your window open there, all this air going underneath it while you're driving, that's gonna create a lotta road noise. Probably be a little annoying for you on your journey. So that's where it's going to go. If you have excess, go ahead and trim it off, but like I said, since we're not doing a permanent install, we're just not gonna use it on this today. Put the end cap on our bar there. Go ahead and get that, and go ahead and push those on, and they'll just snap right into place. Once that's done, go ahead and grab your keys and your tower cover. That's gonna slide right on, just like so. And then you can lock it into place. Once you've done that on both your driver and passenger's side, give everything a good shake test. Make sure that the vehicle's moving but the bar isn't, the towers aren't, and you're all set to get loaded up for your adventure. If you have any questions about it after watching this video, go ahead and leave those in the comments below. We would love to answer those for you and share those answers with other neighbors just like you so they can make the best decision for themselves. Once again, this is Curt with etrailer. Thanks for stopping by.
Ratings & Reviews


Info for this part was:
At etrailer we provide the best information available about the products we sell. We take the quality of our information seriously so that you can get the right part the first time.


Thank you! Your comment has been submitted successfully. You should be able to view your question/comment here within a few days.
Error submitting comment. Please try again momentarily.