
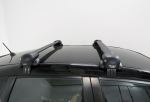
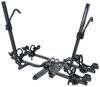
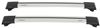
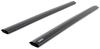
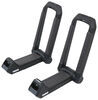
Inno Aero Flush Roof Rack for Raised Rails - Aluminum - Black - Qty 2


To see if this custom-fit item will work for you please tell us what vehicle you'll use it with.
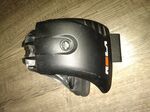
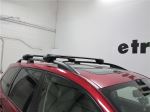
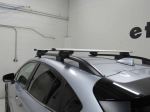
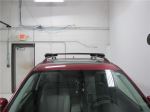
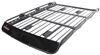
This aerodynamic roof rack mounts flush on your roof for a factory look. Crossbars with push-down rubber strips in top channels work with channel-mount and clamp-on accessories. Installs to raised rails on your vehicle's roof.
Features:
Specs:

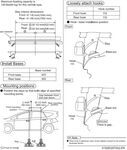
Videos are provided as a guide only. Refer to manufacturer installation instructions and specs for complete information.
Hello, neighbor, this is Curt with etrailer. Today, we're taking a look at the Inno Aero Flush Roof Rack on our 2024 Toyota 4Runner. Now, if you have any experience with this Inno Aero Flush Roof Rack or if you have any questions about it, please leave them in the comments below. We love to take those questions and your stories and share them with other neighbors in order to help them make the best decision for themselves. Now, as the owner of a Toyota 4Runner, my guess would be that you have a bit of an adventurous side. And you might be going on some journeys where everything you're taking with you cannot fit in the vehicle, either because you don't want it in there or you have too many passengers or it's just oversized in order to get there.
One of the great ways around that is a roof rack system. This roof rack system from Inno is a flushed system, meaning the bars won't come out in overhang. It gives it a little bit of a cleaner, almost more factory look, I guess, on the vehicle than the overhang bars would. And what it's going to allow you to do is attach rooftop accessories, either for cargo carrying or some skis or snowboards or anything that really isn't gonna be able to fit inside the vehicle or either that would be too much of a nuisance inside the vehicle. But all in all, I think a roof rack system on a vehicle like this is a great way to get started on your journey.
Now, one of the things about a flushed crossbar system as opposed to an overhang crossbar system is that we are gonna be a little bit more limited on the amount of bar space that we actually have. So let's take a measurement and see what we're working with. In the T-track up on the top here, which you can access through the cover here for those accessories, we're gonna have roughly about 40 inches worth of this track to be able to use. And as far as a clamp-style system on your rooftop accessory, we're gonna be at about 34 3/4, so just under 35 inches of usable bar space for a clamp-on accessory. One of the things we also kinda wanna keep in mind while we're up here is just how much clearance we have underneath the bar.
Right now, it's just a hair under three inches of area under here, so we'll keep that in mind with any of the accessories that we put up here as well. Now, these bars are gonna have a 165 pound weight limit. However, it's always a good idea to check your owner's manual and see what your vehicle's rooftop capacity is. If it's lower than 165 pounds, then that will be your capacity. The way we have them set up right now is that the center of the T-track to the center of this T-track, we're at 29 inches.
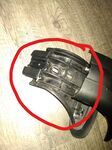
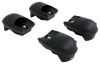
26 to 30 inches is a really good sweet spot to be. Most rooftop accessories can handle a crossbar spread like that. But now that we've gotten up here and taken a look at the kind of the way that it fits the top of our 4Runner, let's go ahead and take a look at exactly how we got these installed. Now, before we get started on the installation, it's always good to kinda lay out your stuff and make sure you have everything straight. So really, all this is gonna consist of is our crossbars, our towers, and the covers for those towers. Installing the towers with the bars is, actually, Inno has one of the easier systems to do that compared to other brands. Other brands would have you remove the endcap and then slide them down. This, you don't have to remove any endcap, they are flushed anyway. But what you're gonna use is this T-slotted system here. This is gonna go into this space, these two will go into this space, and it'll simply slide over. Now, before we do that, one of the things I wanna point out is that on your towers, you'll get two of them that say R, two of them that say L. L meaning driver's side, R meaning passenger's side. Now, while these actually install onto the bars very, very similarly, you would think that it wouldn't make a difference whether or not you had to put these on a particular side until you get to their covers. The covers are gonna be very, very important, because they are contoured, like this one is here, to be wider to the front and then taper to the back, similar to what our bar does. It's also gonna be important to make sure that the cam and key system lines up with where it'll actually lock in. So we've got this on our passenger's side for the R, we've already put our driver's side on. So let's go ahead and slide that into place. Once you get it on there, you just slide it over, it locks into place. It can be removed by pushing down this tab and sliding it all the way over like that. Now that we've got it on there and kind of locked in, we're gonna go ahead and take it up on our roof and get it mounted there. So we're gonna begin by getting up on the roof here. And as you could see over there on my passenger's side, I want it to overhang the top of the bar, and I want this rubber strap to be coming underneath the bar. So I'm gonna just set it on there just like so. I'm gonna position it as far forward as we can get it. Up here on the 4Runner, you may notice that the rails that we have up here, these factory-installed rails don't run the length of the vehicle. Really, the front most mounting point is gonna be about halfway into your second row doors. So we're gonna mount this as close as we can up to the front. And set our crossbar spread to somewhere where we can find it most useful. So once we have this up here in position, we're gonna go ahead and get them tightened down before we grab our covers. So the first thing that we're gonna wanna do is get this wrapped around here and cradled through these little hooks. If you need a little bit more slack in doing that, it's controlled by this knob here. You can go counterclockwise to loosen this up. We're gonna go clockwise to get it tightened down, since we have it seated. And doing this is actually gonna tighten down two areas. One, it's gonna tighten down our bar, so we don't get any sliding back and forth on that. Two, it's gonna tighten this strap to get a good grip around those rails and make sure everything up on our roof up is secure. So I'm gonna get it pretty tight. Give it another half turn, get it flat. There we go. Now, in installing your covers, first thing you wanna do is make sure these tabs go underneath here. And with those in place, we're gonna simply turn our keys, and lock it on. So as you can see, the install on this was really very, very easy. Because it doesn't have a fixed mounting point on these raised rails, I can maneuver these bars to be any crossbar spread that I really need. I can move them further toward the front or further in the back as needed. And if I'm gonna spread these all the way out, I'm gonna get a crossbar spread of about 38 or 39 inches, which is more than most rooftop accessories need or even can handle. But having that kind of maneuverability back and forth and it being very easy to do so is a huge bonus to this Inno roof rack system. Now, whenever I'm discussing a roof rack system, I always wanna mention one more accessory. This is called the Moki Door Step, which is an important tool in my case, especially on a taller vehicle like this, in order to really get up into your rooftop accessories and be able to organize, install, uninstall, anything you need to do up there where you just simply can't reach by jumping up into the door. It works very simply. Folds open like this. Hooks in through this loop in your door. And it's gonna give me a 400 pound weight capacity in order to get up here and really be able to dig in to the different accessories that I'm looking through. I think that's especially important on a flushed rail system like we're looking at today, or a flushed rack system rather, because, generally, anything we're putting up here is gonna be toward the middle of the vehicle, because our stop off point is further in toward the edge. So with everything being kinda center mounted up here for the most part, being able to get up here and be able to reach the far side of the cargo carrier if I need to really kind of organize it, especially if I'm coming up here to look for one in particular thing that's up there, this is gonna come in really handy in order to be able to do that. Plus, being so compact, I can keep it right inside the door if I'd like. And that's much more convenient than driving around with a small stepladder everywhere you go. So there's a look at the Inno Aero Flush Roof Rack on our 2024 Toyota 4Runner. I'm Curt with etrailer. Thanks for stopping by.
Ratings & Reviews


Info for this part was:
At etrailer we provide the best information available about the products we sell. We take the quality of our information seriously so that you can get the right part the first time.


Thank you! Your comment has been submitted successfully. You should be able to view your question/comment here within a few days.
Error submitting comment. Please try again momentarily.