
Inno Square Bar Roof Rack for Naked Roofs - Black - Steel - Qty 2
Item # IN25TR
Our Price: $359.97
Will this fit?
To see if this custom-fit item will work for you please tell us what vehicle you'll use it with.
In Stock


- All Info
- Reviews (299)
- Q & A (0)
- Videos (3)
- Photos
Inno Roof Rack - IN25TR
- Square Bars
- Crossbars
- 65 Inch Bar Space
- Inno
- Black
- Overhang
- 2 Bars
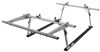
These steel, square crossbars attach to Inno feet to create a sturdy roof rack for your vehicle. Elastomer coating resists corrosion and helps cushion your load. Bars accommodate carriers and accessories that clamp around bars.
Features:
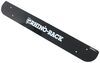
Inno Square Load Bars - Black - 65" Long:- Square crossbars let you build a roof rack for your vehicle
- Pair with Inno feet and custom fit kit to create a complete roof rack
- Standard square bars provide exceptional load support
- Clamp-on carriers and accessories conveniently wrap around bars
- Elastomer coating helps to prevent rust and cushion your load
- Endcaps keep out dirt and water
- Hardened steel construction is strong and durable
- Black color
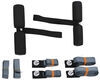
Inno Custom Fit for XS200, XS250, and INSU-K5 Roof Rack Feet:
- Custom-fit clamps and pads let you install Inno roof rack feet on your vehicle with a naked roof
- Works with XS200, XS250, or INSU-K5 feet
- Pairs with 4 feet and 2 crossbars to create a complete roof rack
- Clamps are designed specifically to fit the curves of your doorjambs
- Mount to roof rack feet with bolts
- Molded pads are custom designed to fit the contours of your roof
- Protect your roof surface from scratches and abrasions
- Press onto the bottoms of your roof rack feet
Inno Feet for Square Crossbars - Naked Roofs - Black - Qty 4:
- 4 Feet let you mount Inno square crossbars on your vehicle's naked roof
- Pair with 2 crossbars and a custom fit kit (sold separately) to create a complete roof rack
- Bases pivot to ensure crossbars are level on your roof
- Locking torque knobs secure system to your roof
- 2 Keys included
- Durable, weather-resistant AES plastic construction
- Tool-free installation and removal - no drilling required
- Torque knobs prevent over- and under-tightening
- Black color
IN-B165 Inno Standard Square Steel Load Bars - 65" Long - Black
K139 Inno Fit Kit Hooks for Flush, Through, and INSU-K5 Stays
IN-SUT Inno Roof Rack Stays for Bare Roofs - Black - Qty 4
Replaces Inno INSU-K5


Video of Inno Square Bar Roof Rack for Naked Roofs - Black - Steel - Qty 2


Videos are provided as a guide only. Refer to manufacturer installation instructions and specs for complete information.


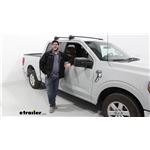
Video Transcript for Inno Aero Crossbars Roof Rack Kit Installation - 2023 Ford F-150
Hi, I'm Matt with etrailer, and today we're talking about the inner roof rack system on top of our 2023 Ford F-150. That's gonna be a great option for you if you are trying to haul anything that's longer that you maybe can't fit in the bed of your vehicle, anything like a kayak, you're gonna be able to put this on top of your roof and it's gonna work greatly, especially if you have a ladder rack that can work in conjunction with it. Another thing that's nice about it too is if you're looking for something that's gonna be a little bit more clean or have more of a flush designed to it, this is gonna be a great option for that too. So let's check it out. Our system today is gonna be comprised of three parts. The first one is gonna be our 51-inch arrow crossbars up top.
Next to that, we're gonna have our flush towers and that's gonna connect to our fit kit. So let's take a closer look at the crossbar, I mean. So this crossbar is gonna have this arrow designed to it that's gonna help it be more aerodynamic to reduce that wind noise. It's also gonna have this weatherstrip on top that's also gonna help reduce wind noise, but it's also gonna help keep debris from entering in here. The whole purpose of this weatherstrip is to help protect that T-channel we have at the top and that T-channel is gonna be used for your T-channel accessories.
And then next to that, we're gonna have the towers that it attached to. This is going to be more of a flush design. So what that means is our crossbar is gonna stick past it, it's gonna give you more of a clean design overall. And beneath that, we're gonna have our fit kit. Our fit kit's gonna be what makes us a custom fit for our vehicle today and it's gonna attach to our gutters within our vehicle and grab hold.
It really does give us a very good secure fit and the only way to access this hardware is to remove the end cap on the back of your tower, which has a lock core to it. To give you a close look at what's inside, we'll unlock this, get this out of our way. The way that fit kit operates is we're gonna have this bolt that attaches or secures down to our tower, and this clamp is gonna be in between the tower and that bolt, holding it in place. And that clamp is gonna attach to the inside of our door jam. And you can see it does cover quite a bit of a distance.
So I am a fan of that design. We're gonna get a few measurements now. The first one I'm gonna get is gonna be the clearance beneath their crossbars to our roof, and that's gonna be at about an inch of three quarters, which isn't a whole lot of space. Now if you want a little bit more space, you can go next to that if you have the chance, which is gonna give us about more like two inches of space underneath here, which is still gonna be very limiting, especially if you are trying to get those more bulky clamps on here. If you are doing that, I'd still recommend sticking to that T-channel if you can. But the overall height, we're gonna get, I'm gonna get from our tower because our tower sticks up a little bit more than our crossbar does and that's gonna be a little bit over three inches, isn't too bad. That's actually a really low profile. So what you lose out on the clearance underneath the crossbar, you gain with how height sits. What I recommend is taking the total height of your vehicle plus your crossbars, and if you have any gear on top of that, include that too so you know what errors you make it under. As for the crossbar spread, we're gonna have a specific number that is gonna work for our vehicle today that you probably can play around with it a bit, but I would still recommend sticking to what the manufacturer recommends. So I'm just gonna go from the back of our front crossbar in the back of the rear crossbar and that's gonna get us a little bit under 29 inches. So that's gonna be mounted in space. You gotta think about when you do put gear up here. You are gonna have the ability to load this up to 165 pounds, which is quite a bit. It's something I do recommend in checking what your roof is rated for on your vehicle. You can find that in your owner's manual and then going from the lowest rated component. But overall, I think this can be a great option for you, especially if you do like something that's more flush and more low profile. Now if you want something that's gonna have the crossbar stick out a little bit, Inno does make another system that does have those bars stick out a bit. That's gonna be a great option if you have any ski carriers that are kind of hard to reach, especially grabbing something right here is gonna be much easier than reaching in, and grabbing something at this point. Or if you wanna check out some of our other roof rack systems, we have plenty from Yakima and Rhino Rack, but if you're curious about the install process, just stay tuned and we'll walk you through it. To start off our installation, we're gonna lay everything out. So up front, we're gonna have our crossbar and the towers on each end, with the end caps in the center, we're gonna have our clamps and then the bases that go on our towers. We're gonna have these two adapters that go into our crossbars so you can attach your towers. We're gonna have some included tools. We're gonna have two different size Allen keys. One's gonna have this built-in torque device to let you know when it's all gonna be tightening down, and we're gonna have a set of keys. What I do recommend is grabbing a tape measure. Your kit will come out with a little tiny paper ruler. I'm not a big fan of using those. I think a regular tape measure is gonna help you out a lot more. Where I wanna start is putting on my tower to my crossbar. To do that, we need to do for a few things first. I'm gonna unlock this so I can remove the end cap. I also wanna make sure this is gonna go on the correct side. So you notice there's an L right here, letting us know it's gonna go on the left side. The end cap's also gonna have a label like that too. So we wanna make sure this goes on the left side of the bar. A good way to figure this out is to orient your bar. So this is gonna be facing forward, so you wanna make sure this thicker side is facing in front of you. Once you've done that, we know this is gonna be our left side, so I'm just gonna flip this over and start prepping the bar. To do that, I'm gonna push this channel forward without do it, I just usually put my finger here and push against it so it sticks all the way out. You're gonna have this square gap. We're gonna put our adapter, this piece right here in there and we're gonna do that through the bottom. You notice we have this notch right here and that's gonna fit perfectly into that square and lock into place and we're just gonna push this all the way back in. It is a little bit of back and forth, but you notice I can't push it in anymore. What I gotta do is press this square down, push it some so it locks in place. The reason why we have to have this all the way in, is when we place our towers on it, we're gonna have two notches that are gonna go into the adapter and that thicker side can't fit into the channel in the thinner areas. That's why we have to have it all the way back here. So I'm just gonna flip that around, line up that notch with that opening right here and place it down. I might have to change my angle just a little bit, but you'll notice it's not grabbing all the way. The fact side's not on there, so we do have to push it all the way back out until it grabs on. And from this side, from this point, I just recommend tightening this slightly so it grabs on. So we're gonna have this channel at the bottom of your tower, you're gonna grab your larger Allen key and tighten that down. Like I said, you just wanna do that just slightly enough for it to grab on so it's not fleeing it all over the place. And once you have that done, you can repeat that process on the other side. With built towers on, we can move on to putting the bases on them. So what I like to do is when I grab that base, you'll notice we have these holes, little divots on them. These are just gonna match those divots to the bolts or screws we have on here right now. And these tabs are gonna go right into those holes too. This is gonna sit on here pretty flush, so if you have any gaps, you know this isn't on there quite right. That's about what it should look like. You just do that on the other side and we have both on there. We can get the distance between the towers. Now that distance that I have today is gonna be 51 or 51 inches or 25 and a half from the center to one of the towers. So I'm just gonna double check, see what mine is. I'm a little bit short, so I'm gonna have to extend these out. So I did tighten these down all the way. So what I can just do is grab my crossbar and pull on the tower, extend that out. I'll do that on both sides and then remeasure everything. Before we get this up on a roof, the last step is just gonna be tightening those bolts, the rest of the way down. And once you do this on both sides, we can finally get it up there. Make this process a lot easier. I recommend just getting in your bed because putting it up here, like I said, it's just gonna be a lot simpler. So when you place this on top of your roof, you wanna make sure that this thicker side is facing forward and this thinner side is facing behind us. After when you've done that, we're just gonna roughly place this where we need it to sit. We're looking at around 20 inches from that door frame, but this doesn't have to be perfect quite yet. Back from when this is roughly on here, I recommend checking both sides, making sure that base is grabbing on to those gutters or that divot we have on top of our roof. When everything's looking pretty good, I recommend just making sure everything's spaced out correctly. It's gonna be the same process for both your crossbars, for your front and rear one. The only difference is gonna be the measurement you use. The measurement we're looking for at rear crossbar is gonna be 19 and three quarters. Now just make sure you go from that point right here between your two doors, measure out to the center of your crossbar and make sure everything's lined up on both sides. At your front crossbar is gonna be sitting at seven and three quarters, so just keep that in mind when you measure from that same distance. We'll make sure that these bars stay up here, so it'll help hold 'em in place, we are gonna have to put on our clamps. And before we can do that, we've gotta remove this bolt. When this bolt is removed, we just set it off to the side, we'll grab it in just a second again, but we wanna put our clamps up here, put that outta the way. You can grab that clamp and you are gonna just line it up to the contours of your tower, and you are gonna push that bolt right through there into where you got it from, and bolt it back down into place. You wanna make sure when you do this too, that this clamp is around your gutter and you're pushing on and against it towards your vehicle. With that hand-tight now, I wanna grab our included tool with that torque device on it and start tightening this down. And the best way to do this is to tighten this a little bit, going back and forth to each side so it doesn't pull too much to one side, making it uneven. But the way it's gonna let you know if it's tightened all the way is when you hear that click that we just had. Finally, our last step is just gonna be putting on our end caps. Just make sure you have the correct one for the correct side so it goes in there correctly. Sometimes they can be a little tricky to line up, but once it's flushed all around, we'll lock it in place. And this is a good point, just give it a shake test, make sure nothing's moving, everything feels pretty solid. And if it does, you can load it up with whatever gear you have, you take it out for a ride. But that was just a look at the installation and some of the features of the NL roof rack system on top of our 2023 Ford F-150. Thanks for watching.
Customer Reviews
Inno Square Bar Roof Rack for Naked Roofs - Black - Steel - Qty 2 - IN25TR
Average Customer Rating: 4.7 out of 5 stars (299 Customer Reviews)
These steel, square crossbars attach to Inno feet to create a sturdy roof rack for your vehicle. Elastomer coating resists corrosion and helps cushion your load. Bars accommodate carriers and accessories that clamp around bars.by: Nathan 05/21/2024
These were a perfect replacement for old corroded square Thule cross bars.
by: 04/23/2024
Been a month haven’t received them yet they are in stock but guess we are waiting for one item which it’s in stock date gets pushed back every day. And the company doesn’t let the customer know the date changes or when they will send it.
by: David 03/13/2024
Fit and finish as described fits the Thule towers perfectly
by: Michael09/21/2023
2015 Honda Civic
Good quality rack system, easy to assemble and install, works well, looks good, fair price, I'm very satisfied with this purchase. I appreciate the guidance I received from William B. at the beginning of my search for a roof rack to carry a canoe on my 2015 Honda Civic. Two thumbs up for this purchase.
by: Blah Blah Blah Motorcycles04/08/2024
Easy to install and have worked great so far!
by: Joseph06/17/2023
Jeep Wrangler
Overall product is sufficient, but when used with the Inno feet (rain gutter mount) on a 2021 Jeep Wrangler JL, the combination produces a very loud whistle that onsets at about 45mph. It isnt clear whether the noise is comming from the crossbars or the feet. I suspect it is the feet, based on the geometry of the sheet metal which presents an open cross section bounded by sharp edges, which is oriented perpendicular to the air stream which likely causes an aerodynamic resonance (much like a wind instrument or a whistle). Obnoxious enough to render it useless. Unfortunately, etrailer wont accept returns which have been used. That is a bit unfair, since many defects cannot be discovered until a product is actually used. Boooo.
by: Ferne03/27/2024
Super easy to install and remove. Lock feature is great
by: Jean 11/13/2023
Products ordered arrived two days sooner than expected! Really appreciate speedy shipping. Installation was straight forward. Quality of products seems pretty good so far.
by: Chris02/21/2024
Incredible engineering: does not feel like an aftermarket rack. Easy to take off if necessary. Solid; highly recommend.
by: Caitlin08/10/2023
Volkswagen Golf
Works well, has stayed attached with no issues. We've used them (plus the bars) to keep a canoe and a rocket box on the car at different times throughout the year (not at the same time, it's on a tiny golf).
by: Chris07/13/2023
Worked great! Traveled with a carrier on these racks from Chicago to Seattle. No issues, would buy again!
by: David 05/08/2024
Perfection!!!
by: Charles 05/10/2024
Perfect fit.
by: Kevin03/16/2023
Good fit and easy to install. Plenty sturdy for a couple bike racks of your choice or a cargo rack. Happy with the purchase and saved some money compared to Thule or Yakima options. The crossbars are a bit loud, but you can reduce the whistle by wrapping a bungee cord around each bar a couple times and hooking them to the towers.
by: Ian07/26/2023
I have two standup paddle boards that literally live in the racks, and have since day one.
The racks are awesome.
by: Alberto11/22/2022
Really great value! No need to spend a lot on Thule. Even those these are square shaped I actually don't hear much road noise. Besides, you're gonna have music playing or riding with the windows down anyway. I would definitely buy these again.


by: Brian Kashner02/21/2023
Odelia was extremely helpful in helping me choose the right product. I had an end-cap that was missing and she sent me whole package of four. This is the kind of customer support one hopes to receive when deciding to spend a few hundred dollars on a product. I will definitely return to etrailer if I need another car rack for our other car.
by: Lisa07/23/2020
I am a fifty-four year old single woman and being able to install these roof racks by myself makes me feel empowered!!
I watched a video emailed with my delivery confirmation of an installation on a similar vehicle all the way through first, and then watched it again as I did the steps myself, pausing when I needed to.
The products appear to be of high quality, were packaged/shipped neatly and it was easy to organize everything for installation. I couldn't be happier!


by: Sean D06/01/2019
Waited till I put the new rack to work before review. Used it the first time today and it worked Great. Seems like a very durable rack system. Love that everything is rubber coated so it doesnt scratch the paint on your car. Installing instructions where a little confusing but found YouTube videos from etrailer on how to install exact rack system.


by: David08/12/2018
Installation is easy. Just follow directions. Front bar parts are different than rear bar parts so you need to look at part numbers and use in correct location. Rack is only rated for 100 pounds but looks and feels much stronger than rating. As noted square bars do create lot of wind noise when driving. Purchase this product to carry my Canoe and it does that at almost $200 less than other rack systems on market. For me the square bars are better fit with ratchet straps to hold Canoe down. Hard to find ratchet strap with hook to fit areo bars.
Dislike. No way to level square bars. With car on level ground high point to high point on bars is level. But each bar is off by 1/8" front to back. Wish they were round bars.


by: Deborah08/31/2022
I purchased these bars to replace my 60 inch Thule bars so I could carry 2 boats horizontally. All my Thule components work fine with these bars. Fast delivery and in perfect condition. Customer service was very helpful, emails kept me informed of delivery status. Would definitely recommend etrailer to friends.


by: Daniel07/01/2023
Quick and responsive customer service! Thank you etrailer!
by: Daniel07/01/2023
Quick and responsive customer service! Thank you etrailer!
by: Bradley07/16/2020
2003 Toyota Tacoma
Good morning so the order I got is amazing I have a old school thule roof rack that I needed the write stuff so can start putting bikes on my roof an my fishing gear or some small stuff for off roading an it works great I will be sure to be buying more stuff from this site great job with the shipping it was very fast an packaging was great it was easy to install an it looks great on my 03 Toyota tacoma thanks again


by: CP05/12/2023
Great roof rack. Easy to install and du rable!
25
1007
Show More Reviews
See what our Experts say about this Inno Roof Rack
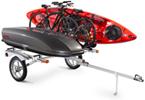
- Solution For Carrying 2 Kayaks On Top Of A 2012 Chevy Express Van 3500It really depends on the weight of your kayaks and also the weight of any other cargo you plan on transporting on top of your 2012 Chevy Express Van. You may get by just fine with a roof rack which is more affordable than a ladder rack in this situation. The Inno Standard Square Steel Load Bars - 65" # INB165 with Feet # INSD would work well. This system has a weight capacity of 165lbs which should be plenty for two average-sized kayaks with a kayak carrier such as the Malone Stax Pro2...
view full answer... - Roof Rack and SUP Carriers for 3 SUPs on a 2016 Chevy TahoeLet's start with a roof rack for your 2016 Chevy Tahoe with factory side rails. The most cost effective option is from Inno using the following parts: Square bars # INB165 Feet # INXP Fit kit # INTR154 You can then use the Thule SUP Shuttle # TH811XT to carry 2 of the boards stacked. Like you said stacking 3 boards is not recommended due to instability. At the widest this carrier will take up 35 inches of crossbar space. The square bars listed above are 65 inches long so if you subtract...
view full answer... - Fit of Inno Rain Gutter Roof Rack Feet INLD on 2018 Jeep Wrangler Hard TopYes, the Inno Rain Gutter Feet for square bars # INLD fit your 2018 Wrangler hard top and will fit the square crossbar set # INB165. I verified the fit with Inno. This rack system offers no-drill tool-free installation and it includes locks for each of the four feet. The weight capacity of the rack when installed on your Wrangler will be a function of the hard top's own weight rating.
view full answer... - Roof Rack For 2010 Chevy Express With Hightop RoofWe do have a solution for you, though there isn't a way to convert the Thule rack you mentioned with your hightop roof. Instead, the best option is a rack from Inno, because it has options for taller rain gutter feet. So, depending on the height of your roof, what you can use are Inno crossbars and either 7-1/2" or 9-7/8" tall feet: - Inno Square Crossbars # INB165 - Inno Feet for Square Crossbars - Rain Gutters - 7-1/2" Tall # INSD or - Inno Feet for Square Crossbars - Rain Gutters -...
view full answer... - Recommended Gutter Mount Roof Rack and Ski Carrier for 2015 Mercedes-Benz G-Series WagonFor your 2015 Mercedes-Benz G-series wagon, I recommend the Inno Roof Rack, which consists of Inno Feet for Square Crossbars - Rain Gutters # INSD and square bars # INB165. These gutter feet are 8 inches tall so they will clear your garage door. For your ski carrier, I recommend the Thule SnowPack Ski & Snowboard Carrier - 6 Skis or 4 Boards # TH7326 which will be quick and easy to install once outside your garage. I've attached a video to assist. We do not have a carrier that will...
view full answer... - Roof Rack and Cargo Basket for 2015 GMC Savana VanWe do offer a roof rack that will fit your 2015 GMC Savana van, as well as a cargo basket that is going to work on it. Let's start with the roof rack you'll need, which is a square bar rack made from Inno and consists of the following parts: - Inno Square Crossbars # INB165 - Inno Feet for Square Crossbars - Rain Gutters # INSD The Inno feet will install in the rain gutters of your Savana and give you a strong base to attach your cargo basket. For the basket the best option is going...
view full answer... - Parts Needed to Install Inno Square Bar Roof Rack on 1991 Ford VanFor your 1991 Ford Van with rain gutters all you need to install an Inno roof rack is the part numbers # INB165 and # INSD and you'd be set. This attaches directly to the rain gutter and gives you a great fitting square bar roof rack.
view full answer...
- Can Longer Inno Crossbars be Used on Roof Rack for 2015 Toyota SiennaThe Inno Square Crossbar Roof Rack, parts # INB117 and # INFR, referenced in your question is confirmed to fit your 2015 Toyota Sienna. If you want to have some overhang with the crossbars on your roof rack, then you can certainly use the longer # INB165 Crossbars with the same INFR Feet. The crossbars will simply slide through to top channel on the feet and any Square Inno Crossbars will be compatible. Switching out the 46 inch long crossbars with these 65 inch crossbars will give you...
view full answer... - Roof Rack Options For 2019 Jeep Wrangler Unlimited With Hard TopI recommend that you use our fit guide to see our complete selection of roof rack systems that will fit your 2019 Jeep Wrangler Unlimited with a hard top. I have attached a link below. If you then sort by price you will see each model that will fit. The EXR # ER96FR roof rack system in red may not be the least expensive, but it certainly may be the most stylish. You might also consider the EXR # ER49FR in black for a similar system, but not in red. Each of these will work with the...
view full answer... - Roof Rack Recommendation for Both 2015 Durango R/T and 2012 Ram 1500The most efficient way to buy a roof rack for both your 2012 Ram 1500 Crew Cab and your 2015 Dodge Durango is to go with the Inno rack that has the following parts that would work on both vehicles: Crossbars # INB165 and Feet # INSUT For the Ram you would need the fit kit part # INK653 and then for the Durango part # INK611.
view full answer... - Most Affordable Roof Rack For 2012 Ford VanThe most economical and shortest length roof rack for your 2012 Ford Van would be the Inno Square Crossbars - Steel - Black # INB165 along with Feet # INSD. The crossbars themselves are 65" long and the feet will connect to your van's door jam. The weight capacity for this system is 176lbs but make sure you don't exceed the weight limit of your van's roof; this is typically found in the owner's manual.
view full answer... - Inno Roof Rack Compatibility With A 2000 Dodge Ram 1500 Conversion Van The Inno Square Crossbars # INB165 along with the Inno Feet for Square Crossbars # INSD would be a compatible fit for your 2000 Dodge Ram 1500 Conversion Van as long as you have rain gutters for the feet to mount to.
view full answer...
- Longer Roof Rack Recommendation for 2015 Nissan Rogue with Naked RoofFor a longer crossbar roof rack confirmed to fit your 2015 Nissan Rogue we do have a great solution. You'd need to start with the # INSUT for the feet and part # INK466 for the fit kit. Then for the longer crossbars we have the # INB165 which are 65 inch long crossbars that will fit. You do want to be careful no too go too long with the crossbars as can be an issue pulling into garages etc. Typically the guideline is to not exceed the width of the mirror housings.
view full answer... - Roof Rack for Carrying 3 Kayaks on Roof of 2003 Chevy SuburbanTo install a longer crossbar roof rack on your 2003 Chevy Suburban you'd want the Inno Roof Rack part numbers # INFR and # INB165 which gives you a 65 inch crossbar roof rack confirmed as a fit. 65 inches of bar space should be enough for 3 kayaks without being too overboard so this would work well. For a J-carrier we have the Yakima JayLow part # Y04073 which can carry two kayaks on end if needed. And then for a saddle style carrier we have the Rhino Rack # RR581 which will work great...
view full answer... - Recommended Low Profile Roof Raco For A 2016 Chevy Express VanHello Cameron, I can definitely help with that. The best option for a low-profile roof rack for your 2016 Chevy Express Van is the Inno Square Bar Roof Rack. The complete rack consists of the following parts: Inno Square Crossbars # INB165 Inno Feet for Square Crossbars # IN72FR The Inno Feet are the shortest gutter mount feet we offer at 5-1/2" tall overall, so they will add as little height to the roof as possible. These "gutter mount' style feet are also quite easy to install. They...
view full answer... - Roof Rack and Bike Rack Solution for 2007 GMC Savana Van 1500We don't have any front hitches that fit your 2007 GMC Savana 1500. Since you probably have something in your rear hitch a roof rack and roof bike rack might be your best option. For that we have the Inno Square Bar roof rack part numbers # INB165 and # INSD. Then for a bike rack you could use the Rhino Rack Hybrid bike rack part # RRRBC050.
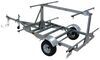
view full answer... - Roof Rack Recommendations for the Thule Hullavator # TH898 on a 2010 Toyota FJ Cruiser w/Bare RoofThe absolute best option to mount a Thule Hullavator # TH898 onto your 2010 Toyota FJ Cruiser is by using Inno Square Crossbars. The length of the Inno Square crossbars you need depends on the measurement between the top of your driver's-side door surface to the top of your passenger's-side door surface. This is where the Inno Feet # INSUT mount onto your roof to hold up the crossbars. For example, for the Inno Square 50" Crossbars # INB127 to be the correct size for the Hullavator to...
view full answer...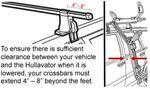
- Lower Gutter Foot Clamp for 2011 Chevy Express VanI can help you find a lower gutter mounted roof option for your vehicle. The # INLD is a 5-1/2 inch tall gutter mount and is a lower option than the # INSD which is 7-1/2 inches in height. The good news is the # INLD is a custom fit for your 2011 Chevrolet Express Van, so if you use the # INLD with the # INB165 rails you will have the lower setup you are looking for.
view full answer... - Recommended Trailer Hitch and Roof Rack for 1999 Ford E150 SuperwagonThe Draw-Tite Ultra Frame Trailer Hitch Receiver # 41906 is a fit for your 1999 Ford E-150 Superwagon. It is a fit for 1995-2003 Superwagon models and will install easily with the included hardware. For the roof rack compatible with a Thule Cargo Basket or Cargo Box, I recommend the Inno Square Crossbars - Steel - Black - 65" Long - Qty 2 # INB165 and Inno Feet for Square Crossbars - Rain Gutters - 7-1/2" Tall - Qty 4 # INSD. To add a ladder, I recommend the Surco Universal Exterior...
view full answer...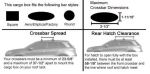
- Reccomended Crossbars for Carrying 2 Kayaks on a 2007 Toyota FJ CruiserThere is a way for you to carry 2 kayaks on your 2007 FJ Cruiser, but using 2 sets of Thule Hullavators # TH898 will not work. One set of Hullavators requires about 31 inches of crossbar space. This means that if you wanted to install 2 sets of Hullavators on your FJ Cruiser you would need a crossbar width of at least 62 inches. The only roof rack that has crossbars that can accommodate 2 Hullavators is the Inno Crossbars #INB165, Feet # INSUT, and the Custom Fit Kit # INK580. Even though...
view full answer... - parts Needed to Mount Surco Safari Basket to the Roof of a 2012 Ford E-150In order to install the Surco Safari basket # SPS5084 you will need a few items for your 2012 Ford E-150. First you will need rain gutter feet # INSD and bars # INB165. And you will need mounting adapters # SPT400. This set up will allow you to mount Surco basket # SPS5084 to the van roof.
view full answer... - Best Type of Crossbar To Use with the Thule Hullavator on a 2017 GMC Yukon XLThe Thule Hullavator Pro Kayak Carrier part # TH898 can indeed be used with both square crossbars via clamp-on attachments as well as aero crossbars via the track system. However, I would not say that one is stronger than the other. Roof rack manufacturers do extensive testing on their track systems and I cannot say I have ever heard of anyone having an issue with the tracks deforming. The main reason I recommend using aero crossbars is because they are much quieter than the square crossbars....
view full answer... - Recommended Awning for 2005 Dodge SprinterFor your 2005 Dodge Sprinter, you can use the Thule HideAway Awning - Direct Mount - Waterproof - 55 sq ft # TH490018 or the 80 sp ft # TH490011. There is not a fit for the rain gutter mount you were referring to. Another option is for roof rack mounting. You can use # TH490010 or # TH490008 with any roof rack crossbars. We do have rain gutter towers for those bars in the Inno roof rack consisting of # INB165 and # INSD.
view full answer... - Recommended Roof-Mounted Bike Rack For 1997 Dodge Van I have a solution for you, however, there are not any front-mounted trailer hitch receivers for your 1997 Dodge Van. Instead, I recommend going with a roof-mounted bike rack if you cannot use a rear hitch due to pulling a trailer etc. For the roof crossbars you can use Inno Square Crossbars # INB165 along with Inno Feet for Rain Gutters # INSD, which clamp onto your van's rain gutters and tighten down with locking knobs built into the covers. You can then mount a bike rack such as Malone...
view full answer... - Roof Rack Compatibility with 2015 Mazda CX-5 and SportRack Kayak CarrierFor your 2015 Mazda CX-5, the Inno roof rack consisting of Inno Square Crossbars - 50" Long # INB127, Feet # INSUT and Fit Kit # INK758 will work well as they are a custom fit with a total load capacity rating of 120 lbs. This will work well with the SportRack Kayak Carrier with Tie-Downs - J-Style - Folding - Roof Mount # SR5513 which is rated for a kayak up to 17 feet long and up to 36 inches wide with a maximum weight of 75 lbs. This combination will work very well for your vehicle...
view full answer... - Inno Fit Kit for a 2013 Honda CR-V with Square BarsIt looks like you have the Inno Square Bar setup on your old Scion. The fit kit you referenced, part # INK225, is not the one that is confirmed to fit your 2013 Honda CR-V. The proper part number for your fit kit is # INK413. These have the parts for the fit kit. Of course, I cannot confirm if this will work for you since I cannot 100% confirm that you have the square bar and the Inno Feet, part # INSUT. If this is the setup you have, then the # INK413 will work.
view full answer...
- Recommended Roof Rack for a 2014 Mazda CX-5 With a Naked RoofYou almost have everything, you're just going to need a fit kit # INK758. This kit will allow you to mount the Inno Feet for Square Crossbars # INSUT to your 2014 Mazda CX-5. The # INSUT crossbars you mention have a dynamic weight capacity of 220 lbs, measures 50" long, 7/8" tall, and is 1 1/4" wide.
view full answer... - Thule Roof-Rack Feet Compatible with 2011 Toyota Tundra Double CabFor your 2011 Toyota Tundra Double Cab you will want the Evo Clamp Feet # TH710501 along with the Fit Kit # TH145182. This combination is compatible with your vehicle and the new SquareBar 60 inch # TH712500 that has the slotted channel for the feet. I also recommend locks # TH450400 for to secure your investment. If you are upgrading, you may want to consider the WingBar # TH711520 for a more aerodynamic bar with a top channel for some accessory compatibility. If you have the old Thule...
view full answer... - Solution For Carrying 3 Bikes On A 2016 Mazda CX-5 With 1-1/4" Hitch ReceiverWhen using a 1-1/4" trailer hitch receiver, you are limited to 2 bikes and cannot carry 3 bikes; this is because class 1 receivers are not designed to hold that much weight. For a 2-bike carrier you could go with the Saris SuperClamp EX Bike Rack 1-1/4" and 2" Hitches # SA4025F. This has a weight capacity of 60lbs per bike. Then if you have a 3rd bike that you need to carry you can add a roof-mounted bike rack such as Swagman Upright Bike Rack # S64720. For this you will need a roof rack...
view full answer... - Roof Rack for 2010 Toyota Corolla Similar to Thule Square Bar RackThule stopped offering the fit kit you mentioned for your 2010 Toyota Corolla which means that while we have other great roof racks that can be installed on your vehicle we do not have any Thule options. For a rack that is very similar to the Thule square bar racks we have the Inno part # INB127, # INSUT, and # INK593 that fits your vehicle. This rack actually has the exact same crossbar dimensions as the Thule square bars but at a much better price.
view full answer... - Is Clamp Kit Needed to Install Inno Square Bar Roof Rack on 2019 Toyota TacomaYou're on the right track, but in addition to the the # INB137 54 inch square crossbars and the # INSUT roof rack feet, you will indeed need the # INK729 vehicle-specific clamp kit.
view full answer... - Parts Needed to Install a Trailer Hitch and Bike Rack for a 2009 Dodge CaliberAs long as your 2009 Dodge Caliber is not the SRT-4 model, then you will not need to purchase any parts other than a trailer hitch and a bike rack from us. The information you received from Dodge may be required to install the trailer hitch they offer, but it is not required for our trailer hitches. For your 2009 Caliber, I recommend installing the Draw-Tite Class I Trailer Hitch, # 24769. This is basically the same as the Hidden Hitch Trailer Hitch, # 60832 (no longer available), because...
view full answer... - Best Economically Priced Roof Rack that Fits 2014 Nissan JukeThe Sportrack semi custom roof racks like the SR1010 that you have for your 2014 Nissan Juke unfortunately don't have a great reputation for fitting well which is why I try to avoid recommending them for people. We've found that they tried to make them too universal which means they don't really fit anything that well and it's hard to say which vehicles happen to fit better than others. If you wanted a custom fit rack for your vehicle that is still lower in price the best option is the...
view full answer... - Recommended Inexpensive Roof Rack for a 2017 Toyota PriusThe most cost effective roof rack system we offer for a 2017 Toyota Prius is the Inno Square Crossbar Roof Rack composed of part # INB127, part # INSUT, and part # INK486. This system is a custom fit and uses clips which attach to the door jambs. It comes with locks for security and square crossbars which are compatible with a wide variety of roof mounted accessories. It can also be transferred to a new vehicle down the road with just new clips.
view full answer... - Roof Rack Recommendation for 2016 Ford Fiesta SedanThe best value roof rack we have for your 2016 Ford Fiesta that has a naked roof is the Inno rack part numbers # INB127, # INSUT, and # INK872. This will fit MUCH better than the Sportrack you tried as it is a custom fit rack and what you tried is only semi-custom and is a design that would most likely at least partially transfer to a similar future vehicle. Then for a 2 kayak carrier the Thule Compass part # TH890000 fits this rack and would be an easy way to carry your kayaks. It's padded...
view full answer...
- Mixing The Old With The New On My 2010 Toyota Prius With Thule And Inno Roof Rack PartsI can definitely find a solution that will work for your 2010 Toyota Prius. Unfortunately, it will not be a Thule roof rack. The Thule foot pack and fit kit for your Volkswagen Jetta are not compatible with the new Thule products. Our best solution would be using the Thule square crossbars with an Inno roof rack. The Inno roof rack you need will consist of the following: Inno Feet for Square Crossbars - Naked Roofs - Black - Qty 4, part # INSUT and Custom Fit Kit for Inno XS200, XS250,...
view full answer...
- Recommended Roof Rack And Kayak Carrier For 2012 Chrysler 200For the 2012 Chrysler 200 with a bare roof, I would install the Inno Roof Rack which uses part numbers # INB127, # INSUT, and # INK600. This is the most affordable roof rack for this vehicle and would work well with a kayak carrier such as etrailer J-Style Kayak Carrier # e98878. This J-style kayak carrier offers a simple tool-free installation and comes with all the straps necessary for securing your kayak. I attached a couple demonstration videos for you to check out.
view full answer... - Parts Needed to Use Older Style Thule Square Bars on 2011 Toyota PriusThat is confusing and I apologize but the Evo Clamp fit kits like the # TH145001 can not be used with the Traverse feet. I do have a somewhat helpful solution though I think. The older Thule square bars are the same dimensions as the current Inno square bars so you could reuse your current bars with the feet # INSUT and fit kit part # INK865.
view full answer... - Can Inno Square Bar Roof Rack for 2015 Honda Fit be Ordered without BarsYes, if you wanted to order the Inno roof rack that fits your 2015 Honda Fit without the bars you would just need the part # INSUT and # INK876. No need for the bars # INB127. Since Thule and Inno bars are same dimensions this would work.
view full answer... - Roof Rack and Canoe Carrier Recommendation for 2001 Toyota CorollaYour best roof rack option for your 2001 Toyota Corolla is the Inno roof rack # INB117, # INSUT, and # INK134 which is a higher quality roof rack at a lower price point. Then for a canoe carrier the Yakima KeelOver part # Y04069 would be a really great solution to carry the canoe upside down.
view full answer... - What Locks Fit the Malone FoldAway 5 and the Malone J-Pro2 Kayak Carrier on a 2016 Mazda CX-5?From your recent searches, it looks like you are looking at the Malone FoldAway 5 # MAL38FR and the J-Pro2 # MPG117MD kayak carriers. For these carries, while Malone does not make locks for these carriers, the best way to lock these to your roof rack is by using the etrailer Cable Lock # e98891. With the cable lock, you can thread it through both cradles and wrap them around your crossbars on the roof. If you plan on transporting 2 kayaks, I recommend going with the FoldAway 5 over the...
view full answer... - Recommended Roof Rack for a 2004 VW BeetleThe only available roof rack for a 2004 Volkswagen New Beetle (Hard Top Only) is the Inno Square Crossbar System part # INB127, part # INSUT, part # INJK, and part # INK775. This is a great system which will accept nearly all roof rack mounted accessories. It installs via clips which attach to the door jamb and it comes with locks for security.
view full answer... - Recommended Square Bar Roof Rack Setup For 2010 Honda Accord SedanI have a solution for you, but Thule does not have any roof rack kits available for your vehicle. While I'm sure this is not the news you would like to hear, I will go ahead and give you my recommendation for a new setup. If you would like to stick with a similar square-bar setup, then I'd go with Inno Square Crossbars - Steel - Black - 50" Long # INB127. You will also need Feet # INSUT and Fit Kit # INK745. Locks and keys are included for the crossbar feet, which will keep it secured to...
view full answer... - Roof Rack Recommendation for 2017 Acura MDX with a Naked RoofWe do have a roof rack that fits the naked roof on your 2017 Acura MDX, but the SportRack Semi-Custom Roof Rack # SR1008 will not fit. For your application I recommend the Inno Square Bar roof rack system which consists of the following: 58" Long Square Crossbars - # INB147 Inno Feet - # INSUT Custom Fit Kit - # INK656 This will actually fit much better than the SportRack roof rack system and we have an install video of the Inno on a 2016 Acura MDX that you can check out.
view full answer... - Roof Rack and Cargo Box Recommendation for 2000 Pontiac Grand AmTo mount the SportRack Skyline XL roof cargo box SR7095 on the roof of your 2000 Pontiac Grand Am would require a roof rack installed with crossbars that are spaced 21-1/2 inches apart. Since the roof racks for your vehicle like the Inno Rack part # INB117, # INSUT, # INJK, and # INK153 have a wider bar spacing of 28 inches this would not be the box to go with. So instead for a similar sized box that would fit you'd want the SportRack box part # SR7016 which would work really well. It's...
view full answer... - Recommended Roof Rack and Kayak Carrying Option for 2020 Mazda CX-5Inno offers a couple different options that would work well with your CX-5. Inno might not have the brand-name recognition of Thule or Yakima, but they make an excellent product that's usually less expensive than products from the more well-known companies. For a rack that uses more aerodynamic oval profiled crossbars, you can assemble a roof rack out of the following parts: Black Aero-style crossbars, part # INXB138-145 Roof Rack Feet, part # INXS250 Vehicle Specific Clamp Kit, part...
view full answer... - Roof Rack that Fits 2014 Mazda 3 and 2014 Subaru LegacyThe best option we have would be a roof rack that is mostly the same that fits your 2008 Mazda 3 and 2014 Subaru Legacy but with different fit kits since the roofs are different. So what you'd want is the Inno Square Roof Rack part # INB137, # INSUT, and # INK851 for the 2014 Subaru Legacy and then use just the different fit kit # INK794 to fit the bars and feet to your Mazda 3.
view full answer... - Cost Effective Roof Rack Recommendation for 2011 Honda AccordWhat we've found with the Sportrack Semi-Custom roof racks like the part # SR1002 is that they don't always fit the best. Reason being they are designed to fit as many vehicles as possible which means they don't fit everything perfectly. The price makes these hard to not be tempted by, but your best option is a fully custom fit roof rack like the Inno part # INB127, # INSUT, and # INK745 otherwise you'll have to get somewhat creative to get the Sportrack to fit right.
view full answer... - Feet and Fit Kit Compatible with Old Thule Load Bars on 2015 Ford F-150We no longer carry the Thule parts you are seeking, however, the Inno Feet for Square Crossbars - Naked Roofs - Black - Qty 4 # INSUT and Custom Fit Kit # INK139 will work well with your old Thule square load bars. This will give your the system you were seeking. I've attached a video of this system to assist.
view full answer... - How to Fit Older Thule Square Crossbars on a 2017 Ford F-150I have an alternative solution for you to use your older Thule square crossbars on your 2017 Ford F-150, but there unfortunately aren't any fit kits that will work with the Thule 480 you need for your square bars. The fit kit 1689 is discontinued and was for a Lexus GS-Series vehicle as well so even if you were able to find it as a resale shop it wouldn't fit your F-150. Instead I recommend picking up the Inno Feet # INSUT and Fit Kit # INK139. This sounds a little weird but we've found...
view full answer...
Do you have a question about this Roof Rack?
Info for this part was:

Edited by:
Daron K

Updated by:
Alex H

Written by:
Ashley K
At etrailer.com we provide the best information available about the products we sell. We take the quality of our information seriously so that you can get the right part the first time. Let us know if anything is missing or if you have any questions.
Product Experts Available Now!
Call 1-800-940-8924
Thank you! Your comment has been submitted successfully. You should be able to view your question/comment here within a few days.
Error submitting comment. Please try again momentarily.