$205.28 - $235.58

$195.08 - $195.08

$397.30 - $397.30

$435.22 - $475.23

$350.92 - $491.13

$201.39 - $201.39

$513.58 - $513.58

$242.03 - $242.03

$280.21 - $280.21

$478.72 - $478.72

$488.43 - $634.63

$615.82 - $1,018.09

$268.59 - $935.74

$674.27 - $1,021.54

$618.04 - $837.21

$1,092.17 - $1,092.17

$824.70 - $824.70

$661.99 - $1,162.44

$750.18 - $750.18

$770.39 - $960.59
Filter Results
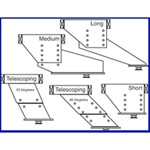
15-3/4 Inch Long
$205.28 - $235.58
19-1/4 Inch Long
$195.08 - $195.08
20 Inch Long
$397.30 - $397.30
21-3/4 Inch Long
$435.22 - $475.23
22 Inch Long
$350.92 - $491.13
22-3/4 Inch Long
$201.39 - $201.39
22-9/16 Inch Long
$513.58 - $513.58
25 Inch Long
$242.03 - $242.03
25-3/4 Inch Long
$280.21 - $280.21
26-1/2 Inch Long
$478.72 - $478.72
36 Inch Long
$488.43 - $634.63
42 Inch Long
$615.82 - $1,018.09
48 Inch Long
$268.59 - $935.74
54 Inch Long
$674.27 - $1,021.54
60 Inch Long
$618.04 - $837.21
70 Inch Long
$1,092.17 - $1,092.17
70-1/4 Inch Long
$824.70 - $824.70
72 Inch Long
$661.99 - $1,162.44
80 Inch Long
$750.18 - $750.18
90 Inch Long
$770.39 - $960.59
 RV Cargo Slides Parts or Accessories
 Filters