
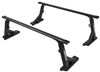
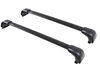
Yakima BaseLine FX Roof Rack for Naked Roofs - JetStream Crossbars - Aluminum - Black - Qty 2


To see if this custom-fit item will work for you please tell us what vehicle you'll use it with.
This aerodynamic, flush-mount roof rack lets you carry gear and cargo on your vehicle while maintaining a clean, factory look. Crossbars work with channel-mount and clamp-on accessories. Installs on your vehicle's naked roof.
Features:
Specs:
 Alternate Instructions
California residents: click here
Videos are provided as a guide only. Refer to manufacturer installation instructions and specs for complete information.
Hello, neighbor. This is Curt with etrailer, and today we're gonna take a look at the Yakima BaseLine FX roof rack on our 2025 Ford Maverick. Now if you've had any experience with the BaseLine FX roof rack, or if you watch this video and you have some questions, go ahead and leave those in the comments below. We'd love to take your experiences and those questions, and share them with our other neighbors in order to help them make the best decision. When you're planning your next adventure in your Maverick, you may find yourself in a situation where you've got some cargo and some items that either won't fit in the truck itself or in the truck bed, or they're just items that you don't want to travel in there with you. A roof rack system like the BaseLine FX would be an excellent choice.
It is a flush roof rack, which means the bars will not overhang. It gives it a much cleaner look. Plus you don't have to really worry about, you know, head clearance getting in and out of the vehicle. The bars have a 165 pound weight capacity. That is something you always want to double check in your owner's manual and make sure that your roof can hold that much.
If not, you're gonna have to go with that lower number. And they're an arrow design bar, which is really gonna help with noise reduction and drag when you're out there driving around. We've got our crossbar spread. That's the distance between both bars set at 32 inches, and that's very specific as that was what was told to us in the instructions as far as the placement. On the Maverick, the BaseLine FX is going to give us about 39 and 1/2 inches of usable bar space up here.
Now that'll be for any of your clamp mount or T-track accessories. There is a weather strip up here that you can depress in the middle of your bar and slide your T-track accessories over before locking them in place. I really like that about this set because most sets you have to take off the end cap in order to access that T-track. With this, you don't have to do that at all. We've got about a 2 and 1/4 inch clearance from the bottom of the bar to the top of the roof, so that is important to know how much you have under there, especially for those clamp-mounted accessories.
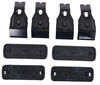
There is one obstacle on the roof that you want to be very conscious of, and that is this antenna back here. It does kind of underlap this crossbar by about a half an inch, and certain accessories are probably gonna extend beyond this bar into this area where the antenna is. So just bear in mind when you're looking at rooftop accessories, this might be an obstacle to consider. Now, it'll come with a plastic core like this that you can open using a flathead. However, for the security of your roof rack and the items on it, Yakima does offer SKS or what they call their same key system. The same key system is going to allow you to purchase metal lock cores with keys to match and get those key alike on all four towers. Plus, if you have any Yakima accessories that you want to have the same key for, you can get the same key for that. Or if you have existing Yakima accessories, you can order key cores and keys that'll match that. That'll just keep everything a lot more organized for you. But now that we've taken a look at all the different features and benefits of the Yakima BaseLine FX, let's go ahead and take a look at how we got these installed. The first thing we want to do is take one of our crossbars and we're gonna set them upside down as such. Next thing we're gonna do is come over here and remove our end caps. Set that off to the side there. We're gonna have this plastic lock core that we're gonna open up as well, and we're gonna just use a simple flathead to do that. There we go. And we're gonna pop that open as well and kind of expose some of the pieces in there. The foot pad that comes with this tower set is going to be different than what came in the fit kit. The one in the fit kit won't actually fit these towers, but what we'll need to do is take the pad from this and put it on here. So we're just gonna simply pop this off of here for now, just like that, and get our pads switched out. And the pad's just gonna come off really, really easy. And we're gonna put it right back in place on the original foot. So we've got our pad firmly in place on there. The next thing we're gonna do is take our door clip. We're gonna make sure that the clip and the rubber is facing inward, and we're gonna slide it into this slot right here as such. Once it's in there, there's a little square piece that's going to catch in the gap of it. We're gonna go ahead and let that set right there. And at this point, we can replace our pad. Now, the pad is gonna have this cutout going around the clip. You could also use this arrow. It should be pointing outward, just in case you need to remember which way this goes. So with the arrow pointing outward and the gap being open right there for the clip, we're gonna go ahead and press this right back into place. And once we do that, we're also gonna bring this gray plastic piece, snap that back into place. We're gonna go ahead and lock that down again. We're ready to go ahead and put it up on our roof, but before we do, there's a couple of adjustments and things in the instructions that we should probably go over. You may have noticed in your instruction book that there's a table with different measurements, M1, M2, M3, M4, without any really good explanation of what those are. And you can find those explanations on Yakima's website, but for now, I'll just kind of fill you in. So you may notice that our front bar is already installed, and the reason we went ahead and installed that before our second bar is that it needs to be installed in order to tell us where the second bar needs to go. So your M1 measurement for the front bar is going to be the measurement of how far apart your towers need to be. There's a little mark that indicates where those measurements should be taken from. On the front bar, it was 43 inches, so we went ahead and moved it out to that and locked it down. And the way you lock them in place is through this notch right here with the provided Yakima tool. Once you get it to the length that you need, you'll tighten it down through here. And it is a torquing tool, so you'll hear a nice pop like that when you know that you've got it tightened down. So on the front bar, that's your M1 measurement. The M2 measurement is the measurement of how far back up here it needs to go. So the measurement was six inches. That would be from the very top of the roof line right here to the front of the tower being six inches. And you do want to do that measurement on both sides and make sure it's equal. That way we know that our bar is perpendicular to the vehicle. The M3 measurement is for the second bar, which would be from the same two marks, and that is gonna be at 42 and 3/4. So a little bit less than the front bar, but that's because the roof tapers a little bit as we go back. The M4 measurement calls for 32 inches. So from the center of this tower to the center of the next tower should be 32 inches. So we're gonna go ahead and measure that out and give us a good idea of where to place this bar. Now we've got our second bar placed, we've got the center of it 32 inches from the center of the front bar. We double check that measurement again on both sides just to make sure everything is parallel. And now, we're gonna go ahead and do some things to get it tightened down. There are two points to do this. The first place that you want to go to is this point right here. This is gonna control kind of the pitch of our feet, and what we're gonna do is tighten that down until it gets just to about hand tight, which is about where I'm at now. We're not gonna completely torque it down quite yet. We're gonna go ahead and tighten that down a little bit on the other side as well before we make our second tightening, which would be through right here. You can go ahead and get 'em done with the torquing. First I'm gonna do is torque this up here, and then I'll go ahead and do the same right here. (screw pops) Once that's done, we can replace these gray caps and we'll get our flathead and go ahead and lock that back in place. Last step in our installation process is to replace our end caps. Go ahead and pop those on. (end cap pops) Now we're ready to load up and hit the road. These crossbars are an excellent choice, I think, for the Maverick. The Maverick isn't a very tall vehicle, so not having the overhang really gives it a factory look. The color of it works really well with all of the matte-finished trim that we have on the Maverick. And overall, I think it's an excellent choice for anybody with this vehicle. So once again, this is the Yakima roof rack on our 2025 Ford Maverick. I'm Curt with etrailer. Thanks for stopping by.

Do you have a question about this Roof Rack?
Info for this part was:
At etrailer we provide the best information available about the products we sell. We take the quality of our information seriously so that you can get the right part the first time. Let us know if anything is missing or if you have any questions.


Thank you! Your comment has been submitted successfully. You should be able to view your question/comment here within a few days.
Error submitting comment. Please try again momentarily.