
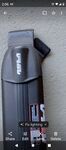
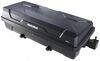
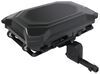
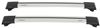
Inno Aero Flush Roof Rack for Raised Rails - Aluminum - Black - Qty 2


To see if this custom-fit item will work for you please tell us what vehicle you'll use it with.
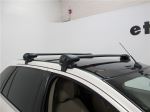
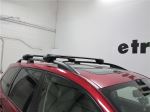
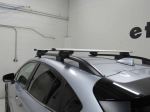
This aerodynamic roof rack mounts flush on your roof for a factory look. Crossbars with push-down rubber strips in top channels work with channel-mount and clamp-on accessories. Installs to raised rails on your vehicle's roof.
Features:
Specs:

Videos are provided as a guide only. Refer to manufacturer installation instructions and specs for complete information.
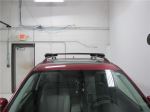
Hi, I'm Daniel with etrailer, and today we're gonna take a look at and I'm gonna show you how to install the INNO Aero Flush Roof Rack on our 2023 Chevrolet Traverse. The Chevy Traverse is a great vehicle to take the entire family camping or on long trips, but when you have it fully packed with people, there's not a lot of room for your things. So adding a roof rack is gonna be a great idea because you can utilize the space on top of your vehicle and have cargo boxes up here. Or if you're going on a ski trip, maybe have some skis or even kayak carriers. The biggest thing that makes this INNO Rack stand out is it's a flush design, so you're not gonna have anything overhanging and it has locking cores for the caps here. So that's a really premium design that a lot of other brands, you'll have to buy separately.
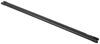
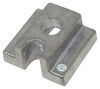
The two main components that come in your kit are gonna be the crossbar and your tower. Now, starting at the tower here, you can remove this cover, and it will reveal how you tighten it. It has a built-in lever, so you can tighten it with ease. And it has a nice strap that goes around your existing raised rail. Now, the crossbar does have weather stripping on top, and you can push that down and slide your T-slot in here for when you put your accessories on.
Like I said before, this strap will tighten down and make your crossbar nice and secure on your roof, but this may not be as seamless as some of the other ones we have in the market that clamp directly on to your raised rail. You will see there is some space in the back here. Now, I'll go ahead and get you a couple of clearance measurements. So from the top of your roof to the bottom of your crossbar is about 2 3/4, so you shouldn't have any problems with any clamp-on accessories. Now, the next measurement, it's gonna be from the top of the roof to the top of our crossbar.
This is gonna be 3 3/4. So that's a good measurement to know if you know the height of your accessory, like a cargo box, you can add that measurement, and that'll give you the peace of mind when you're pulling in and out of a garage. This rack can support up to 165 pounds, but do check your owner's manual and check your roof's load capacity and go by the lesser of those two numbers. If you decide to get this roof rack system for your Traverse, then please let us know and review our comment how it's serving you on your adventure. Now, getting onto the install, this is super easy.
And if you're ready to get it installed, then follow along and I'll show you how to do it. We've went ahead and installed the front crossbar already on our Traverse. Now, I'll go ahead and show you how to install the rear. So there is a front and back to these. So there's gonna be a thinner side and a thicker side. That thicker side is gonna be facing towards the front of the vehicle. And on your towers here, there's gonna be an R and L for right and left. So I got the right tower here. That's gonna be on the passenger side. It's also gonna be a slider that you're gonna wanna push all the way back, push down on that square button, push all the way back till it stops. You're gonna want the handle facing out. You're gonna want this bracket to go into this opening. We'll go ahead and get this in. (bracket clicking and clattering) Slide this all the way forward. We can now put our assembly on our raised rails. Make sure the rubber strap goes underneath. And now, we'll get these in place. We will measure the back one to make it square with the front one. And how we got this front one attached is we went ahead and measured from a common point on the vehicle here to the edge of the tower, and went ahead and made sure those two measurements were the same on either side. Now, we know this one's square and it can measure off of it. Now, you're gonna usually wanna measure your accessories so you space these accordingly. So I'll go ahead and measure this from T-slot to T-slot (measuring tape rattling) and make this equal on both sides as well. Next, you wanna center your crossbar by simply just putting the cap on either side and making sure that they both go on with no issue. Once you've done that, you can put the strap into the cradle and get this tightened down. Now, we'll recommend tightening this down a little bit and then go to the other side and tighten it down until you can tighten them down both evenly. Once you've got this good and tight, you can go ahead and slide your accessory in, put your cap on, lock it in place, and you're ready to hit the road. And that was a look at the INNO Aero Flush Roof Rack System on our 2023 Chevrolet Traverse.
Ratings & Reviews


Info for this part was:
At etrailer we provide the best information available about the products we sell. We take the quality of our information seriously so that you can get the right part the first time.


Thank you! Your comment has been submitted successfully. You should be able to view your question/comment here within a few days.
Error submitting comment. Please try again momentarily.