
To see if this custom-fit item will work for you please tell us what vehicle you'll use it with.
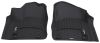
These premium mud flaps are easy to install and digitally designed for a perfect fit. Protect your vehicle and your trailer from road debris. Flaps are constructed of durable thermoplastic resin with stainless steel fasteners.
Features:
Precision fit, durable components and ease of installation make WeatherTech NoDrills your first choice in mud flaps. Installing mud flaps has never been this painless. Patent-pending QuickTurn stainless steel fasteners makes installation quick and easy - no drilling required.

Videos are provided as a guide only. Refer to manufacturer installation instructions and specs for complete information.
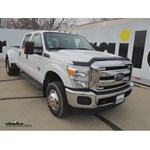
Today on our 2013 Ford F350 Super Duty Crew Cab, we'll be showing and installing the WeatherTech Front and Rear Mud Flaps, part number WT110020-120030. We've gone ahead and installed them on our passenger side. You can see how they match into the contours of the bodywork. This will be a no-drill install and either use existing hardware or provide the hardware as needed to install. They're more semi-rigid closer to the vehicle with more flexibility towards the bottom. From the bottom edge of the bodywork to the bottom edge of the mud flap, will be about 8" for the front and about 9-3/4" for the rear mud flap. Now let's show you how they install.
We'll start with the front. We'll go ahead and remove the factory fastener located here and here. To remove these screws, we use a 5.5mm socket. We'll go ahead and take our mud flap and put it up in position to make sure it fits around the bodywork. We'll reinstall our fasteners. We'll go ahead and run down our hardware just to take up some of the slack.
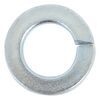
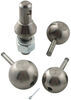
We'll still leave it loose so we can move around to install the last bit of hardware. Our hardware will be this stainless steel bolt with Phillips head, a stainless fender washer, a lock nut. Let's go ahead and run this through the bottom of our mud flap. Move around to run it through the existing hole in the bodywork and reaching from the top and going down. It's a little bit of an odd angle. We can install our flange nut. Now looking from underneath the truck, it might be a little easier to see what's going on.
Our screw is right here. The threads of our screw are right here. We'll run down and get started and we'll use a number two Phillips screw on the outside to tighten it down. With all our hardware loosely installed, we'll go ahead and tighten them down. I like to start with the ones on the outside first and then do the bottom one. When we tighten these down, we don't have to crush them, just where they tighten up and stop on their own.
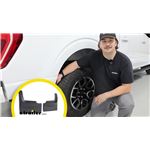
Go ahead and give it the old shake test and firmly installed. It only took a few minutes to really install these. With the front mud flaps completed, we'll go ahead move on to the rear set. Forward passenger side, looking underneath the truck, facing out, we can see the fasteners that we have to remove. There are one, two, three, four plastic rivets that we have to remove and one small screw. On the plastic rivets, there's typically a small edge where you can take a flat screwdriver and work it inside of the center of the rivet. Once you have it loosened up, you can pull up the center more and then the whole rivet. If you have a trim panel tool, this actually works really good to pull the rivets out as well. Now to remove that screw, we used a 5.5mm socket. Next we need to go ahead and install our hardware for these holes right here. You see this piece of hardware right here They get replacements to cover up the holes that we're used by our plastic rivets. With the flat side facing out, it's nice and centered. Let's go ahead and install the rest of them. We'll go ahead and put this liner, let it fall back in place. We'll stack our new mud flap on top of it and install new hardware. Our hardware will be a new stainless steel screw and a flat fender washer. We'll just get it all started and then we'll tighten them down for good. Now with all the hardware loosely installed, we'll go ahead and tighten it down. We'll need a different size socket. We're going to use a simple 1/4" socket. We'll tighten these down. We don't have to crush them, just run them down so they naturally want to stop. Now that will finish it for, part number WT110020-120030, the Weather-Tech mud flaps on our 2013 Ford F350 Super Duty Crew Cab. .

Great
Info for this part was:
At etrailer we provide the best information available about the products we sell. We take the quality of our information seriously so that you can get the right part the first time. Let us know if anything is missing or if you have any questions.


Thank you! Your comment has been submitted successfully. You should be able to view your question/comment here within a few days.
Error submitting comment. Please try again momentarily.