
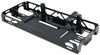
Trailer Mate Trailer Hitch Receiver - Custom Fit - Class III - 2"


To see if this custom-fit item will work for you please tell us what vehicle you'll use it with.
Thank you! Your comment has been submitted successfully. You should be able to view your question/comment here within a few days.
Error submitting comment. Please try again momentarily.


Your vehicle might just need a hitch that fits, works, and holds up. This one's built for everyday use, but not oversized jobs. It's perfect for adding a bike rack or cargo carrier for weekend trips, or towing a utility trailer to the store.
You don't need a heavy-duty truck to get out there with your gear. With 5,000 lbs of towing capacity and 500 lbs of tongue weight, this hitch is built for everyday use. It's right at home carrying a cargo tray for a weekend trip, taking bikes out to the trailhead, or even hauling a small trailer to the hardware store. The 2" receiver is what most racks, trays, and ball mounts are designed for, so chances are the gear you already have (or the gear you want) will slide right in. You shouldn't have to hunt for an adapter to make your accessory work. And it's Class III, which means it's strong enough for regular use, not just occasional hauling.
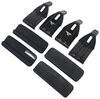
This hitch bolts directly to the frame using included hardware and the tools most folks already have in the garage. There's no need to drill into the vehicle or weld anything in place, and you won't be cutting up the bumper just to make it fit. It's designed for a simple install whether you're putting it on yourself or having a shop handle it. If you'd rather not DIY, we can help you find a local installer using our dealer locator.
This hitch meets SAE J684 standards, so it's been tested to handle its rated capacity under real towing conditions. You may not spend time thinking about certifications, but they matter when you're pulling weight. This one covers strength, performance, and structural integrity, so you're working with something that's actually been proven, not just claimed.
California residents: click here
Customer Satisfaction Score:
97% were satisfied with this product
3% of customers were not satisfied
Ratings & Reviews

Delivery of the Trailer Hitch Receiver was just a few days. It was packaged well and the video instructions were easy to find for my exact make and model. This was installed on a 2021 Toyota Highlander XLE. Install took about 45 minutes working at a slow pace with two people. Once complete the receiver looks great. You can barely see it as most of it's tucked away underneath the vehicle. I'm extremely satisfied with the quality and finish of the product. I thought this was going to be a nightmare getting it to fit and look right. Very Satisfied with the purchase and easy of installation.
I would have given it 5 stars if it wasn't for the fact that it got bent during shipping and I had to pry it open. Once I figure out how to do that (with the help of the etrailer employee), the hitch receiver went right in place.
Their customer services lady (Siobhan M.) is amazing (5 stars for her), she was quick to respond, respectful, helpful, and knowledgeable.

Kate F.
11/26/2025
Yes, it is annoying when the hitch is flexed, but I am happy to hear that Siobhan was able to get you all squared away. etrailer is thankful to have you as a loyal neighbor (customer)! I hope you have a wonderful Thanksgiving =)
Probably the easiest hitch I have ever installed. Looks great and tucks up under nicely. No cutting into the bumper which was important to me. Did it by myself on the floor without having to jack up the car. I did unhook the muffler but only because my torque wrench was too large to fit above the muffler and I do not have a long enough extension to extend below the muffler. My Highlander is a Hybrid and it fit fine- the e-trailer web site never mentions hybrids but it fit.
The hitch install went easy as advertised with an extra pair of hands. My daughter and I had it installed in about 40 mins.
Trimming the under body dust cover panels removed took the most time of the install.
My main use for the hitch is to carry a bike rack. This hitch was the most cost effective product from eTrailer.
good product,but should also include light kit and mounting bracket fot flat plug
Perfect fitment. And the installation video was spot on, it went over everything.
Product and shipping time are great. The only problem I had was having to lever the mounts about a half inch to get bolts holes to line up ( Possible shipping damage)?
Got it last night 3/13, as promised. Installed it this morning and it works like a charm!
The hitch was quality. Arrived on time. Had it installed professionally in about 1.5 hours. Done!
My only gripe with the product was that the install was a bit more challenging that I had hoped. Doing it solo is challenging but the main hold up was that the hitch seemed to not line up perfectly with the car frame holes. Once I got one bolt in place, I had to use C-clamps to move the hitch to have the same hole centers so that I could install the rest of the bolts. Again, a very hard thing to do without help or proper tools. If there is any way to keep the bolt slots the same as they are not on one side of the hitch and then change the opposite side to a 90 degree bolt slot, that would fix this issue. Thanks.
Easy to install!
Easy to install, fit very well.
Great product, simple install!
Great and prompt service. Thank you.
Awesome fitment, great customer service !
Good product and fast delivery
It came promptly and was easy to instal l.
Easy to install
Do you have a question about this Trailer Hitch?
Info for this part was:
At etrailer we provide the best information available about the products we sell. We take the quality of our information seriously so that you can get the right part the first time. Let us know if anything is missing or if you have any questions.


Nick S.
12/1/2025
That is great to hear! I am glad we had a video ready to help you with the installation and make it smooth. I love the factory finish look on these. What are you planning on using the hitch for?