
To see if this custom-fit item will work for you please tell us what vehicle you'll use it with.
Thank you! Your comment has been submitted successfully. You should be able to view your question/comment here within a few days.
Error submitting comment. Please try again momentarily.


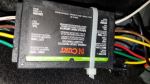
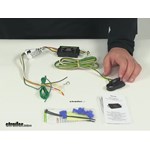
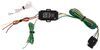
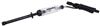
Built to last, this tail light converter with a 76" 4-way flat harness is made using surface-mount technology. Designed for Volvo 240 Seriess that have amber turn signals and incandescent bulbs. Includes wire taps and color-coded wires.
Features:
Specs:
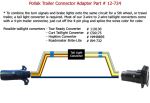
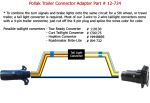
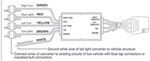
Some vehicles operate on a 3-wire system, wherein the brake signal and the turn signals run on separate wires to illuminate different lights. (Typically, these vehicles have amber turn signals.) But most trailers run on a 2-wire system, which means the brake and turn signals travel along a single wire. You'll notice that, on your trailer, the brake light will flash for the turn signals.
If your vehicle operates on a 3-wire system, it will need to be converted so it will be compatible with the wiring system of your trailer. This is where a tail light converter comes into play. This converter lets you combine the brake and turn signal functions of your vehicle so they run on a single wire to properly activate your trailer's tail lights.
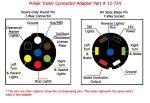
| Wire Color | Wire Function |
|---|---|
| Green | Right turn |
| Brown | Tail lights and parking lights |
| Red | Brakes |
| White | Ground |
| Yellow | Left turn |
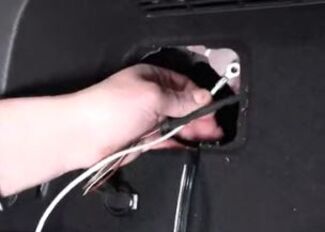
To begin the installation, use a circuit tester (sold separately) to double-check the function of each wire on your vehicle's tail light wiring harness. The color/function of the splice-in wires on this converter may not match the color/function of those on your vehicle, so you'll want to be sure to check all of the wire functions first. Once you've figured out the functions of your vehicle's wiring, use the included quick-splice connectors to connect the corresponding wires on the trailer connector. Quick-splices, or "wire taps," offer a quick way to make connections without you having to strip and twist wires. Just place the wires in one of the taps and snap the cover down.
Use double-sided tape to stick the converter box to a flat surface inside your vehicle near the tail lights. It's helpful to clean the surface first so the tape can adhere fully.
Find a raw, unpainted metal surface to use as a grounding point and secure the white ground wire with the included self-tapping screw. Cleaning the surface prior to securing the white wire will ensure the converter is fully grounded. Finally, secure the converter wires to your vehicle using cable ties (sold separately).
Quick Tips:
Curt builds each tail light converter using surface-mount technology (SMT). This construction method involves soldering electronic components directly to the surface of a printed circuit board. SMT eliminates the need for leads, which are used in older through-hole technology. The result is a smaller circuit board that provides more routing area and that offers superior performance, reliability, and durability.
Circuit boards constructed using SMT perform better under rough conditions with excessive vibration than those made using the through-hole method. And where would vibration be more likely to occur than in towing applications? Curt converters also produce less heat, increasing durability and lifespan. In addition, lower resistance levels ensure better performance, especially for parts that operate at higher frequencies.
Each Curt circuit board is made using high-quality components pieced together in the most technologically savvy fashion, leading to greater predictability and reliability in functioning.

California residents: click here

Installed on a 2012 Hyundai Accent SE 5DR/HB - with relative ease for a first-timer.
Tips for my make and model would have been nice but none really existed that I could find. Details were generic.... so.... here goes, from memory (so I hope it's close enough for non-government work LOL)...
1) Open the HB and remove the center plastic inner body panel that is about 18" long and has the latch protruding through it. This requires removing 2 screws and popping it loose.
2) Remove everything from the trunk so that you'll have easy access to the grommet on the rear body wall - which is below and towards the driver's side of the rear latch.
3) Pop loose the driver and passenger side rear corner panels and use a 6"-8" tool or something to prop them open so that you can easily access the wire. There is no need to completely remove them as that would require going around to each door. You will likely want to push the rear seats forward so that the panels more freely swing open. The plastic body wall piece that fit over the rear seat latches might pop loose - don't panic, you can re-seat them later when you're all done.
4) With parking lights on, I simply unplugged the obvious wire set going into the rear light section on each side. I went through and tested, with a power tester light, to identify all of the wires that I would need to match to the Curt harness. NOTE: the colors of the Curt harness will NOT match the colors of the Hyundai wire harness, so test the power connector and write the color of that wire on your Curt instruction sheet next to the Curt wire that it must match.
5) Place the Hyundai wire on the completely open side of the Curt connectors. The Curt wire will go in the other side, which is blocked on one end. Use a set of pliers to squeeze the metal connector down ALL the way and it will cut through the outer wire wrapping and connect to the wire. Do this for all four connecting wires.
6) If you have a lack of power at the Curt wiring harness plug that will connect with your trailer lights or Bully LED Step Hitch, then go back and make sure that the metal has been locked ALL the way down to make a solid connection. You will know which connector to check by which plug terminal is not hot. Simply follow that color back to the "splice" junction.
7) If the power is good to the plug at the end of the harness, then snap the covers shut on all the Curt connectors at the "splice" junctions. Locate a nice flat place on the rear driver's side body wall and use the double-sided adhesive tape provided to lock in the "black box" (converter box).
8) Find the grommet that is below the latch and towards the driver's side of the car. The wires going through it are those that power the lights above the license plate. GENTLY remove the grommet. It easily comes out BUT the wiring goes through a small, tight rubber sleeve that is part of the grommet. That's the reason that you cannot push the connector through the grommet itself and why there is no need cut the grommet. Simply push the connector and some wire through the pre-existing hole in the body, and then replace the grommet. I chose to rotate the Curt wires to the top of the grommet to further decrease any likelihood of random water entering the trunk.
9) Place the connector cover on the connector. I left my connector with just enough play in the wires that it would dangle just below the body, so that I could grasp it to connect my Bully LED Hitch Step, and when using my Curt Basket Carrier, it actually tucks up on that same body panel and stays in place without falling down.
10) Use some small wire ties to tie off any excess wire and some electrical tape to lock the green wire in place so that it's not dangling loose to get caught in the center panel when you replace it.
11) Replace everything in order, and carefully... no need to break any plastic tabs such as on the door latch pieces. Take note of how they slide and then pop into place. If you have struggled to get them to snap in place, then carefully examine the tabs and flex them back into correct place if need be, or you'll break them off in the process of never getting the piece(s) to lock in place. The key is easing everything into place. The rear body panels have a couple of screws to replace and then you can ease the rear center piece in place... and then hand slap it to make sure it snaps in and holds.
At that point, even though I'd checked everything prior to closing it up, I re-checked my Curt connector plug to verify the three hots were indeed hot. The last thing you want to do is load up the trunk and hook up a trailer with lights, etc. and then discover there's no power to your Curt connector plug.
Things sometimes move or shake loose enough that there's not a solid connection. This would most likely be one of those light blue connectors with the metal wire pincher that I mentioned earlier. It MUST be squeezed completely flat to the surface of that plastic sleeve to make sure that it's gone all the way down far enough to pop open the wire insulation and make a good connection to the wire. Even an 1/8" or 1/16" left up can be the root of all evil and cursing. I know because it happened to me... so don't let it happen to you, because "I Told You So!" LOL
No pics. Failed to take any. It was hot and I was focused on getting things done and the trunk reloaded.
Good! I found a photo and text demo page that let me match wire color and pin position on my 09 yaris hb, much faster with good intel. The car's wires are skinny and tightly bundled and it's fiddly to get the chunky splices in there, got tight connections though. Works well so far

Had a defective harness. E trailer was OK to deal with, but I had to contact the supplier (Curt) who were horrible. They kept telling me it was the car, but it wasn't. Even after I told them I replaced their harness with one from another supplier and everything was fine, they still wouldn't acknowledge their fault. They cost me a lot of time because they had me second guessing myself a lot. I wish E trailer would have intervened.
eTrailer gets a grade of A+. The actual part gets a grade of B-. Two of the wires arrived slightly damaged - luckily near the cut end so I didn't have to lose much length. The sticker identifying the 4 wires on one side and 5 wires on the other was upside down, so I peeled it off and reapplied (my OCD kicking in!). I wanted to keep my original quick release plugs on 1996 Jeep Cherokee Sport & was able to do that. Used heat shrink connectors between them & Curt Converter. All lights on vehicle & trailer working perfectly again!
The quick splice were a bit oversized for my Audi wiring. Required me to wiggle it a bit to get a good connection to the, my guess 22ga, wire. Could also use at least a few more zipties. Otherwise, this is a good kit.
Awesome plug and play.
I am very pleased with the service, materials, and overall experience ordering over the phone with etrailers! Customer service was excellent. Items arrived on time. And materials are exactly what I needed.
works great

Robert 
2/12/2025
Still works GREAT

Fairly easy to attach just had to double check the wiring on the car and had to sandpaper away some paint in order to get a good ground connection.
been good!
I've been using this wiring harness for around a year now and it's performed amazingly. I have a 2004 VW Jetta Wagon, picked up some cheap female "pin" connectors as my taillights on my car had pins that you could just slide a connector on to. I was able to use this method to install this harness without actually cutting into any of my cars wiring. Working amazingly.

Corey
5/6/2022
Still working great 2 years after purchase. No complaints at all.
Was very happy and satisfied with my purchase and delivery of my product. Insulation went very well.
The Circuit Protected Converter # SMT C56175 trailer lighting harness for my 1998 VW Beetle arrived within a few days and was easy to install with the include instructions!
All trailer lights worked perfect the first time they were checked after the install! Great job to ALL of you at etrailer.com

David W.
1/4/2015
From the day I installed the SMT C56175 Converter, I have had no problems at all! This is a well designed, high quality item that I would highly recommend to anyone!This item still gets a five star rating all day long!All The Best,David W
Good price, product was perfect, and the shipping was quick. Problem solved. T-taps are sort of miserable, but that's on the installer, not the product - cutting, soldering, and heat shrinking is definitely the way to go.
If you have a problem with your 'Yota truck lighting acting wonky, chances are very high this unit is your issue! Mount it up high, on the bottom of the bed to keep it dry and give it decent life. The harness cover is a nice touch that does not come with all of these - pack it with dielectric grease, and you'll get many years out of this.
Good job, etrailer!

Patrick B.
3/4/2013
We have seen some wonky trailer light issues with Toyotas when adding aftermarket harnesses like this. Typically the issue is the ground. The Toyota frames do not ground as easily as other makes. Sometimes we have to move the ground or extend it to a factory ground point in order for the system to function correctly.
I installed this on my motorcycle, a 2004 Honda VTX 1300S. The converter itself is attached beside the license plate, exposed to the weather. It has functioned flawlessly for almost a year now, through Kansas cloudburst, desert heat and mountain freeze. If I should ever need another (not likely), I will get the same model.

Alan
11/27/2019
A year later and it still works just fine.
The online fit guide stated that this would work for my 2000 Honda Civic, but after installation (double checked for proper installation) only one brake light worked on the trailer.

Brooke M.
1/23/2023
I am sorry to hear you are having issues with this. It sounds to me like there is a bad ground connection. You may want to double check once more and just make sure your ground wire has a direct, clean, and secure connection. So often, when it comes to wiring, the ground connection is the issue.
Something is defective with this unit. While the running light circuit is fine, the circuits that convert the brake and turn signals into a single circuit (the essence of the device) is intermittent; sometimes it works properly, sometime only the left light responds, sometime only the right, sometimes nothing. I believe the problem is due to a bad diode in the unit. I am experienced with these devices, so it is not an installation error. Due to the installation, I am unable to return the unit in unused condition.
1996 Jeep Cherokee.
FYI- this unit was purchased to replace a similar unit that started having a different problem after ten years of use.

Mike L.
10/10/2018
When a wiring harness is acting up, the first thing youll want to do is isolate the cause to the vehicle or the trailer wiring. Use a standard incandescent circuit tester like our part 40376 on each pin of the trailer connector as each function is activated. If youre not getting signal on the trailer connector pins, try testing on the input side of the converter. If the signal is entering but exiting the converter box, youll have confirmed that the converter is bad. Youll also want to ensure that the ground connection is secure. An insufficient ground can cause all kinds of odd behavior in the lighting. Ill link you to an help article on trailer wiring troubleshooting.
Helpful Links
The product works fine. I Youtube video for installing a harness on a Suzuki XL-7 IS NOT this product. If you're not a very handy person you may have problems getting this installed. I figured it out but I'm pretty handy. The video show them just plugging it into a 6 pin connector inside the left rear qarter panel. But the harness itself has no matching connector. You have it splice each wire to a wire on the car.
Patrick B.
11/11/2013
The video that we had was for wiring in Tow Ready part 118372 [no longer available].
great wire harness, could not have been easier for the "common man" to deal with ! came with the hitch, I paid for it, but same package so didn't have to wait for a second box.
Darrell N.
6/17/2015
WONDERFUL!!
OK this product is great, installs quickly with the supplied tap connectors and works as expected. i installed on a 05 Hyundai Elantra.
Do yourself a favor and save yourself hours of troubleshooting. take some sandpaper and scratch off the paint on the metal surface of the car. I did it inside the light access panel. Use the supplied self tapping screw to make a Solid ground or your trailer lights will not work! i took a shortcut and secured to a screw in the panel, with paint under it. While this was sufficient ground for my test light, it was not for the trailer lights. <- this really threw me off and i wasted a lot of time troubleshooting. i even thought my trailer lights were bad and got a replacement set! but no good until i grounded properly.
PS tech support was AWESOME! i had to call twice, once for the hitch install, another for trailer light issue. they answered my questions quickly and even helped me troubleshooting my trailer light issue!.
When it comes time to get a hitch for my wife's van, i am definitely re-ordering from etrailer.com.
A "shade tree mechanic" perspective:
Contrary to the included "tools needed" my 2001 Dodge Grand Caravan bolts were 18 MM not 17 MM. I bought a 6 point 18 MM impact socket from Lowes for about $5.
You can remove the bolts with a 3/8" socket wrench and about a 12" 3/4 iron pipe as a cheater.
There are two installation videos available on Youtube. 2001 and 2004. One shows removing the spare tire. You don't need to do that.
Access to the driver's side mount is very tight. I could barely touch the rubber flap blocking the channel.
Don't try to pull on the fish wire to force the bolt assembly past the rubber flap. I almost lost one of the bolts. I ended up using a piece of 1/4" rod bent in a U to push the rubber flap out of the way enough to get the bolt past.
I was able to mount the hitch without help by balancing it on three 2 foot long pieces of firewood (rough guesstimate). I lifted one side and fastened it losely to the bolt closest to the end of the hitch, then fastened the bolt on the other side a bit more tightly. then lifted the middle of the hitch and lined up the other bolts.
Got everything wired in on my 96 Jeep Cherokee and it works great!
I installed this item on a 2014 Mazda 3 HB. I actually placed the unit in the right rear of the vehicle in the jack compartment, keeping it completely out of the way. Doing this required to have a longer piece of wire for the left turn signal input, as the unit comes with a long wire for the right turn signal input wire. The unit is high quality, easy to install with simple instruction. Note: to those using this in the new Mazda 3 series, there is a hole in the bottom of the jack compartment covered by tape. Since I already have another 4 pin flat car end, I will get a trailer end connector and plug it to the unit and run the wires through the hole with a grommet and splice them on to my other car end connector. This will allow me to have the trailer connector available under the car at the hitch and I won’t have to run the wires out the hatch door possible pinching or rubbing on the bumper.
Did not work with my application. To this day I still don't have working trailer lights.
David B.
10/8/2022
Ill have CS reach out to you William. In the meantime I would double check your grounds, look for damaged wires and loosecorroded connections.


Do you have a question about this Custom Fit Vehicle Wiring?
Info for this part was:
At etrailer.com we provide the best information available about the products we sell. We take the quality of our information seriously so that you can get the right part the first time. Let us know if anything is missing or if you have any questions.


Gwendolyn Y.
10/14/2024
Hey Kevin. That doesn't sound like the best experience you are going thru. Are you still in need of getting a replacement harness? Let me know and I can get the warranty taken care of for you.