


To see if this custom-fit item will work for you please tell us what vehicle you'll use it with.


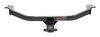
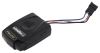
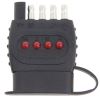
Quickly and easily install a 4-way trailer connector on your vehicle with this custom harness. T-connector plugs directly into existing wiring - no cutting or splicing required.
Features:
This custom-fit T-connector plugs into your vehicle's wiring harness, which is located in your rear cargo area on either the driver's side or passenger's side, depending on your application. You will have to remove cargo trays, trim paneling, and interior covering to access this harness.
Once installation is complete, the 4-way flat connector will be stowed in your rear cargo area.
It is recommended that you use a small amount of grease on all electrical connections - the plugs on your automobile and the 4-pole connector itself - to help prevent corrosion.
A tail light converter is built into this T-connector. Because most trailers run on a two-wire system - wherein the brake and turn signals are carried on one wire - the separate brake and turn signals from your vehicle's three-wire system need to be combined so they are compatible with the wiring system of the trailer. This converter combines the brake and turn signal functions of your automobile so that they run on one wire to properly activate your trailer's tail lights. Note: This will not affect how the tail lights on your vehicle operate.

California residents: click here
Videos are provided as a guide only. Refer to manufacturer installation instructions and specs for complete information.
Speaker 1: Today on our 2017 Acura RDX we will be having a look at and showing you how to install the Hopkins Plug-in Simple Vehicle Wiring Harness with 4 Pole Flat Trailer Connector, part number HM11143265.Here's what our wiring looks like installed. As you can see, this wiring is designed to be stored inside the vehicle when it's not in use and that'll help protect it from the elements. This wiring harness is going to give you the basic lighting functions that are required by law in order for you to safely and legally tow a trailer. The white wire is our necessary ground connection between our vehicle and our trailer. The brown wire is for our taillight and running light circuit. The yellow wire is for our left turn signal and brake light and the green wire is for our right turn signal and brake light.
We have a nice dust cover here which will help protect our connector when it's not in use. One thing I recommend doing is putting a little dielectric grease on the inside. There is some included with the kit to help better protect it in case any moisture or debris gets inside.When this wiring harness is not in use, we can simply open our hatch up and we can store it inside this compartment here off to the side so it's tucked up out of the way and we don't have to worry about any of our cargo getting snagged on it or loading it in or out of the vehicle. The great thing about this wiring is it has a built in convertor box and this will isolate your vehicle's expensive wiring circuits from the trailer. If you have a short on the trailer, you don't have to worry about any voltage being back fed into your vehicle.
Another great thing about this wiring harness is that it plugs into your factory tow package connector on your vehicle. There is no cutting, no splicing, it is a very simple plug and play operation.Now that we've gone over some features, we'll show you how to get it installed. To begin our install, we'll open our rear hatch. Now we need to locate our factory tow package connector. It is on the driver side of our vehicle behind this panel right here.
We'll remove this panel by taking a flathead screwdriver and popping it loose and then right in this area we'll find a blue connector. You can see our blue connector behind the panel, it's on the upper right hand side when you're facing it. We can plug in our connector from our 4 pole flat module this will only on one way so just line it up appropriately and push until it clicks into place, pull back and make sure it's secure.And here's what it looks like plugged in. We went ahead and zip tied up our module so we don't have to listen to it rattle around and it'll hold it in place securely. There's a hole in this area here behind the module that you can secure it with a zip tie.
Now we have two options that we can use with our 4 pole flat connector. One is just to store it inside here when it's not in use to keep it out of the elements and better protect it. And that's what we're going to do today for video purposes. Another thing you can do is route underneath the carpet here into your spare tire well. If you had a spare tire, you can store it down inside there or if you find a grommet underneath the spare tire well you can run it through that grommet and mount it permanently outside on the hitch. It's all up to personal preference though, but today we're just going to put it in here.Now we find ourselves underneath the hood on the driver side right behind our air box we'll find our fusebox. We'll open this up by pressing on this tab here and this one here and it'll lift up and so right here in our middle row there's an open slot close to our air box. We need to install our provided 15 amp fuse into that spot. This will power our factory tow connector. Don't be alarmed that it sticks up higher than the rest. It's still working fine, it provides proper protection for the circuit, it's just a slightly taller fuse than the factory fuses. With our fuse in place, we can now reinstall our cover.Now we'll test our wiring to make sure it's working properly before we hook up to a trailer. We're using a 4 pole tester, it's part number I26 on our website. The reason we're using a tester versus a trailer is because if we have a problem with the trailer we won't be able to isolate if the problem's with the trailer or the vehicle. We want to make sure the vehicle's working properly. Start by turning on our headlights and as you can see, our taillight and running light functions are working properly. Left turn signal, right turn signal, brake lights and with our foot on the brake we'll test to make sure the turn signals still function properly as well. Okay, everything's working as it's supposed to.And that completes our look at and showing you how to install the Hopkins Plug-in Simple Vehicle Wiring Harness with 4 Pole Flat Trailer Connector, part number HM11143265 on our 2017 Acura RDX.

The wiring harness was easy to install, and the instructions were simple to follow. However, I would have liked for there to be a way to separate the trailer plug from the power unit so the wiring could be installed through one of the grommets in the spare tire area. I realize it is intended to be installed under the rear hatch, but with a little effort, it could be installed so that the plug remains outside the vehicle.
The installation instructions that came with the product were incorrect for my model and year.
I was able to find the exact item I wanted by placing the make, model, and year of my vehicle. More impressive was the video provided that showed a step by step process to install the part giving me the confidence to tackle the do it yourself project on my own and saving me a lot of money. Highly recommend this site and will be back again.
Product is well made but plug on car and harness is not compatible. Going to hard wire connections no big deal. Not your fault and not paying dealer $314 for something I can do. It’s a shame they make a part you cannot buy anywhere.
Info for this part was:
At etrailer.com we provide the best information available about the products we sell. We take the quality of our information seriously so that you can get the right part the first time. Let us know if anything is missing or if you have any questions.


Thank you! Your comment has been submitted successfully. You should be able to view your question/comment here within a few days.
Error submitting comment. Please try again momentarily.