
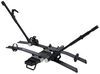
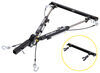
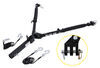
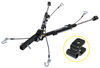
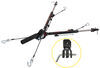
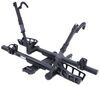
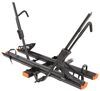
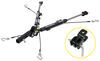
Roadmaster Direct-Connect Base Plate Kit - Removable Arms


To see if this custom-fit item will work for you please tell us what vehicle you'll use it with.


Designed for use with motor-home-mounted tow bars, the direct-connect brackets are virtually invisible, easy to mount and remove, and they eliminate the need for a quick-disconnect crossbar on your tow bar. Installs on your vehicle's frame.
Features:
Note: Roadmaster direct-connect base plates will only work with Roadmaster tow bars that slide into a trailer hitch, such as the Sterling, Blackhawk, Blackhawk 2, Falcon, or Falcon 2. These base plates will not work with tow bars that require a hitch ball.
The drawbars, or front arms, on this base plate kit are supremely easy to mount and remove. Just insert them into the brackets and twist to lock them in place. To remove each arm, simply tug the built-in pull pin to disengage the lock, twist the arm back and pull it out of the bracket. Once the drawbars have been removed, the remaining brackets are virtually invisible. On most automobiles, the brackets are mounted within the grille, where they remain not only unseen, but protected from scrapes and scuffs as well.

California residents: click here
Videos are provided as a guide only. Refer to manufacturer installation instructions and specs for complete information.
Speaker 1: Today on our 2016 Mini Countrymen, you're going to take a look at and I'm going to show you how to install the Roadmaster EZ5 base plate kit with removable arms, part number RM-521883-5.This is what our EZ5 base plate looks like when it's installed. As you can see, it fits nice and flush with the fascia. It's not going to stick out, protrude. It's not an eyesore. It looks really nice on there. It's going to have a nice black powder coat finish, so it's going to resist and rust or corrosion.
You're going to have removable arms. Simply slide them in, twist, and they lock into place. You'll have one of these for both sides. To remove it, simply pull the ring, twist, and it slides out.It's going to be one of five main components in a flat tow set up. The other four are going to be your braking system, your lighting, your safety cables, and your tow bar.Now what this base plates going to do for you, it's going to allow you to safely flat tow your vehicle behind your RV when you're traveling.
As far as the installation goes, it is a pretty straightforward installation, you're not going to have to do any welding. You will have to remove your fascia. Again you'll have to do a little bit of trimming here. Other than that, it's pretty straightforward. It's going to come with all the necessary hardware.
Now that we've gone over some of the features, let me show you how easy it is to get installed.To begin our install, we're going to have to take off our grill. To do that, we're going to have four bolts that run across the top here. Now our instructions say they're supposed to be 10 millimeter head bolts. In our case, they are going to be T25 Torx head bolts.Next we're going to pull our grill off. You just want to grab like right around this corner, just kind of wiggle it out should just pop right out of there, just like that.
We're going to have four fasteners right here inside of our fender well that we need to take out. One's going to be a push pin fastener down here. You're going to have eight millimeter head bolt right here. You're going to have two fasteners right here that we're going to have to remove.We'll start with the eight millimeter bolt. There's not really a particular order that these need to come out, flathead screwdriver, like that. Make sure you pull the base out with it. Then for our top two, top two are going to be a little bit different. There's like a little bitty pin right in the center. But if you pry out just enough, like that, you can actually grab it and pull it out. And we're going to repeat that same thing on the other side.This trim piece right here. We need to pull this off our front fascia. So what you're going to do is you're going to take your liner, you're going to pull it back. And you're going to have three little plastic clips right in here. If you reach up and then pull down on them, you'll be able to pull them out it. I'll show you what it looks like here.So this is going to be your clip. What you want to do is reach up there and just pull down on it, just like that. So what I like to do, since we're going to be moving the fascia around to get it off, I'm going to take some tape and I'm going to cover this edge right here, so it doesn't scratch it. You can use electrical tape, black tape, whatever you have. It doesn't have to be a masterpiece, you just want to protect the paint job on the car. Just something like that. I'd say go ahead and do that on the other side also. We're going to have a couple of lights right here on the sides. We need to unplug those. We're just going to push in and pull out. You're going to have one of those on both sides of the vehicle.Now we need to come underneath our vehicle. Now our instructions tell us we're going to have two push pin fasteners and a T25 Torx bit. We don't have T25 Torx bit down here. It's going to be a 10 millimeter head bolt. Now our instructions tell us we need to take out the two push pin fasteners. You can see here we have four that are attaching this to our fascia. However, if we just remove this 10 millimeter bolt, we don't need to take this off. You can see it's loose.Next, once you have that removed on both side of the vehicle, you're going to have three push pin fasteners right across the center. So flathead screwdriver and right in the center, trim panel tool. You want to make sure the base comes out with it. If it doesn't come out, pull the base out. You can always slide this back into it.Next on the front, we're going to have two T25 Torx bits head bolts, have one here and one on the other side. Go ahead and remove those. Now our instructions don't tell this, but right here there's actually a 10 millimeter head bolt that we have to remove. It's holding the top part of the fascia on. Then we're going to repeat that on the other side.Now we can start pulling our fascia off. One thing to keep in mind, if you have fog lights, those will need to be unplugged. So we'll just start right here underneath of this fender trim piece where it's going to start pulling out. I'm actually going to get a second person. I'd recommend doing the same. You can see we have a couple of plugs here we're going to need to remove, one there. So here's a plug on the back of our lights. What you want to do, you just want to push in on the bottom to release it. You're going to have one of those on each side. This one you're just going to have one, push down like that.Next thing we need to do is we need to remove our ambient temperature sensor. All we're going to do, is we don't want to break this. I'm just going to slide it out like that. Then we're going to have a clip here on the side of this we need to remove. I'll just let that hang for now and then we need to remove this. This one actually happens to be loose, but if you look right here these little tabs actually fit right inside of here. You take a flathead screwdriver and you just push down. You can see how that flexes, that'll release them. Go ahead and pull that off. We're going to do that on both sides.Next thing we need to do is, we need to remove our bumper core from the frame. In order to do that, we're going to have two bolts down here on the bottom. We're going to have two on the top. Then we're going to have a couple Torx head screws. Our instructions tell us that these are going to be 16 millimeter head bolts except they're not. They're 13 millimeter head bolts. The two top ones are going to be 16.On the driver's side, they're going to be back behind here, but you're not going to be able to access them like this. You're going to have to go underneath the car. Go ahead and remove the two bottom ones on both sides. This bottom one here we can get to with just a wrench and a socket. So next on the inside here, there's actually a 16 millimeter head nut that we need to take off.So what I have found the instructions don't tell you this. But right inside your fender well, you're going to have four 8 millimeter head bolts. Then you can take this off, it gives you a lot more room to work, eight millimeter socket. We'll go ahead and remove this nut just like that. And you'll have one of these on the passenger side also.Next take a T20 Torx bit, we're going to have three screws we going to need remove. Our directions tell us two, they tell us this one here and that one up there. Except on this one, we have one right here. We don't take this off, it's attached to this whole bottom piece. You're not going to be able to get your bumper core off. Then you're going to have the same three on the other side.Now we're going to have two 16 millimeter head nuts on this side and on the other side. Before we take those all the way off, right down here at the bottom, you see this hose. This hose runs all the way across and it attaches to the bottom. So we're just going to unclip it like that. We'll do the same thing here on the passenger side. Now we'll take our 16 millimeter socket. Go ahead and pull off the two remaining nuts.I would suggest sliding this out slowly. Make sure you don't hook any of your wires, your hoses or anything like that, just like that. You want to make sure that your bumper core is upside down on a flat surface table, work bench, the floor if you want. You're going to need some black spray paint or some clear coat. If you have a die grinder, you need a die grinder with a bit like this or a half inch drill bit. If you have a long one like this, you can use it just in a drill. If you don't, grinding bit and die grinder.What we're going to do is we're going to take our base plate like this and you're going to have two holes. You're going to have one here and have one on the other side. You're going to have two holes here on the bumper core. We're going to line those two up. You can see on this side this hole's not exactly straight. We can't go forward anymore because we're caught there. And we can't go side to side because this plate here is up against our bumper core. So what we need to do is we're going to open these holes up to a half inch, which is the holes that are already in the bumper core. Just like that, we're going to do that on both sides.Now you want to take some spray paint and we're going to spray that bare metal. Going to help keep it from rusting and corroding later on down the road. You can give it a good coat, do that on both sides. Now we're going to take half inch bolt, you're going to get a nut plate like this. Take a lock washer, slide it on to your bolt. Some red Loctite, now this does not come in your kit but you can find it on our website. You want to make sure that this goes on all of your hardware.What we're going to do, is we're going to take a bolt, we're going to go down through our hole like this. Nut plate, we're going to go inside this back hole right back here. Thread them together, we don't want them completely tight just yet. You just want to hand tighten it on there. Then we'll do the same thing to the other side. I'm going to take a 19 millimeter socket and I'm going to tighten this so that it's sitting flat and it's holding our bracket against out bumper core correctly. Go ahead and do that same thing on the other side.Next thing we want to do is we're going to turn our bumper beam up like this. We want to make sure that our base plate is square with our bumper core. We're going to have two holes here on both sides. We're going to drill these out to a half inch. So what I'm going to do, I'm going to use my half inch drill bit. I'm going to make me a mark in there, that way when I go to my smaller one it doesn't move around on me. We're going to use the same combination of hardware. Again make sure your Loctite is on. I'm going to go through the hole like this our nut plate. Come in this back hole on the bumper beam. Get those all together, we're going to do the same thing on the other side. Don't forget your second one on that side.Next we're going to tighten and the torque all of our hardware to the specifications in the instructions. Next we're going to cut off the end of our wires. You can use some tin snips here. Go ahead and repeat that on the other side. Now we can get our bumper beam back into place. Again, watch your rubber hoses there. We don't want to damage them. Same thing over here on the passenger's side. So if you notice this piece here, with our base plate installed, we cannot get it past this section. We're going to have to cut a little section out of this. I'm going to use base plate Dremel tool with a cutting blade. You can use a utility knife if you have one. Basically just like that, we're going to do the same thing on the other side.So you can see on this piece that I already cut, I need to come up just a little bit higher because it's still pushing against it. And then right here in this corner, you can see where it's hitting it. It's actually pushing this against the radiator. I don't really like that so I'm going to cut a notch out of there so this will sit inside of it.Now we've got our bumper core up here, looks good. We got the necessary adjustments needed cut out in places we needed to cut out. It fits well. Now we can go ahead and reinstall all of our hardware in reverse order from the way we took it out. Next thing we need to do, we've got our fascia just sitting up here. What I need to do is I need to mark and cut out my fascia right here for my base plate. So I'm just going to take a black marker or any color marker you want really. That's going to have to come off. I think I'm going to have to cut off this right here. We'll do that on both sides. Now we're going to do the same thing on the other side.Doesn't look like I'm going to have to cut this out. What I'm going to do is I'm going to wait, get my other side cut out for this section. And then we'll see how the fascia falls in place. I may not need to do this here. Now that we have our fascia cut out, we're going to go ahead and remove it and reinstall our air tubes on both sides and anything else we need to put on while our fascia is off. Ambient temperature sensor we actually zip tied it to the back side here. Now we can put our fascia back in place. However, keep in mind if there's any other wiring accessories, anything like that you're going to be putting them on now would be the time to put them on while you have the fascia off. That'll do it for a look at and installation on the Roadmaster EZ5 base plate kit with removable arms part number RM-521883-5 on our 2016 Mini Countryman.

Have not installed it yet
Do you have a question about this Tow Bar Base Plate?
Info for this part was:
At etrailer we provide the best information available about the products we sell. We take the quality of our information seriously so that you can get the right part the first time. Let us know if anything is missing or if you have any questions.


Thank you! Your comment has been submitted successfully. You should be able to view your question/comment here within a few days.
Error submitting comment. Please try again momentarily.