How to Install a Brake Controller on Chevrolet / GMC 1999-2006 Pickups

Custom Fit Brake Controllers

Please select the year of your vehicle to search for your brake controller and wiring kit

Search For Year 


Vehicles with Factory Installed 7-Way


If you are attempting to install a brake controller on a Chevy/GMC truck (~1999- 2006, inc. 2007 classic) and your vehicle is equipped with the factory installed 7-Way trailer connector, the only part needed to install the brake controller is the unit itself. The manufacturer provides a brake control adapter that connects to the brake controller and plugs into the vehicle's electrical junction box. This junction box (show below) is located on the driver's side below the dash, left of the brake pedal. If the factory brake control adapter cannot be found, we offer a replacement (for model years 1999-2002 use 20263, for years 2003-2006, including 2007 Classic models use 20264). After mounting the brake controller in a place that is easily accessible, your installation is complete.

Cover removal

The brake control adapter plug is located in the electrical junction box on the driver's side of the cab, left of the brake pedal.

Cover removal

This close-up of the electrical junction box with the lid off shows several different available slots. The brake control adapter is plugged into the second slot from the left on the top row.


Vehicles without Factory Installed 7-way
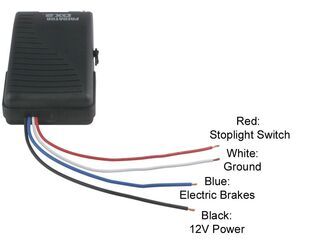

Step 1 - Install Brake Controller:

Parts Needed:

  1. The Brake Controller
  2. The Brake Control Adapter.
  3. The Brake Control 7-Way or 6-Way Installation Kit

Hardwire the open wires of the brake control adapter to the wires on the brake controller. Plug the other end of the adapter into the electrical junction box (see above). Mount the brake controller in a place that is easily accessible.


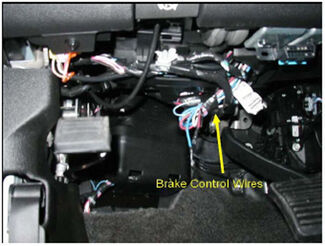
Step 2 - Under the Hood:

Remove Bracket

A: Remove the bracket in the corner closest to the driver.

Remove Cover

B: Remove the top cover of the "Accessory Fuse Block".


Remove Bracket

C: Remove the lower cover to the fuses.

Remove Bracket

D: Locate the Blue and Red Wire. These are normally located next to the fuse block on the cab side. The Blue Wire has a plug on it, the Red Wire has a ring terminal on it.


Remove Cover

E: After locating the Blue and Red Wires, place the Red Wire over the closest positive post (B). A Green 30 amp Fuse is needed in the location nearest the positive post to power the brake controller. If a smaller brake controller is used, such as the Draw-Tite Act I (5100), a 20 amp Fuse may be required. Consult the brake controller installation instructions and the vehicle's owner's manual. Next, clip off the connector on the Blue Wire (A).


Remove Cover

F: The installation kit provides a gray "double bonded" wire which is really two wires in one. Connect the white wire in the gray housing to the blue wire under the hood. If a hot lead is also needed connect the black wire, (shown in red for clarity), to the other auxiliary positive post. A 40 amp fuse needs to be placed in the last spot, closest to the post, to power the hot lead (see picture). If this post is already in use, you may connect the hot lead directly to the positive side of the battery via a 40 amp circuit breaker (provided in kit). After the connections are made, route the remaining length of the double bonded wire to the back of the vehicle, where it will be attached to the 6 or 7-way adapter (provided). Usually the wire is run either inside or above the frame on the driver's side of the truck. Once run, connect the white (brake) and black (hot) to the blue (brake) and black (hot) respectively on the back of the 6 or 7-way adapter.


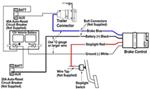
Step 3 - The Trailer Connector:

Remove Cover

A: If the vehicle is already set-up with a flat 4-pole trailer connector, then plug it into the 4-pole on the back of the 6 or 7 way adapter that comes with the installation kit. The white wire (ground) coming out of the back of the adapter needs to be attached to a substantial grounding point on the frame. After mounting the new 7-way or 6-way connector, installation would be complete.


Remove Cover

B: If no trailer connector has been provided, the necessary wires can found above the spare tire. The Yellow Wire is the left turn and brakes, Dark Green Wire is the right turn and brakes, Brown Wire is for the taillights, and White is the ground. Often if the loom is cut back, two more wires will be found. The Light Blue wire provides a lead for a camper shell brake light. The other, a Light Green wire, is for the reverse lights.


Remove Cover

C: Connecting the Wires. First cut off the 4-pole on the provided 7-way or 6-way adapter in the installation kit. Scotch locks are provided to connect to the wires above the spare. The green wire is connected to the dark green wire on the vehicle; the yellow to the yellow, brown to brown. The white (ground) on the adapter can either be connected to the white (ground) wire above the spare, or it can be grounded directly to the frame.


After installing the mounting bracket with your 7-way or 6-way trailer connector the installation is complete.


Was this FAQ helpful?

Installation

Brake Controller Installation - 2007 Toyota TundraBrake Controller Installation - 2007 Toyota Tundra
Brake Controller Installation - 2008 GMC SierraBrake Controller Installation - 2008 GMC Sierra
Brake Controller Installation - 2008 Ford F150Brake Controller Installation - 2008 Ford F150
Brake Controller Installation - 2004 GMC EnvoyBrake Controller Installation - 2004 GMC Envoy
Brake Controller  Installation -  2006 Ford RangerBrake Controller Installation - 2006 Ford Ranger
Brake Controller Installation - 2006 Ford Ranger Part 2Brake Controller Installation - 2006 Ford Ranger Part 2
Brake Controller Installation - 2004 Ford F150Brake Controller Installation - 2004 Ford F150
Brake Controller Installation - 2003 Ford F250Brake Controller Installation - 2003 Ford F250
Brake Controller Installation - 2007 Dodge Sprinter without Tow PackageBrake Controller Installation - 2007 Dodge Sprinter without Tow Package
Valley Odyssey Electric Brake Controller Typical InstallationValley Odyssey Electric Brake Controller Typical Installation
Brake Controller Installation  - 2005 Ford E250 without Tow PackageBrake Controller Installation - 2005 Ford E250 without Tow Package
Brake Controller Installation - 2003 Ford F250Brake Controller Installation - 2003 Ford F250
Brake Controller Installation - 2008 GMC SierraBrake Controller Installation - 2008 GMC Sierra
Brake Controller Installation - 1999 Ford F250Brake Controller Installation - 1999 Ford F250
Brake Controller Installation - 2005 Dodge DurangoBrake Controller Installation - 2005 Dodge Durango
Brake Controller Installation - 2004 Chevrolet SuburbanBrake Controller Installation - 2004 Chevrolet Suburban
Brake Controller Installation - 1993 Chevrolet SuburbanBrake Controller Installation - 1993 Chevrolet Suburban
Brake Controller Installation - 2007 Ford ExpeditionBrake Controller Installation - 2007 Ford Expedition
Brake Controller Installation - 2008 Toyota SequoiaBrake Controller Installation - 2008 Toyota Sequoia
Brake Controller Installation - 2008 Ford F250 Super DutyBrake Controller Installation - 2008 Ford F250 Super Duty
Brake Controller Installation - 1996 Ford ExplorerBrake Controller Installation - 1996 Ford Explorer
Brake Controller Installation - 2009 Ford F150Brake Controller Installation - 2009 Ford F150
Brake Controller Installation - 2006 Honda RidgelineBrake Controller Installation - 2006 Honda Ridgeline
Brake Controller Installation - 2003 Dodge DakotaBrake Controller Installation - 2003 Dodge Dakota
Brake Controller Installation - 2001 GMC YukonBrake Controller Installation - 2001 GMC Yukon
Brake Controller Installation - 2009 Chevrolet SilveradoBrake Controller Installation - 2009 Chevrolet Silverado
Brake Controller Installation - 2007 Chrysler 300Brake Controller Installation - 2007 Chrysler 300
Brake Controller Installation - 2009 Honda OdysseyBrake Controller Installation - 2009 Honda Odyssey
Brake Controller Installation - 2009 Chevrolet SilveradoBrake Controller Installation - 2009 Chevrolet Silverado
Brake Controller Installation - 2007 Chevy SilveradoBrake Controller Installation - 2007 Chevy Silverado
Brake Controller Installation - 2008 Chevrolet SilveradoBrake Controller Installation - 2008 Chevrolet Silverado
Brake Controller Installation - 2009 Dodge RamBrake Controller Installation - 2009 Dodge Ram
Brake Controller Installation - 2007 Dodge DakotaBrake Controller Installation - 2007 Dodge Dakota
Brake Controller Installation - 1999 Dodge PickupBrake Controller Installation - 1999 Dodge Pickup
Brake Controller Installation - 1999 Dodge Ram PickupBrake Controller Installation - 1999 Dodge Ram Pickup
Brake Controller Installation - 1990 Ford F-150Brake Controller Installation - 1990 Ford F-150
Brake Controller Installation - 2008 Toyota TacomaBrake Controller Installation - 2008 Toyota Tacoma
Brake Controller Installation - 2007 Ford F-250 Super DutyBrake Controller Installation - 2007 Ford F-250 Super Duty

Brake Controller Help

Installation Instructions for Ford Trucks with Optional Brake Controller (2005-2006)Installation Instructions for Ford Trucks with Optional Brake Controller (2005-2006)
Electric Brake Controller Installation on Dodge Ram TruckElectric Brake Controller Installation on Dodge Ram Truck
Ford Brake Controllers (1997-04)Ford Brake Controllers (1997-04)
Brake Controller Installation: Starting from ScratchBrake Controller Installation: Starting from Scratch
How to Install a Brake Controller on Chevrolet / GMC 1999-2006 PickupsHow to Install a Brake Controller on Chevrolet / GMC 1999-2006 Pickups
Brake Controller Installation on a 2008 GMC Sierra and Chevy SilveradoBrake Controller Installation on a 2008 GMC Sierra and Chevy Silverado
Trailer Brake Controller InformationTrailer Brake Controller Information
Ask the Experts

Do you have a question about a product or how something works? With thousands of product installations and troubleshoots under our belts, we don't just sell this stuff, we know how to install and use it. Just type your question in the box below.

It may be helpful to include the year, make, and model of your vehicle if you have a question about a custom fit product.

Name:


Contact email:


Subject:


How can our experts help?


Satisfaction Guarantee
Service was extrordinary, product arrived much sooner than expected & communication was great.
Clarence, Harrison, AR