


To see if this custom-fit item will work for you please tell us what vehicle you'll use it with.


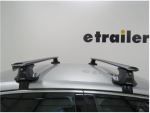
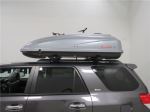
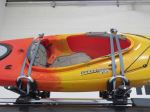
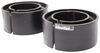
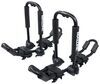
This sleek, aerodynamic roof rack provides space to carry gear on your vehicle. Crossbars with push-down rubber strips in top channels work with channel-mount and clamp-on accessories. Installs to raised rails on your vehicle's roof.
Features:
Specs:

Videos are provided as a guide only. Refer to manufacturer installation instructions and specs for complete information.
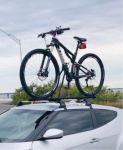
Hi everybody. Bruce here at etrailer. Today we're gonna take a look at and install our Inno Aero roof rack on our 2020 Toyota RAV4. You may be wondering why you may need a roof rack. Roof rack's the perfect option to go ahead and free up space inside your vehicle, or if you've got skis that you're carrying or snowboards or anything muddy and you don't want to get that inside your vehicle, it's a great option. Before you really decide which roof rack you would like, We need to check a few things out.
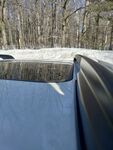
On our RAV4 today, we have raised rails and the way we can tell it's a raised rail, I can fit my hand underneath the bottom rail and the top rail. Then you're gonna have flush mounted rails or you're gonna have a naked roof. Let's go ahead and get into some of the features. What I do like about this roof rack, it is a nice sleek look and it does have a little bit of a overhang, which is good if you're carrying skis or snowboards. You can keep those closer to you.
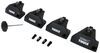
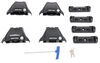
And we also do have locking cores that this does come with. So you can lock your rails down, unlock it, pull that off, and then what else I like is it is a completely toolless design. This is how we loosen and tighten our towers onto our crossbars. Now if we go ahead and look underneath the knob here, we do have a rubber strap that goes around our rail and that's instead of a clamp style. It's a really good feature 'cause it really snugs it down to the rails and get a really good bite.
Plus it's got rubber coating so it's not gonna scratch or anything on your factory rail system. Now moving up top to our crossbar here, maybe you can see this little rubber strip in there. That is a great feature 'cause that is able to accept any T channel accessories. If we pull the end cap off, you do not have to remove this piece of rubber. The T channels just push down and they will grip right inside there.
Let's go ahead and take a few measurements. The first measurement I'm gonna take is our overhang. Overhang is great if you've carrying skis or anything like that, you can actually get those closer to you so you're not reaching all the way over to the center. You can actually have 'em over to the edge of the vehicle further and we will make 'em easier to take off. Our overhang on the front, we're looking at about two and a half inches. And if we go ahead and move to the back, we've got a little more, we're looking at about four inches. That'll give you plenty of space to go ahead and clamp anything here. The other measurement I really want to take right now is our crossbar spread, and that's from the back crossbar to the front crossbar. We're looking at about 28 inches. Now that's gonna vary depending on what accessories you're actually mounting up there. You may need to be a little further, but we're pretty much maxed on the back and we've got a little room on the front, but you're looking at 28 inches. The next measurement I do want to take is on top of the roof, how much distance do we have to the crossbar to the actual roof And this vehicle, we do have a sunroof and we do have it popped open and there's still plenty of space there. So I'm gonna go ahead and measure from the sunroof itself. And we're looking at to the bottom rail, you're looking at about three and a half inches. So if you do have any accessories that do clamp on, you're gonna have plenty of space to still operate your sunroof. I really like the overhang feature on this roof rack, but if you don't care for an overhang, there is another option for you. It's the Inno Aero flush mount, which takes your crossbars and puts them even with your end cap here on your tower. If you do like the way this roof rack looks, stick around and we'll show you the installation. We already have one of our crossbars mounted on our vehicle. We're gonna go ahead and show you how to mount the other one. So what I like to do is go ahead and put out all my parts. So I've got two towers, I've got a set of keys and I've got two locking end caps for our towers. And we have our crossbar. What we noticed with our rail is it does have two different sides here. You've got a flatter side and a more arrow side. The flatter side is actually gonna face the front. So now we tip turn this over and our T-track here is for our tower. You notice it's got a little lock here. We do need to press this in, move it over, then we can grab one of our towers and you can see the T channel here. And we'll just lay that in this pocket and we'll slide it to the outside. (mechanism clicks) Once you have your tower on on one side, you do have to do that on the other. So now that we have both of our towers on, we're gonna go ahead and grab our rail and we're gonna make sure the orientation, as I stated before, is in the correct position. We're going to go ahead and slap this up on our roof. And you can do this by yourself or you can have a buddy help you. That's not too bad. But if you do want to grab a set of extra hands, you can. Now we have our crossbar on. We're gonna go ahead and use a reference point on the vehicle or you can measure, but we decided to go ahead and use a reference point. We're gonna use the door right here as our reference point. We're gonna put that in the center. And now if you look at this tower here, we've got a gap here, right here I can fit my hand under. We do need to slide that over so it is touching that rail. And then we're gonna lift the knob up, grab our strap and it's gonna go right in those two teeth and then we can tighten it down. Now when you're tightening this down, you want to go a little bit on this side and then go to the opposite side because it will pull these rails towards you as you're tightening it up. Now that you do have these snugged up, again, you don't need to overtighten these, just snug them down and then this little piece will flip back down. And make sure you have your crossbars even going across the top of the roof. And we're ready to go ahead and put our locking end cap on. This just goes in, take our key, lock it in, pull it out, and you're nice and secure. This completes our installation of our Inno Aero roof rack on our 2020 Toyota RAV4. I'm Bruce. Thanks for watching.


Do you have a question about this Roof Rack?
Info for this part was:
At etrailer we provide the best information available about the products we sell. We take the quality of our information seriously so that you can get the right part the first time. Let us know if anything is missing or if you have any questions.


Thank you! Your comment has been submitted successfully. You should be able to view your question/comment here within a few days.
Error submitting comment. Please try again momentarily.