bing tracking image

how to replace the spring axles on your boat trailer
Written by: Jacob J
Last updated: 5/1/2025
Est. read time: 10 mins

How to Replace the Axle on your Boat Trailer

(Without Leaving your Driveway)
Replacing the axle on your boat trailer definitely seems like an intimidating task, especially if you're doing it by yourself. You can't just take it to a shop, who knows how long it will take to get it back, and will they charge you an arm and a leg for work you could do yourself? Who knows? But for our boats, it isn't worth the risk. Today we're going to go over everything you need to know to change the axles on your marine trailer. From steps to parts to tips and tricks, lets get your trailer ready to rock so you can get your boat back where it belongs, on the water.It's important to note that the process will change slightly depending on the type of axle you have. If your trailer has leaf springs on it, then it's a spring axle, and if not, then it's a torsion axle. This article is going to speak directly about the process of changing a spring axle. This article will also assume that you have a single axle trailer, if your boat trailer has multiple axles, then the suspension hardware will be slightly different, but the process will largely be the same.

Step Zero: Prep work

You will need a few tools first:
You will also need all of the parts you plan on replacing:
Once all of your tools and parts are assembled, it's time to park your trailer on a level, even surface and get started!

Step One: Jack up your Trailer

The first step is to get your boat trailer secured off the ground so you can get started. Put your jack under the frame of the trailer and raise it up. You only need it high enough off the ground that the wheels can spin freely on both sides. There should be no weight on the tires themselves when you're finished. Securing your trailer properly with jack stands is vital to completing this project safely, so make sure you're using a minimum of four jack stands, two in the front, and two in the back, and on opposite sides. Every trailer is different, so the exact location where your jack stands should go may vary. But structural, load bearing pieces and welded joints make great candidates for places to put a jack stand.
jacking up a trailer
Make sure your trailer is raised and secured on the jack stands before you begin

Step Two: Remove your Wheels

Once your trailer is secure on the jack stands, go ahead and remove your wheels. If your lug nuts are giving you trouble because of rust, try using your breaker bar to apply a bit more force and break them loose.

If you do need an extra bit of "persuasion" to get your lug nuts off, then it may be time to replace them. Click here to grab a new set!
removing the tire
If the lug nuts are particularly corroded, a breaker bar is basically necessary

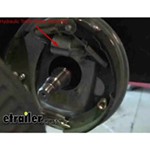
Step Three: Detach your Brake Components (If you have them)

If your axle is an idler axle (one without brakes where the wheels spin freely) then you can skip this step.
Many smaller boat trailers will not have brakes, but it's important to check. If you do have brakes on your boat trailer, make sure to disconnect your brake lines and remove your brake assemblies.
For questions about your brake assembly, or to learn how to add electric drum brakes to your trailer click here to read our step-by-step guide.

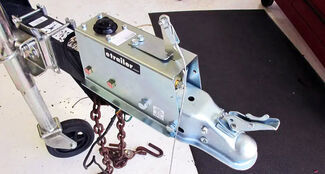
Step Four: Remove your U-bolts

Your u-bolts are what hold your axle onto your leaf springs. They're shaped like the letter U (big surprise I know) and attach to a plate underneath the axle. Removing these can be somewhat difficult if the nuts have been rusted in place, but your impact wrench should be enough to handle it. If not, that's what we brought the breaker bar for! We suggest using new hardware when you install your new axle, but if you plan on reusing your u-bolts (which is perfectly fine if there's no damage/corrosion) make sure to hold onto them after removal.
Note: This step has a bit more to it if you're also replacing your leaf springs.
After your u-bolts are disconnected, slide your axle out from under your trailer. Next, remove the shackle bolts connecting your leaf springs to the trailer (some leaf springs have only one shackle bolt, these are called slipper springs, but they function similarly otherwise). The shackle bolts will likely be somewhat difficult to remove because they are designed to "dig into" the metal of the trailer, but with a mallet you should be able to knock them free. Once they are removed, you can set your old leaf springs aside and attach the new ones. For more information on what that process looks like in detail, click here to read our guide on leaf spring replacement!
removing u-bolts
Removing your u-bolts can be difficult if rust has set in, and in the absolute worst case the u-bolt must be cut off. This is rare but we see it from time to time

Step Five: Replace your Axle

With the axle detached from the leaf springs, it's finally time remove it from the trailer. Be careful when sliding your axle out from under your trailer though. Your trailer should be stable on your jack stands but your boat is far too valuable of a payload to take any precautions for granted. When that is completed, slide your new axle underneath your trailer, making sure to align it with the leaf springs. In order to lift your axle into place, you may need the assistance of a jack. This is totally normal, particularly with axles designed with larger payloads in mind. Once your new axle is resting on your leaf springs, it's time to move onto the next step.
leaf springs
Many leaf springs have a "post" in the center that aligns with a hole in your axle and your u-bolt plate. Use this to center your axle before reinstalling your u-bolts

Step Six: Secure your new axle

Attach the axle to the leaf springs by reinstalling the u-bolts and torquing to manufacturer specifications.
Note: If the plate you're connecting your u-bolts to has a "lip" on the outer edges, make sure that it is facing down. This promotes water runoff and can keeps your hardware in good shape for as long as possible.

If your new axle does not have an installed hub assembly, or if you are re-using your hub from your previous axle, now is the time to install that. For a detailed explanation of that process, click here to read our guide on hub replacement.
new u-bolts
The rounded edge of your u-bult plates should be facing down like this to prevent corrosion in the long run

Step Seven: Reattach your brake components (if applicable)

If your trailer has brakes that you detached earlier in this process, reattach them now. Again, many smaller boats don't require a trailer with brakes, but this may be necessary for larger boats trailers with built-in trailer brakes.

If your trailer has hydraulic brakes you need to bleed the brake lines as well to keep air from getting in. For a step-by-step guide to bleeding your brake lines check out our guide here.

Step Eight: Finishing up

The last step before we lower your trailer back to the ground is to replace your tires. We suggest hand tightening them now (not torquing them down) and tightening them completely once the trailer is on the ground.
Once your wheels are on and the lug nuts tightened by hand, you can put your jack back under the frame of your trailer and start removing it from the trailer jacks. It's very important to be careful during this part, as not to damage your boat, your trailer, or your jack stands (you'll need them again now that you can fix your own boat trailer, right?)
Take a second to make sure all of your hardware is torqued according to manufacturer specs, and then you're all finished! Congratulations, you have officially replaced the spring axle(s) on your marine trailer. Now it's time to relax the best way we know how, on the water!
replacing a trailer tire
Make sure to tighten your lug nuts in a star pattern to ensure that they mount correctly
Jacob J
About Jacob JTo say that my path to etrailer was complicated would be an understatement. I have always had a passion for helping others, and throughout my education and career as a social worker or community liaison, I have loved writing as a hobby. When I found etrailer and was given the opportunity to turn something I enjoyed doing into a career that helped people access information and products they need to live the best life they possibly could, I was instantly interested. I am a lover of the outdoors, I have been loading and unloading trailers since before I was old enough to drive them, and have spent my recent years working in and around the automotive industry. And I am excited to share all of the things I have learned (more often than not the hard way). I consider myself a perpetual student, and etrailer gives me the opportunity to learn something new every day and share my findings with others. Which is something I am extremely grateful for. I look forward to continuing to help people find the answers they need to make memories for a lifetime.