
To see if this custom-fit item will work for you please tell us what vehicle you'll use it with.


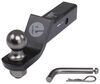
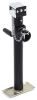
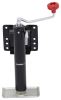
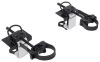
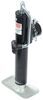
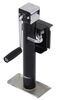
This fully welded trailer hitch receiver bolts onto your vehicle's frame with no welding required. Receiver sits beneath your bumper so it's out of the way when accessing cargo. Powder coated steel is sturdy and corrosion resistant.
Features:
Specs:
California residents: click here
Videos are provided as a guide only. Refer to manufacturer installation instructions and specs for complete information.
Hi, everyone, Aidan here with etrailer. Today we're gonna be taking a look at and later be showing you how to install this TowSmart Class III receiver hitch on our 2024 Ford Maverick. Now the Maverick is a super capable little truck. I drive one myself, and adding a hitch to it was one of the best decisions I ever made because it allowed me to carry bike racks, maybe some cargo carriers if the bed did get full of stuff, which it's pretty easy to do with the shorter bed length, or maybe do some light-duty towing if we ever wanted to tow around, like a teardrop camper or something. My wife and I have gotten a lot of use out of our hitch. And if yours didn't come with one from the factory, getting one aftermarket like this is a great way to still get that enhanced function.
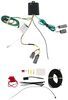
This particular option from TowSmart gives you a two inch by two inch receiver tube opening, which is pretty much standard for all the hitch options on the Maverick. It's gonna work with the widest range of accessories available on our website or on the market. And you'll secure those accessories using the 5/8 inch hitch pin hole. Now the hitch pin and clip aren't included, but depending on the accessory you choose, maybe like one of our etrailer ball mounts, they will come with the hitch pin and clip. So if you're getting an accessory as well in addition to the hitch, just make sure you check and see if it includes one.
If not, you can always get one here at etrailer. If you're towing, you'll need safety chains, and those will attach to these safety chain loops on the side. Whether you've got the standard S-hook like this or even a larger clevis, they'll fit just fine. Of course, no matter what you're using this for, you'll want to be mindful of the weight capacities. You get a gross trailer weight limit of 4,500 pounds.
That's the amount of weight that the hitch can pull, and that includes your trailer and everything loaded on it. And then you've got a 675 pound maximum tongue weight rating. That's maximum downward pressure on the end of the receiver tube. That tongue weight's gonna be more than enough for fully loaded cargo carriers or four-bike bike racks with e-bikes and stuff. The towing capacity, you definitely wanna check your owner's manual though because if you have the hybrid like this, it's gonna be the limiting factor for towing.
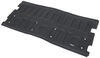
So just go by the lowest rated component, whether that's your truck or the hitch. Few measurements to watch out for. From the center of our hitch pin hole to the outer face of our bumper here, we're looking at about 2 1/2 inches, and that'll let you know if you have clearance for any folding accessory like a bike rack or cargo carrier. I found that everything should clear just fine on the Maverick. And then for your ground clearance, from the ground to the top inside edge of that receiver tube opening, we're sitting at 19 inches, and that'll let you know for certain accessories like a ball mount if you do need to tow a trailer, whether you need a slight drop or slight rise to be towing level with your truck and trailer combination. But I think my favorite thing about this hitch is that you get a really good clean, finished look whenever it is installed. Ford includes that factory cutout there where you take the panel out, and that's gonna give you room for your hitch. Normally, with it being offset, I think it maybe looks a bit off-centered, but if you have wiring like this neighbor got and like I added to my own truck, I think that extra space off to the side is actually really nice because it gives you plenty of room to hook up that wiring connection when you do go to tow a trailer. But as far as the install process goes, it's really straightforward. Something that I think you could definitely do in your driveway or your garage with a very few simple hand tools and maybe just a little bit of time. Now if it's not something you want to tackle on your own, whether you just don't have the space or the desire to tackle it, that's totally okay. You can either dealer locator to find an installer near you to help you get this installed, but if it is something you want to tackle, I'll walk you through step by step what that looks like. And before we get into that, if you decide that this is the right hitch for you and you decide to put it on your Maverick, I'd love to hear how you like it. Drop us a review, let us know how you're using it and how it's holding up for you. Without further ado, let's get going on that install. The first thing we need to do is lower our exhaust down to give ourselves a bit more room to work. And before we do that, we need to find a way to support it. So if you're on the ground, a floor jack or a jacks stand can probably do the job just fine, maybe some blocks of wood. But what we do is we typically hang a strap between two points underneath the car. We can tighten it up against the exhaust. And then once we remove the hangers, that'll allow us to ease this down, and this will make sure it doesn't drop down too far on its own. We really just have one exhaust hanging to worry about, and we're actually gonna just fully remove the mount that's holding it in place using a 10 millimeter socket. (drill whirring) (drill whirring) Now we don't need to let this down super far. There's another hanger up there that's gonna be holding it in place pretty well, but this will just give us a little bit of room to flex and move it out of the way as we need to. Next we need to get this underbody panel removed on the passenger side. There's gonna be a number of seven millimeter screws around here that's holding it in place. So it's a good idea to just start in one spot and work your way around. (drill whirring) (drill whirring) With that panel out of the way, we can see two 18 millimeter bolts, and these will be mirrored on the driver's side too, but we wanna remove them all. (drill whirring) (ratchet cranking) While you're over on the driver's side, take that hanger off of the isolator because this part that we remove those 10 millimeter bolts from won't get reused, but the isolator will. So just pop that back onto your exhaust and we'll get to it in a future step. Our hardware spots for the hitch will be the locations we remove those two 18 millimeter bolts on either side, as well as this slotted hole towards the front of the vehicle. Now to get our hardware in place, we're gonna have a couple of pull wires here. We're gonna need to reverse fish wire everything in. So slide a spacer block onto the fish wire, thread a carriage bolt onto the coiled end, and we're gonna push the carriage bolt up into that hole first. Try to keep my hand out of the way as best I can, then the spacer block. (metal clacking) Pull it all back down through. And one thing I like to do is put a small bend into the end of the fish wire there, kind of like that, so it doesn't want to pull itself back out of the hitch when we do raise it into position. You can also check to make sure that your hardware threads in smoothly to the other weld nuts there. And if it doesn't, you could always go through and clean it out with a tube brush and some penetrating oil or something. And it's a good idea right now to go over the hardware combination we will be using for the hitch. So we're gonna have the silver bolts in our kit and a conical tooth washer with the teeth facing up towards where the hitch will sit. And the one thing we need to do before we raise the hitch up though is decide what we want to do with this cover panel. You can trim around here and cut part of it out. And I think that's fine. But for me, personally, on my own Maverick, I just removed the panel entirely. It's gonna give you a lot more room off to the side to mountain wiring, if you wanted to do that later, which this neighbor will be. So on each corner of that panel, there's going to be a rivet. We're just gonna drill those out. I've got Ethan helping me out to raise the hitch up into position. We're going to kind of start on his side, making sure we get, one, our fish wire fed through the rearmost hole on the hitch, but, two, we want to raise everything up and over the exhaust first. (metal clacking) There we go. And as we get those fed through, we can line everything up, making sure that you don't pitch this wiring harness underneath. Grab a piece of that hardware combination that we showed earlier, and just get one started on either side. (metal clacking) I know we already went over the hardware combination for the weld nuts, but the carriage bolt will be a slightly different story. First, I'm just gonna get the fish wire removed. Now you can just pull this off, if you want. Or since you've got the room for it, I like to unthread it just because I don't wanna risk popping that carriage bolt back up into the frame. And you can apply a little bit of sideways pressure with a finger or a screwdriver or something, and it's just gonna get a flange nut with those teeth facing up towards the hitch. And once you get that started, you can thread it up all the way until it touches my hand. (metal clacking) Now I am not gonna get this really even hand tight because we have a lot of side-to-side play, so I'm gonna come out to the back of the vehicle and just center up the hitch before tightening anything down fully. Now getting things centered up, I just use something like that backup camera as your guide, and you can get something like a ruler or something to actually line that up perfectly. But we did that and found that right about here is good. There is a fair amount of play side-to-side, so I'd say it is still pretty important to make sure you get that precise. Once you're happy with how it's placed, you can go back through and tighten up that hardware before we fully torque it down. Now if you don't have a torque wrench, you can find them here at etrailer. Or typically, you can check them out or rent them from a local auto parts store. But you wanna make sure you reference the instructions to find the right torque specs because it will be different for the weld nuts and for those carriage bolts. But just go back through and repeat that for your remaining hardware. With everything torque down, we can return to our exhaust and rehang it on the newly provided tab on the hitch. Just push it on and you're good. The last thing we need to do is trim our underbody panel so that it can fit around our hitch here before we put it back into place. Now I've marked out a guide that we're gonna follow. So pretty much right here on this top lip where we took out the push pin fastener and there's a stud passing through, I'm going over a couple inches and going down at this sort of 45-degree angle. And once I reach close to the bottom, I pretty much just go straight across. This mounting tab is the only one that will get cut off. So you can use whatever you want to cut through this. I mean, it's pretty thin plastic, so I'm gonna give it a go with some snips, but you could also use something like a rotary tool or a multi-tool. Now as you're test fitting this back into place, you might realize like us, you need to cut a bit more away just for it to clear right here. So I'm just gonna continue probably just another line right here and just go straight across from there. Again, all these mounting locations will be retained. And TowSmart doesn't give any diagram for this, so you can just trim to your heart's content. I like kind of starting small like this and trimming more as needed 'cause you can always take more away. Now once you're happy with the fitment, you can go back and reattach everything. I'm actually gonna leave this off for now because we are gonna be doing our wiring, and that's gonna give us a lot more room to work. So once all the install stuff is done, you can put it back together. If you're just doing the hitch, you can put those fasteners back in place and you're good to go. And that'll do it for our look at and installation of this TowSmart Class III receiver hitch on our 2024 Ford Maverick. My name's Aidan, and thanks for watching.
Ratings & Reviews

Was able to install this in the driveway in under 3 hours (including the wiring harness). Not bad for someone with below average mechanical experience. The video was incredibly helpful!
Very easy install, takes about 30 Min. Nice factory finish and truck only needs minimal modification to the plastic. (2022 Ford Maverick)
Fast Shipping, Good Packaging, Item as Described. All Hardware Included, Easy to Install, Looks Great.
Excellent, easy to install. NEED a TEMPLATE for cutting the plastic.
Do you have a question about this Trailer Hitch?
Info for this part was:
At etrailer we provide the best information available about the products we sell. We take the quality of our information seriously so that you can get the right part the first time. Let us know if anything is missing or if you have any questions.


Thank you! Your comment has been submitted successfully. You should be able to view your question/comment here within a few days.
Error submitting comment. Please try again momentarily.