
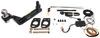
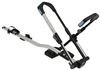
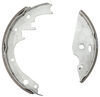
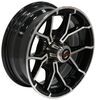
Draw-Tite Max-Frame Trailer Hitch Receiver - Custom Fit - Class III - 2"


To see if this custom-fit item will work for you please tell us what vehicle you'll use it with.
Thank you! Your comment has been submitted successfully. You should be able to view your question/comment here within a few days.
Error submitting comment. Please try again momentarily.


Fully welded vehicle trailer hitch is strong and durable. Draw-Tite's Tested Tough guarantee ensures that this hitch exceeds industry standards. The combination of an e-coat base and a powder coat finish provides excellent rust protection.
Features:
Specs:
Draw-Tite's Tested Tough program provides testing standards far superior to those outlined by the Society of Automotive Engineers (SAE), the go-to source for engineering professionals.
Each Draw-Tite trailer hitch receiver undergoes extensive fatigue testing and static testing with the ball mount that is either supplied or recommended for use with that particular hitch, thus ensuring results that are applicable to real life use. Fatigue testing is also conducted on hitches rated for use with weight-distribution systems.
In addition, Draw-Tite performs static testing on a simulated automobile, as opposed to the rigid fixture used for SAE testing, resulting in a more true-to-life scenario.
At etrailer.com we're committed to the products we sell, and to our customers. Our experienced and knowledgeable staff are available via both phone and email to address your questions and concerns for the lifetime of your hitch. The technicians at etrailer perform hitch installations on a daily basis, making them a valuable resource for do-it-yourselfers. The one-on-one, personal service you'll receive comes straight from an expert in the towing and automotive field. We've installed it, we've wired it and we've towed with it, so whatever your question, we can answer it.

California residents: click here
Videos are provided as a guide only. Refer to manufacturer installation instructions and specs for complete information.
Hello neighbors, it's Brad here at etrailer and today we're taking a look at installing the Draw-Tite Trailer Hitch Receiver on a 2021 Mercedes-Benz GLB. Now this is what your hitch is gonna look like when it's installed on your Mercedes and overall it's a very clean look and that's because it's a hidden cross tube, meaning the only thing that you're gonna see is the functional part of the hitch here where you're gonna be loading things up so you get a nice clean look and all the usability of your hitch. Now this one is a 2 inch by 2 inch receiver tube opening, which is gonna be great for a number of different accessories. It's kind of the standard size. So when choosing ball mounts, bike racks, or cargo carriers, you're gonna have tons of options. Now all of those accessories are gonna stay in place with a 5/8 pin and clip.
Keep in mind this does not come with the hitch. A lot of times your accessories will have them included. If you plan on leaving your accessories on your vehicle, I would highly recommend picking up a locking pin and clip. That way you can lock it in place and know that no one's gonna walk away with your accessories. Rolled style safety chain loop makes it nice and easy to hook up your safety chains, whether you have a standard S hook or even a larger clevis style is gonna go on there nice and easy.
And speaking of towing, you're gonna wanna adhere to the weight capacities of the hitch, which are gonna be rated pretty decently. You have a gross trailer weight rating of 3,500 pounds, which is the weight of the trailer plus the accessories loaded onto it. Your tongue weight rating is coming in at 525 pounds, which is gonna be the downward pressure put on the inside of the receiver tube opening. That's gonna be your suspended accessories, like your cargo carriers, your bike racks, and with 525 pounds, that means you can get a four bike bike rack loaded up and you shouldn't have any problems. Now keep in mind, just because the hitch is rated at that, you do wanna check the vehicle's owner's manual to see what it's capable of towing.
Compare that with the hitch as well as all the components that you'll be hooking up to your trailer. Make sure that you're staying under the weight capacities of all of them. From the center of our hitch pin hole to the furthest point of the rear fascia, we're coming in about 4-1/2 inches and that's gonna be important for folding accessories. You should be able to fold those in the stowed position and not have any clearance issues with your fascia. Now keep in mind when they're folded up, you're probably not gonna be able to open up your hatch, but not to worry if there's nothing on 'em, you can lower those down and still gain access to your hatch.
Also important is your ground clearance. And this one is pretty low here, so it's coming in at 11 inches. So when choosing accessories, you might want to get one with a raise on the shank. That way it gives you a little more ground clearance. It's also gonna be important for choosing a ball mount. So with that measurement you can compare against the coupler on your trailer and determine the rise or drop necessary. And now also keep in mind when you have suspended accessories like cargo carriers, bike racks, as you go up inclines, those wanna tilt towards the ground and you don't want those to bottom out. So just keep that in mind when you have those loaded up. As far as the installation goes, this one's actually not too bad. You are gonna be lowering down the exhaust and you're gonna have to trim out a heat shield and also drill a hole in the frame, but none of it's terribly hard to do. So I think overall this could maybe take about an hour or so. I'm gonna walk you through step by step. So let's get your hitch installed. To begin our installation we're gonna remove our lower splash shield and it's gonna require an 8 millimeter socket. The instructions say 10, but turns out these are 8 and we're just gonna kind of work our way over. So we start here. (drill grinding) And then just kind of follow your way over. You're gonna find that you'll have more as you go along. Now throughout this process we're gonna be removing quite a bit of hardware, so I recommend having a nice organized spot to keep all this. It makes reinstallation that much easier. (drill grinding) We also have plastic push pins that are on each side, so you're gonna want to try to pry on the center. A flathead screwdriver will work pretty well here. I'm using a trim panel tool, but we're gonna accomplish the same thing. Just pry that center part out and you should be able to remove the rest of that plastic push bin. Now once we get the other side off, we'll have this little splash guard come off. We're gonna set this aside. Now we need to lower down our exhaust and there's gonna be a Torx style bit or a star bit, a 10 millimeter socket's gonna work on here to lower this down. So there's one on each side. Go ahead and get this taken out. (drill grinding) Now there's a sensor on the exhaust and we're gonna be lowering down a bracket further down. So the exhaust is gonna hang down. We wanna make sure we don't damage the sensor. So there's a plastic push pin. If you use a pair of needle nose pliers, you can kind of just pinch in those tabs and we can push this out. And then from here we can just unplug our sensor. So there's a small locking tab here that's gray. My fingernails aren't doing it, so I'm gonna grab a small flat head and that's gonna unlock it. You can then push that tab and get it separated. Now I put cam buckle strap on our exhaust because we're gonna drop down this plate that has the other exhaust isolator on it. There's another one that's further ahead. I don't really think that it's gonna hang down too much, but I'm just gonna put that there as just a extra brace. That way that exhaust really isn't hanging down causing potential damage. We'll get our brace taken off. This is gonna be a 16 millimeter socket to accomplish that. (drill grinding) Now as you can see, the exhaust does hang down. Our cradle's really not doing a whole lot here, but I'm gonna just kind of, you know, sitch that up. Just give a little support. But this is gonna give us a little bit more room to work to get our hitch up. Exhaust down, we can remove the heat shield 'cause we're gonna trim it. Now there's gonna be four 8 millimeter nuts that are kind of tucked up here. So we'll just buzz these off real quick. (drill grinding) Now where our sensor was, there's gonna be this little clip on the heat shield, you're gonna wanna pry that off. And then also where the heat shield goes into our wheel well whiner here there's also gonna be an 8 millimeter bolt and there's one on the other side. So go ahead, get that taken out. (drill grinding) Now we're gonna be trimming our heat shield. I put some painters tape here to give you kind of a visual cue. So the edge here that has kind of this bump out, that's gonna be cut off. So we're just kind of following this square. You're still gonna have your four points that bolt back up and to cut through this, this is a pretty thick heat shield. A pair of tin snips is generally a good idea if you have another cutting method, whether it be a power tool, by all means, go ahead and do that. Just know that these edges get pretty sharp. So I'll go through, we'll get this all cut out and then we can reinstall this. (saw grinding) Tighten down those 8 millimeter nuts. On our frame rail we're gonna have this bolt here that's gonna be a T25 Torx bit to remove. There's gonna be one on each side. Go ahead and get these taken out. We're gonna raise the hitch up and it's not gonna be for the installation quite yet. We're just gonna be marking our rear most hole and that way we can determine where to drill. So have a paint marker ready or some way to make a mark here. Foremost hole, this should go right over to kind of the rubber cap that's in the frame rail. Eventually that's gonna be a spot where we feed our hardware in. So the main thing is, is again, get these two aligned with those weld nuts and get one of these started on each side. That way it supports it up and we can make this hole marked out. We'll just raise this up and again, align those holes with the weld nuts and get that started. If you want to, you can use a 13 millimeter socket to kind of zip this up and that way it holds the hitch exactly where we need to be. But I have a chalk marker here. I'm gonna just mark out this entire hole here and that's gonna give us a spot that we need to drill. So good time to check to make sure that your other weld nut is aligned. Now we can take our hitch back down that way we have a clear shot to be able to drill that hole out. Now with this marked out we're gonna be using a 1/2 inch drill bit eventually, but with a bit like that, you don't want it to walk around too much and we're gonna just start a pilot hole here first. (drill grinding) Now we'll go back and enlarge this with the 1/2 inch drill bit. You can go a little bit larger. Don't be too worried because when we feed the hardware in, that hole's not slotted on the hitch. So it has to be a perfectly drilled mark. So if you're happy with what you've drilled out, great, but again, don't be afraid to kind of waller it out just a little bit. That way when you raise the hitch up, it'll be nice and aligned, you're not gonna have to fight it. (drill grinding) Now to get our hardware in this drilled out hole, we're gonna find that we have this rubber grommet back here or towards the front of the vehicle. Go ahead, you can pop that out. Look if we get it with my fingers here. If not, you can use just a pair of pliers. But this will be our access hole for our hardware. So take one of your fish wires and the coiled end and you're gonna want to feed it into the drilled out hole and back towards this access hole. Now there's a hole in the frame so it might get caught up here and there. As I'm reaching up here I can kind of feel that, but you're gonna be reaching for that coil and trying to pull it through the access hole. Take your time here. It can be a little bit tedious. And once we pull this through, what I'm gonna do on the end of our wire, just put a bend in it that's gonna kind of help prevent it from being pulled through. And we're gonna take our spacer block, the smaller spacer block, there's gonna be a longer one. Make sure you get the shorter one and feed this in the frame. We'll then take our carriage bolt and thread this onto that coiled section. Now as you probably notice, feeding that coil in that section here is gonna get kind of tight here. So just be patient if you can kind of feed that block through there because we're gonna try to get this to drop in. So what you can do also is take the carriage bolt, feed that in, just kind of jostle that around until it drops in. So don't be surprised if it doesn't go that smooth. Sometimes they can be a little bit tricky. The main thing is don't put too much tension. You want this fish fire to stay on here and we're gonna keep this on here even for now because this'll help when we get our hitch raised up. For the access hole we're gonna use a reverse fish wire technique, which is pretty easy. You'll just take your carriage bolt and coil that on. And I have my spacer block ready to go here. So this should just kind of be ready to drop in. So we'll just push up our carriage bolt and then our spacer block. And this may have to kind of align with the frame so it's kind of tight here, but we should be able to get this dropped down and make sure that it's sitting flush. Now we're just gonna repeat the same process on the other side of the vehicle. Now with an extra set of hands we're gonna get our hitch raised in place. So take your fish wires for the bolts that we passed in and feed those through the corresponding outside holes. And then I'm gonna use the weld nut bolts like we had earlier to get this all aligned. So as we raise this up, pull your fish wires through, get those aligned with those weld nuts and just get a few threads started and that way it's gonna hold the hitch up making it a lot easier to get the rest of the hardware in place. It's a good time to make sure that you're bolts passed through. This is why I said it might be beneficial to enlarge that hole to have a little bit of wiggle room to get this to drop in. But once we get one started on each side, it's gonna make it a lot easier so we can get the rest of the hardware on. Now for the weld nuts, I suggest doing the one that's towards the front of the vehicle. The reason being is this is going to become the mounting point for our exhaust bracket eventually. So we'll need to put a washer in place there. So instead of getting that one started, we'll go ahead and we can pull up our fish wires once we have those bolts pulled through the hitch. And then we'll take our conical tooth washer. The teeth on it need to face towards the hitch. So just slide this here and use that washer to kind of keep the bolt in place and get a few threads started on each bolt. We'll then repeat that for the remaining three. Now with those hand tightened up, you can snug them down with a socket. This is gonna be a 3/4 inch to accomplish that on the nuts that we just fed on. At this point though, I'm gonna go ahead and get these torqued down. So the torque settings are found in the instruction manual. The larger bolts do have a higher torque setting than the ones that go in the weld nut. So we'll get the four big bolts torqued down first and then we'll come back with our 13 and get these torqued down to their torque settings and then we can get this one in place. So still hang tight on putting the hardware in that hole. Now we can get our exhaust raised back up and we're gonna be using the new bolt and then putting a washer that's included on top of the bracket. So just kind of slide that on here and then raise your exhaust up and get this started. Now it might be beneficial to put the bracket downstream to kind of help support the exhaust. That's completely up to you. I'll just get mine started here on both sides. Now we'll get these torqued down. We'll get our exhaust bracket put back in place. (drill grinding) I also want to get our exhaust sensor plugged back in. Push that locking pad back on. We can put this clip on here. And that's gonna do it for the installation of your hitch. And that was a look and installation of the Draw-Tite Trailer Hitch Receiver on a 2021 Mercedes-Benz GLB.


Was a chore to install. Was the only maker of two inch receiver. Followed instructions and went on as detailed. Have used many times without issue. Would definitely purchase again.

Jim

7/23/2025
great , no issues
Great product but the etrailer video made it all so easy. I attempted to retain as much of the heat shield as possible but in the end I should have cut it exactly like the video describes. It is low but a 5 inch rise should make trailering my 16 foot boat easy.
I've had this hitch for a year now with no issues. I had etrailer install it on my vehicle. This is the second time I've had them put a hitch on one of my cars. I've been pleased each time and will return if ever I need to. No complaints.
The installation video you provided was spot on, and made the install much faster and easier. Looks like it was meant to be on the car. Exact fit.
Delivery on time , decent price.
Perfect

Do you have a question about this Trailer Hitch?
Info for this part was:
At etrailer we provide the best information available about the products we sell. We take the quality of our information seriously so that you can get the right part the first time. Let us know if anything is missing or if you have any questions.


Jim
7/10/2025
Fantastic working great