
To see if this custom-fit item will work for you please tell us what vehicle you'll use it with.


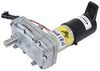
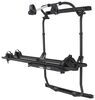
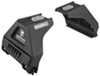
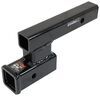
Fully welded vehicle trailer hitch is strong and durable. Draw-Tite's Tested Tough guarantee ensures that this hitch exceeds industry standards. The combination of an e-coat base and a powder coat finish provides excellent rust protection.
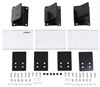
Features:
Specs:
Draw-Tite's Tested Tough program provides testing standards far superior to those outlined by the Society of Automotive Engineers (SAE), the go-to source for engineering professionals.
Each Draw-Tite trailer hitch receiver undergoes extensive fatigue testing and static testing with the ball mount that is either supplied or recommended for use with that particular hitch, thus ensuring results that are applicable to real life use. Fatigue testing is also conducted on hitches rated for use with weight-distribution systems.
In addition, Draw-Tite performs static testing on a simulated automobile, as opposed to the rigid fixture used for SAE testing, resulting in a more true-to-life scenario.
At etrailer.com we're committed to the products we sell, and to our customers. Our experienced and knowledgeable staff are available via both phone and email to address your questions and concerns for the lifetime of your hitch. The technicians at etrailer perform hitch installations on a daily basis, making them a valuable resource for do-it-yourselfers. The one-on-one, personal service you'll receive comes straight from an expert in the towing and automotive field. We've installed it, we've wired it and we've towed with it, so whatever your question, we can answer it.

California residents: click here
Videos are provided as a guide only. Refer to manufacturer installation instructions and specs for complete information.
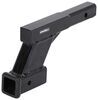
Hey neighbors. Today we're gonna be taking a look at a Draw-Tite hitch on our 2020 Range Rover Evoque. Some of the reasons why you might need a trailer hitch on your Range Rover is in case you're carrying a cargo carrier or a bike rack or something like that. You're also able to do some light duty towing with this vehicle. Just keep in mind that if you're doing towing, you'll need to buy a wiring harness separately. Towing capacity for this hitch is gonna be 4,000 pounds, so that's the amount of weight that you can have in your trailer.
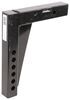
The tongue weight capacity is 400 pounds. That's the amount pushing down on your tongue here. And just keep those numbers in mind and also check your owner's manual to make sure those numbers correspond. Although this hitch does not come included with a pin, many of your accessories will come included with that, we do have these available separately on our website along with locking pins. As far as the safety cable loops, these are nice rounded loops.
They're gonna fit almost anything. You got your regular style here and also your clevis. Those fit perfectly fine. For a few measurements here, from the bottom of the receiver to the ground, of course I'm on the lift so this won't be dead on accurate. It looks like about 16 and a right about 16 inches.
As far as how far it sticks out from the back of the bumper, looks like that's gonna be three and three quarters of an inch. So that's gonna stick out pretty far beyond your bumper. The measurement from the center of your hitch pin hole to the end of your receiver is gonna be two and three quarters of an inch, and that's a two inch by two inch receiver there. As far as the install goes, this is a pretty difficult install. Make sure you follow the instructions very clearly and then hopefully I can show you some tips and tricks along the way.
If you don't feel comfortable yourself doing it, then feel free to check out our dealer locator and you can find somebody that'd be happy to help you with that install. If not, follow along and I hope I can help you out. To start our install, we're gonna be removing this fascia. So first step is to remove these six T25 screws. (socket whirring) And we have these two 10 millimeter bolts going through the heat shield. (socket whirring) Onto removing this wheel well lighter. We have a Phillips screw here and it looks like two 10 millimeters, then I'll go ahead and remove now. (socket whirring) So there is another Phillips screw in here, it's kind of tucked back. So behind this wheel well liner that we have pulled back now, we have two Phillips screws and two T15s that we'll remove. So we're gonna take this last T15 out, remove the mud flap and then we'll repeat that process on the other side. Before we get any further, it's a good idea to tape up on the bumper and then on your fender, I'll probably also throw some tape up here just to make sure that we aren't scratching any surfaces because while we're uninstalling and reinstalling, these might rub together. So I just wanna put some tape on there to keep scratches from happening. We'll remove this plastic panel. I have a plastic trim tool here. It should just pop up. Probably have to work your way around. There's a few clips in here and it pulls out. Behind that plastic panel, there's an eight millimeter bolt that we'll remove and then we'll repeat that process on the other side. (socket whirring) You'll have this plastic pin here to remove. I'm using that same plastic trim tool is one here and then one on the other side. At this point, we're ready to remove the fascia. I have a friend here helping me out, so we're just gonna work our way around, popping these clips out. We've got all those clips removed here. There should be some more in the middle. Now we've got the bumper off. It took a few sets of hands. I'll just show you where we had issues. So on the outsides, they pulled right out just fine. Once we got to the middle here, there's these tabs. So we had to have somebody pull it back and then we took a hose pick in here and pushed these tabs down to release them. Here's what those tabs look like on the bumper, again, we had to have somebody pulling the bumper back and another person going in with a hose pick to manipulate those to take this bumper off. Over here, this is the passenger side. This is a plug that we had to unplug. I can show you the other end the way that I had to unplug that. So you'll just pull this clip back and that releases the plug. So while we had the fascia off, we went ahead and got our wiring done for our neighbor. Now we're ready to take off this bumper support. There's gonna be a bracket with a 10 millimeter nut. Take that off. (drill whirring) There's another one of those on the passenger side once you have both of those off. So I'm gonna take these four bolts off and then there's four on the other side, 21 millimeter. I'm just gonna break these loose by hand and then use my impact on the on the rest of them. One thing I wanted to mention, while we have our wiring ran across, we just gotta be careful because I have this wire running here, so I'm just gonna keep that in mind when I eventually take this bumper support off. (drill whirring) Don't forget to set these bolts aside. You are gonna reuse those. However, this bumper support is just coming off and not going back on. So before we go ahead and get our bumper up, we're gonna apply some silicone sealant behind. It's just gonna help that seal up a little better. So I just put a glob around the border and I'll do a second one outside that. Now ready to get our hitch on. Just lift it up above the heat shield there. I'll get one bolt started on this side. I'll go to the other side and get a bolt started there. (drill whirring) I'll go ahead and get all these ran down just snug because I'm gonna come back through with a torque wrench afterwards. (socket whirring) We've got all these bolts snugged up and it's ready to torque them down. We're just gonna torque them to the specifications listed in the instructions. If you do not happen to have a torque wrench, we do have 'em available on our website or you can always borrow one from an auto parts store. So I've measured out on our fascia here what we're gonna cut out. I just followed the instructions. It's got pretty thorough measurements on where we're gonna cut. Today, I'm gonna be starting cutting with the oscillating tool. You could use a Dremel or anything like that, but this is just what I have around the shop so I'm gonna use that. (oscillating tool whirring) So I got that all cut out. It still looks pretty rough. I'm gonna clean it up a little bit, but it's always a good idea before you do that to just kind of mock it up on the car and make sure it looks like it's gonna fit. And then once you figure out that it's gonna fit and you're done trimming off pieces, go back in and clean this up with a razor blade or a file. Alright, so we got everything back together and our hitch is looking good. So that'll do it for our install of our Draw-Tite hitch on our Range Rover today.


My boyfriend installed this on my 2020 Evoque after Land Rover quoted me nearly $3k to install a receiver for a bike rack. His notes after dismantling my car: this whole unit is actually stronger and sturdier than my existing bumper beam, which has to be removed to swap this in; worst part was having to cut into the car's lower fascia. I was nervous it would look bad but it turned out ok. Not sure what the process is for newer versions of this car but if you have some skills or a good mechanic, this receiver is def worth it. One year out and no issues - rack is held in tight and overall I'm stoked we found this as an alternative!
Info for this part was:
At etrailer we provide the best information available about the products we sell. We take the quality of our information seriously so that you can get the right part the first time. Let us know if anything is missing or if you have any questions.


Thank you! Your comment has been submitted successfully. You should be able to view your question/comment here within a few days.
Error submitting comment. Please try again momentarily.