
To see if this custom-fit item will work for you please tell us what vehicle you'll use it with.
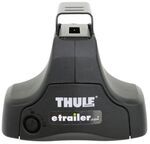
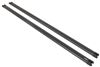
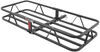
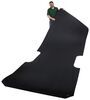
This aerodynamic, flush-mount roof rack lets you carry gear and cargo on your vehicle while maintaining a clean, factory look. Crossbars work with channel-mount and clamp-on accessories. Installs on your vehicle's naked roof.
Features:
Specs:
 Alternate Instructions
California residents: click here
Videos are provided as a guide only. Refer to manufacturer installation instructions and specs for complete information.
Hello neighbor, this is Curt with etrailer and today we're taking a look at the Yakima BaseLine FX roof rack, and we're gonna see how it fits and how it installs on our 2024 Nissan Rogue. Now, a roof rack is an excellent way to be able to carry some of those items that either don't fit or you just don't want riding with you inside of the vehicle. There's things like bike racks, kayak carriers, ski and snowboard carriers, cargo boxes, cargo baskets, any number of things that you can end up putting up on your roof to give you that extra storage space without adding to the length of the car like a trailer or a hitch cargo carrier would. Now in the case of the BaseLine FX, it is a flush roof rack. Now, a flush roof rack as opposed to an overhanging rack does offer less bar space. However, as far as the look of it goes, it actually looks a little cleaner and a little more of an OEM look than having that overhang.
It does, however, force you to kind of put items toward the center of it. Luckily, though the Rogue isn't some really, really tall car that can make life really difficult in those instances. This roof rack is gonna offer a weight capacity of 165 pounds. However, you should definitely check your owner's manual and see what your roof carrying capacity is there. Whatever number is lower is the number that you're gonna end up being able to carry.
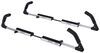
But with all that being said, let's go ahead and take a look at it from up on the roof and get some measurements and see how it fits on our Rogue. Now before I get into some of the measurements, I also wanted to mention that this roof rack can accommodate your clamp mounted accessories or your T track accessories through this rubber strip right here. They can be dropped right here in the middle and then just slid into position. But we're gonna take a look at how this fits on the roof. There are some things in the install, for instance, as far as where our bars get placed, that is going to be pretty specific in our installation instructions.
But I think they're in an excellent position, and personally I wouldn't wanna move them from where they are anyway. Let's start with our crossbar spread. Now the crossbar spread is important to know, because any rooftop accessory that you have is gonna have a minimum and a maximum bar spread that you can use it on. And in the case of our Rogue, our bar spread ends up being exactly 32 inches. That's actually perfect as far as I'm concerned.
Most rooftop accessories fall between the 26 and 36 inch mark, so a 32 inch crossbar spread makes me feel really, really good about not running into too many accessories that won't work on my Rogue. The other thing that we're going to take a look at is how much height does this add to the Rogue We're looking at it adding about 3 3/4 inches. So if you're worried about roof clearance, whatever the height of your accessory is, add 3 3/4 inches to it along with the vehicle height, and you should get your overall height when you have that accessory up on the roof. We're also gonna take a look at what we have underneath the bar. And we're gonna have about 2.5 inches of space under the bar, and that should be more than enough for any of those clamp mounted accessories to go on here without really running into any interference from the roof. Now, I had mentioned in the installation instructions that bar placement is very, very specific. So stick around and we'll show you exactly how we got these up on the roof of our Rogue. So to begin our installation, we're gonna go ahead and lay our bar out. Now for reference, we're showing you installing the second crossbar. We've got the first crossbar up already, and we'll show you the placement on that in a moment. But what we've got here is we've got our crossbar with the attached towers, our tower cover. This is what comes in our custom fit kit. We've got a foot pad with the rubber on the bottom of it, and we've got our clamp and our Yakima tool, and we've got a small flathead screwdriver as well. So the first thing we want to do is make sure that we get our crossbar or basically our tower spread correct. So there's a little arrow right in the middle here of our crossbar, and that is going to note the center of it. Now the thing is is that the instructions call for 36 inches, you know, to be our spread here. So 18 inches, basically from this line on our tower to the center. When we put it at that, we actually discovered that it was a bit too wide, so we played around a little bit with it and what we came up with was that if you go 17 3/8 rather than 18 inches from the center to this line, you actually get the correct tower spread. Now you could do that by measuring again from that hash to the very center. It could be a little bit difficult to eye that out, though. So what I did was I just took a measurement of how much of this is exposed right here. And if you get 3/8 of an inch on that, on this side and the other side, then you're gonna be in the right spot. So that's a really quick and easy way to get that measured. So once we have that in the correct position, we're gonna go ahead and through this bolt right here, we're gonna tighten it down with our Yakima tool until we hear a pop like that. (bolt popping) Once we hear that, we know that it's torqued down enough and it's got the correct tightness, it's not gonna go anywhere. The next step we're gonna take is to put on our foot pad. Now, the fit kit comes with this plastic piece and the rubber attached to the bottom of it. That's 'cause this is meant to go on the BaseLine tower as well as this. The BaseLine FX, however, has a little bit of a different attachment point, so it comes with them already. And what we're gonna end up doing is just removing the rubber pad off of the plastic bottom of our fit kit, and we're gonna attach it to the one that comes on the BaseLine FX tower. We wanna make sure that we get it flush all the way around and it's got a good tight fit on there. Now for the next step, we're gonna go ahead and turn our bar over and take our flathead screwdriver, and we're gonna unlock this portion right here using the flathead screwdriver. Now, this is how it'll come with these plastic lock cores. A suggestion I'm gonna make is that you take a look at Yakima's SKS system or same key system, and what you could do is you could buy lock cores and keys and you can actually match them up and get them keyed alike to any other Yakima accessories you have. That way you don't have, you know, six, seven different keys for six, seven different accessories. So it's also gonna help keep our bars secured onto our vehicle. So with it unlocked, we're gonna depress this tab that's down here in the front, and we're gonna open it up. Once we have it opened up, we're gonna go ahead and turn it over and we're gonna grab our clamp. Now our clamp is gonna be inserted right here, and what you want to do is make sure the rubber side of it is facing up the same as the rubber side of our feet. We're gonna slip that in there. It's gonna kinda lock and latch into this metal block here in the front. Then once that's in, we can go ahead and close that gray door again and lock it in place. Now in your instructions, you're gonna see a chart that has measurements like M1, M2, M3. Pay close attention to those 'cause they do indicate what measurements and dimensions we need to make our bars. However, we did discover that there we inchesre a few mistakes in that. We discussed a little bit about what the tower spread should be on our back bar, but we're gonna come over to our front bar and talk about that a little bit. The front bar asked for a measurement of 38 and 3/8. What we found out was that the correct width of these is actually 37 inches. So make sure on your front bar you get it at that 37 inch point. The other measurement you're gonna see for the front bar is an M2 measurement, and that has to do with where on our roof it gets placed. So the M2 measurement, which says 12 inches, is gonna go from the corner of our roof here above the glass to the very front of the foot pad on our first bar. So that's a measurement of 12 inches. The measurement for the tower spread on the second bar is the M3 measurement, we had just talked about that. And the M4 measurement is gonna be how far back that's gonna rest. And that M4 measurement is gonna be taken from the center of our first crossbar to the center of our second crossbar. And the instructions indicate 32 inches, so that's where we're gonna plan to put that second bar right here. Okay, so we're just gonna get up in our door here and very gently make sure that the clamp goes around on the outside, and our rubber pad should be fitting on the middle of this black track right here. And once we have that in kind of the general area, we're just gonna grab our measuring tape and make sure that we have 32 inches. And keep in mind when you're looking at those M2 and those M4 measurements, make sure that you measure both the driver and the passenger side of the car. That way we can guarantee that our bars are parallel to each other and perpendicular with the rails. So we've got 32 inches over on the driver's side, and now we're at 32 inches on the passenger side. So we've got our bar placed exactly where we want it to be on the roof. The next step we're gonna take is going to be to go ahead and open up our little door here again, just like so. And then we're gonna see a little bolt hole at the end of this block here that's gonna fit our Yakima tool. Now, what I'm gonna end up doing here is tightening it down, but I think it's important to tell you that I don't want to tighten it down completely on one side and then go do the same on the next side. What I'm gonna do is get this really snug, and then I'm gonna go to the other side and do the same, and I'm gonna incrementally back and forth keep tightening this down. And the reason for that is if you tighten one of these sides down completely without doing it to the other one, the other one can kind of pop out of place and then you're back here starting all over again anyway. It's much better to tighten each side down a little bit at a time and work it back and forth. And then finally you're gonna get it down to the point where you're going to hear that pop again like we did earlier, (bolt popping) just like that. Now we know we've got that torqued down to spec and our bar isn't gonna be going anywhere. At this point, we can go ahead and shut this little door there and go ahead, take our flathead and lock it. If you do replace this with a metal core like that, you just obviously use your key on that. And then what we're gonna do is take our tower cover, we're gonna slip these two tabs right in through here, and just pop it right on into place, just like that. Now we've got everything installed. The clamp is fitting nicely around our door frame. Everything is nice and flat up here on our foot pads and everything is nice and tightened down up here. Nothing is moving at all except for the car when I shake it like that. So again, a very, you know, simple install, as long as you realize that some of those numbers in their chart instructions were a little bit off. If you do it to the specs that we measured at, you're gonna be just fine. And I also would rather make an adjustment with those numbers of how far apart the towers are than I would by moving it further up or further back. These are actually in a really good place as far as the way that the roof curves, and it leaves them pretty even with each other. But again, fairly simple instructions as long as you, you know, pay attention to those numbers that we mentioned. This is something you could easily do on your own. So that's really all there is to it. And if you decide that the Yakima BaseLine FX is the roof rack for you and your 2024 Nissan Rogue, you go ahead and you get it, you install it, you're able to use it a few times, please share with us what you think of it in the comments below. We would love to share your experience with other neighbors so they can make the best decision for themselves. Once again, this is Curt with etrailer. Thanks for stopping by.


Do you have a question about this Roof Rack?
Info for this part was:
At etrailer we provide the best information available about the products we sell. We take the quality of our information seriously so that you can get the right part the first time. Let us know if anything is missing or if you have any questions.


Thank you! Your comment has been submitted successfully. You should be able to view your question/comment here within a few days.
Error submitting comment. Please try again momentarily.