
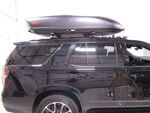
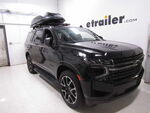
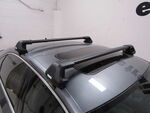
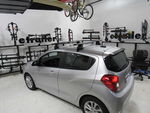
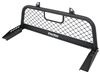
Thule WingBar Edge Roof Rack for Naked Roofs - Aluminum - Black - Qty 2


To see if this custom-fit item will work for you please tell us what vehicle you'll use it with.

This aerodynamic Thule roof rack mounts flush on your roof for a sleek, factory look. Crossbars with split rubber strips in top channels work with channel-mount and clamp-on accessories. Installs on your vehicle's naked roof.
Features:
Specs:
 Alternate Instructions
California residents: click here
Videos are provided as a guide only. Refer to manufacturer installation instructions and specs for complete information.
Hi, I'm Matt with Etrailer. Today we're gonna talk about the Thule roof rack on our 2023 Ford Maverick. Now this can be a great option if you're taking those longer trips and you're realizing that your bed space is filling up pretty quick. This is gonna be another spot where you can store those items on. Now, another storage option that you can go with is gonna be your hitch. We can put a cargo carrier or a trailer behind you.
The downside of that though, is, it's gonna make the footprint of your vehicle a lot longer, making it harder to get into those tight of spots. But with a roof rack in general, you don't have to worry about that. You just have to worry about the space above your vehicle. And with the Maverick being a shorter vehicle, most times you're probably gonna be good. Now, what I really like about this one we're talking about today is, this game's a really good fit and it's just really easy to use with.
So really for me, this is probably gonna be one of my top picks. Now, I do recommend using our fit guide. Make sure you're finding the right one for you because all these are gonna be custom fit to your roof. So today we're mainly gonna be talking about how this roof rack is interacting with our truck. So to do that, we're gonna go over all the components of it first.
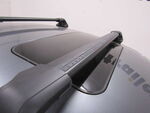
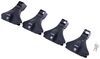
So we're gonna have crossbars at the very top, these towers. And then our fit kit then connects it to our roof. So let's start with the crossbar. So with these, they're gonna have this arrow shape room that's gonna help reduce wind noise from driving down the road. And we're gonna have this weather stripping here.
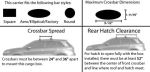
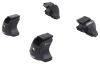
This is also gonna help reduce wind noise, but what it's also doing is preventing any debris or grime from getting into this channel right here, that channel so if let's say you have some accessories and you don't like the way they're clamping on, or they don't clamp on very well, if they have a T channel slot instead you could put it here instead. Now we're gonna have the towers, and you'll notice it has this black plastic core here. We can actually get this replaced later on with a metal locking core. You can actually find that on our website. And now I can remove that and we can see the inner components of this. And you can see we have a pretty easy access to this T channel now, and that's something I do like about it. Some other roof racks out there are a little bit harder to get to. And with this down here, it may look like a lot, but it's a pretty simple process. All we have here is the hardware that grabs onto your roof. So speaking of that fit kit now, that's would've come with a hook here that grabs onto the little gutter. And then we're gonna have this rubber piece that contours to your roof. And this is doing a really good job. What I look for in a good fit kit is to make sure we don't have any gaps anywhere. And with this one we don't. Now this is get a couple measurements to see how this is gonna fit on top of our roof. So the first one I'm gonna get is gonna be underneath the crossbar. So here in the center, that's gonna be a little bit over two inches. So that's not gonna be a whole lot of space. So keep that in mind if you have a clamp on accessory that is a little bit more bulky. But again, we do have this channel here at the top if you want to use that instead. The next one I'm gonna get is gonna be the over a height, that's gonna be just about three and a half inches. So that's not gonna add a lot of space to the top of your roof. That's one of the nice things about this being a little bit lower to the your roof, it is just gonna give it more of a sleek look. And for the overall crossbar spread we're gonna have, that's gonna be 27 and a half inches. So that's important to know, if you have any type of accessories that's gonna work with this or not. And typically it'll have that listing in the manual of your accessory. Something I do wanna point out about this one though, is the very end of these crossbars, this is gonna be a flush dial so we don't have to worry about any overhang, which also makes it look nicer. But if you have anything like skis or a kayak carrier, typically you want that closer to the edge 'cause it's a little bit harder to reach typically. And this is gonna have a pretty good weight capacity. Now it's important to check what your roof's rated for and then go from the lowest rated ones so you don't damage anything. Now, in my opinion, I think this is gonna be a pretty solid choice if again, you're looking for something that's just gonna look good on top of your roof and it's gonna be easy to work with. Now, another good option that I like to recommend is gonna be the Rhino Rack roof rack, because that will be a little bit more affordable. To me it just doesn't look as nice as something like this. But that's all more personal preference. So I'd recommend checking that one too. Now, when it comes to installing it, probably the easiest one in my opinion, but if you're curious to see that process, just stay tuned. We'll walk you through it. To begin the installation, we're gonna lay everything out and we're gonna make sure we have all our parts. So I have my crossbar, we're gonna have our towers that go along with it. I'm gonna make sure I have a tape measure so I can make sure everything's even, the tool detecting everything down. The fit kit, which is gonna be the hook, the rubber pad. And then we're gonna have our end caps. Now you'll notice I only have one set of everything up here because I already have the other one installed. It's gonna be the same process. We are gonna get a little bit of different measurements, but I'll talk about that later on. So let's start off with the tower. I can actually put that on now. So you're just gonna line this up the inside and it should match the contour of your crossbar. Notice how there's a longer edge back here that's gonna line up with this edge here. Let's get that the lined up. You'll push it in. You'll find you have some resistance 'cause we have a block. I'm gonna push that down with my thumb. Push the rest of the way in. There we have it. Sometimes it's a little bit easier if you just press on the bolt itself, keep pushing it in and it'll drop into place in that block hole. Now we're gonna reference our instructions for this next part. You're gonna notice we have A, B, C, D, and a bunch of other letters here. You're gonna reference your instructions and make sure you get it on the right marker. Once you find that out, then we can tighten this down until this line lines up with the very edge of our crossbar and the setting we're gonna be lining it up with today is gonna be D. Notice how that gets right up against there, but I won't go any further. There we go. Now this is gonna be for your rear crossbar. Your front crossbar is gonna be on the C setting. So just make sure you do this on both sides of your crossbar now. And we're gonna have this weather stripping. You're gonna notice one side has these little tiny arrows, the other side doesn't. What I'm gonna do is separate these by pulling them apart. Make that separated. We're gonna take this side with the arrows and make sure that's facing forward. Make sure your cross force in the orientation as it is right now with the thin side behind this, thicker side in front of us, we're gonna have this little tiny edge here that's gonna go into this tiny little divot, apply pressure, seat it in there and do that all the way across. You're gonna do the same thing for the other strip that comes with your kit. Again, you're gonna be using that thinner side that go into that thinner crevice. I'm gonna kind show you what that looks like now. Then this side right here, going into this point here, just like that, you're also gonna have this rubber pad. This is just gonna sit right on top of this base of your tower. You'll notice it just has the same contours. We're gonna have this kind of hook here that's gonna grab onto the front like so, just apply some pressure, just all the way flush against it. And you'll also notice that have a little bit of this edge peeking out on the side. You can trim that off if you want. I'm not today, so I'm just doing it for demonstration purposes. You also notice I have this hook already installed. I only recommend doing it on one side if you want to at this point, and I'll show you how to do that a little bit later. But make sure that the thicker point of the crossbar is facing in front of you, thin side behind you. So I'll just walk over here and we'll just kinda roughly place it up here. It doesn't have to be perfect quite yet, just kind of making sure it sits on top of our roof and sits on this edge. All right, so let's make sure this is sitting in the right spot. So the way we can do that is by grabbing your measuring tape, measuring from the front of one crossbar to the front of another one. And what we want here is gonna be 27 and a half inches. You can actually find this in your instructions. It'll show you the distance from one to another. We can adjust this a tad bit more just by pushing it back some. Check that one more time. And there we have it. Now, before you can actually get this measurement, you need to make sure the front one's on the right spot. The way you can do that is by measuring right here at the top of your windshield to the very front end of that tower. And that's gonna be 12 and a quarter inches in length. And just make sure that's the same distance on either side. All right, so everything's in the right spot now. You notice I have a little bit of a gap between the very front edge of that rubber pad and this corner here. And that's actually what we want, we just want a little gap like that. We don't want it flushed quite yet because in one of our next steps, we're gonna tighten this down. And if it's already making contact, sometimes it can become a little bit too tight and gonna come loose. So with that in the right spot, I can grab our hook and show you how to put that on. First I'm gonna open up my door and then we're gonna have these hooks go and grab the inside of this tower. You're gonna hear it click into place. You'll pull it down. Sometimes you might have to lift up on it so you can get a little bit more pressure in there because it should kind of seat in place a bit. There we have it. I'll probably double check that measurement right now. We got this in a good spot. Now let's say that gap was too short for you or too wide for you. What you can do to adjust that is come here to the very top and we can either just loosen or tighten this boat a little bit to get everything to fit a little bit better. And now we moved over to the other side because when we tighten this down, 'cause that's gonna be the next step, you wanna go back and forth. 'Cause if you stay on one side, you're gonna get an uneven fit. So that's why we're going to so slowly tighten it back and forth until you get that clicking right here. What that clicking is telling you is that this is all the way tightened down and it's gonna be secure. So I'll give it a good shake afterwards. Make sure it's not gonna go anywhere. That's feeling pretty good. Then just make sure you grab your end cap, the little plastic lock core, put that into place and you'll be good to go and you can load it up and take it out for a ride. Have you guys have any other questions let us know here at Etrailer. And again, I'm Matt and thanks for watching.


Do you have a question about this Roof Rack?
Info for this part was:
At etrailer we provide the best information available about the products we sell. We take the quality of our information seriously so that you can get the right part the first time. Let us know if anything is missing or if you have any questions.


Thank you! Your comment has been submitted successfully. You should be able to view your question/comment here within a few days.
Error submitting comment. Please try again momentarily.