
Custom Fit Roof Rack Kit With Y01156 | Y03541 | Y06179 | Y28TR | Y48FR
Item # Y59BB
Our Price: $767.75
Confirmed to Fit
2014 Nissan Rogue
Will this fit?
To see if this custom-fit item will work for you please tell us what vehicle you'll use it with.
This item qualifies for Free Shipping
In Stock


- All Info
- Reviews (212)
- Q & A (0)
- Videos (9)
- Photos
Yakima Roof Rack - Y59BB
- Crossbars
- Square Bars
- 2 Bars
- 55 Inch Bar Space
- Yakima
- Black
- Overhang
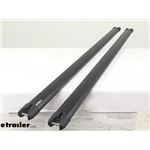
Heavy-duty crossbars mount to Yakima towers (sold separately) to create an aftermarket roof rack. Top and bottom channels let you add channel-mount accessories. Tie-down points in endcaps let you easily secure cargo.
Features:
Yakima HD Bar-SM:- Heavy-duty crossbars let you build an aftermarket truck bed rack or roof rack for your vehicle
- Pair with Yakima truck bed towers or roof rack towers and a fit kit (sold separately) to create a complete system
- Full-length design maximizes space for carriers and accessories
- Versatile crossbars accommodate accessories that mount in the T-slots or clamp around the bars
- Accessories can be mounted in top and bottom channels
- Rubberized strips in top channels reduce wind noise and drag
- Keep dirt and grime out of crossbars
- Provide cushioning and slip resistance for your cargo
- Bottom channels allow for easy installation on Yakima truck bed rack towers
- SL adapter (Y03541 - sold separately) allows bars to work with BaseLine, TimberLine, SkyLine, and RidgeLine towers
- Etched measurements on bottom of bars help center rack on your vehicle
- Heavy-duty yet lightweight aluminum bars are durable and rustproof
- Plastic endcaps help to keep water and debris out of bars
- Integrated tie-down points make it easy to secure gear
Yakima HD Bar SL Adapter:
- Adapters let you mount your Yakima HD crossbars on BaseLine, SkyLine, TimberLine, or RidgeLine roof rack towers
- Can also be used as replacement adapters for JetStream crossbars
- Easy installation with included tool
- Simply slide adapter into bar's channel and secure it to the tower
- Kit includes 4 adapters
Yakima BaseClip 179:
- Custom-fit mounting clips and pads allow you to mount BaseLine towers on your vehicle with a naked roof
- Padded, stainless steel clips provide secure grip on your door jambs
- Snap onto DropHooks inside towers
- Protect door jambs from scratches and abrasions
- Powder coated for durability and rust resistance
- Molded rubber pads fit the contours of your roof
- Clip onto bottoms of towers
- Protect roof from scratches and abrasions
Yakima BaseLine Towers (4-pack) (w/new covers):
- 4 Heavy-duty towers mount Yakima crossbars to your vehicle with a naked roof
- Pair with 2 Yakima crossbars and BaseClips to create a complete roof rack
- Tower pitch can be adjusted 6 degrees forward and 6 degrees backward to level your crossbars
- Pivoting bases can be adjusted during installation to ensure towers are seated correctly
- Versatile BarBeds are curved to accommodate the elliptical shape of Yakima CoreBar and JetStream crossbars
- Also fit RoundBar crossbars with adapter
- Safe and easy installation with DropHook system and included torque tool
- DropHook clip holder adjusts on 3 axes for perfect fit on your naked roof
- BaseClips attach to hooks in tower assemblies and tighten for a secure grip
- Torque tool clicks 3 times when clips are secure - eliminates fear of under- or over-tightening
- Lockable with Yakima Same Key System (SKS) lock cores (Y07204 - sold separately)
- Weather-resistant stainless steel, glass-reinforced plastic, and elastomer construction with matte finish
Yakima BaseClip 203:
- Custom-fit mounting clips and pads allow you to mount BaseLine towers on your vehicle with a naked roof
- Padded, stainless steel clips provide secure grip on your door jambs
- Snap onto DropHooks inside towers
- Protect door jambs from scratches and abrasions
- Powder coated for durability and rust resistance
- Molded rubber pads fit the contours of your roof
- Clip onto bottoms of towers
- Protect roof from scratches and abrasions
8001156 Yakima HD Bar T-Slot Crossbars - Aluminum - Black - 55" Long - 500 lbs - Qty 2
8003541 HD Bar Adapter for Yakima StreamLine, BaseLine, TimberLine, Skyline, and RidgeLine Towers - Qty 4
8006179 Custom Base Clips and Pads for Yakima Base Line Towers
8000162 Yakima Base Line Towers for CoreBar, JetStream, and RoundBar Cross Bars - Bare Roofs - Qty 4
Replaces 8000146
8006203 Custom Base Clips and Pads for Yakima Base Line Towers
Video of Custom Fit Roof Rack Kit With Y01156 | Y03541 | Y06179 | Y28TR | Y48FR


Videos are provided as a guide only. Refer to manufacturer installation instructions and specs for complete information.


Video Transcript for Yakima JetStream Roof Rack Kit Installation - 2023 Nissan Rogue
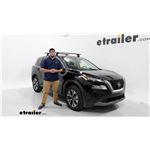
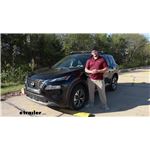
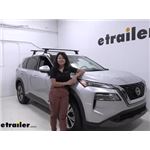
Hi, Matt with Etrailer. Today we're gonna be talking about the Yakima JetStream roof rack system, on the 2023 Nissan Rogue. Now this is gonna be a great option for ya, if you have a lotta stuff you need to carry, and you can't fit it in your vehicle, or you have a lotta people back there, or you need to fit a lot more larger or longer items, maybe like a kayak, or skis. Our system today is gonna be comprised of three parts. and that first part's gonna be our Yakima JetStream 50-inch crossbars. And that's gonna sit right on top of our Yakima baseline towers.
And that's gonna be connected to our fit kit, which is gonna be a custom fit for our vehicle today. Now let's take a closer look at our Yakima bars. Our JetStream bars are gonna have this arrow shape to them, and that's gonna make it more aerodynamic, to help reduce on that wind noise. And we're gonna have this T channel up here, and that's gonna be able to accommodate those T track accessories. And it's gonna have this built-in rubber track.
That built-in rubber track is gonna help reduce that wind noise as well, and keep any debris from getting in there. What's nice about this one in particular is, it's built into our system. So a lot of crossbars would have these built-in rubber tracks, but a lotta times you have to cut them down to size. And we're also gonna have this channel at the very bottom. And it's gonna have a ruler built in on it, and this is gonna be where you attach your towers to.
Now typically there would be a rubber track at the bottom that you cut down the size to accommodate different types of systems or fits. But in our case today, since this is one we have in the shop, and it gets used a lot, we don't have that rubber track anymore. Then we're gonna have our tower. And, this is really nice, 'cause it just covers up your fit kit. And it's gonna have all this hardware, to install onto your vehicle, under this end cap.
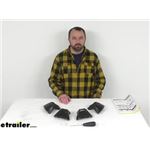
Now, if you want to, you can invest in a metal lock core, for that additional security. Right now we just have this plastic core right here, just as a placeholder. And what's nice about that Yakima lock core you can eventually get, is it can be keyed alike to any of your other Yakima items. And our fit kit is basically just gonna be this clamp, that just attaches to the top of your door frame. As far as the weight capacity is concerned, you have to find out which is the lowest point. So, you need to look at what your crossbars can handle, your base can handle, and what your roof can handle. And when you found out which one is the lowest component, go off of that weight. As for how it's gonna sit up here, it's gonna sit pretty flush with our vehicle today. It's not gonna stick out too far. As for how far it's gonna sit off our roof, to the bottom of our crossbar, we're gonna have just under 3.5 inches. So that's something to keep in mind, when you are putting those clamped on accessories on here. I think that's gonna be able to accommodate a lot of accessories, but if you have anything really big and bulky, that might get kinda close to your roof. As far as how far it's gonna stick up total, is gonna be just under 4.5 inches. So, that's something to note if you're going through any low clearance areas. So you're gonna wanna take the total height of your vehicle, plus the total height of your roof rack, and then plus any accessories you have on top, make sure you can get through those lower areas. As far as what a crossbar spread is gonna be, you need to go off what your make and model is and off the instructions. For a vehicle today, we wouldn't have a 32-inch crossbar spread, so that's important to note to make sure you can accommodate certain types of accessories. Our crossbar is gonna be constructed from aluminum so they're gonna be very light white, and weather resistant, and they're gonna have this black powder coat finish to 'em, that's also gonna help with that weather resistance, making 'em less likely to rust And it's gonna help add to the look, kinda matching to what our car has today. Overall, I think a roof rack system's gonna be a great way to get additional items on your vehicle, especially if they are those longer items, like your kayak or skis. And the ones we have today, are great for putting on any clamp-on accessories, or if you have any T track accessories too, so you're gonna be able to go a lotta different avenues. Overall, the install, it's pretty straightforward. Just something you gotta make sure you pay attention to the instructions. But if you need some help with that, just stay tuned, we'll show you how to do that. To start things off, I just like to lay everything out. So take a closer look at everything. We're gonna have our 50-inch JetStream crossbars. And in front of that, we're gonna have our towers, and the bases to the towers off to the right. We're also gonna have these clamps, and this adapter piece for our JetStream crossbars to go on. And over here are gonna be the bases to our fit kit. And we're gonna have this included Allen Key. It's gonna have this built-in torque to it. And, going to come with some measuring tape. Now we're gonna use our own measuring tape in a shop, just 'cause it's a little bit easier. And I'd also recommend just getting a measuring tape like this. It's gonna be a little bit more sturdy, and a little bit easier to measure things out. Now today we're primarily gonna be working, and showing you how to install your front crossbar. The rear crossbar is gonna be very similar, there's just a few differences. We're just gonna use different size clamps. This is gonna depend on your make and model of vehicle. And we're gonna have a different tow and pitch setting, which is also dependent on your make and model as well. For now, I've just removed the rear crossbar, so there's not gonna be any confusion. Before we can put on the rear crossbar, we have to put on our front crossbar, because that measurement is gonna be dependent on where we place the front crossbar. So to start off with, I'm gonna come over to our towers. You're gonna wanna make sure the base is removed. You wanna pull the security tab out. And this is gonna allow you to put on this adapter piece. We just gotta line up this plastic piece like so. And just put it in at an angle at first, and push down, and it'll clip in right into place. Just like that. Next up, I'm gonna take this block. And, this can be a little tricky sometimes, to get everything lined up. So what I like to do is, take our included tool. And just put it through this bolt here. And I can actually kinda change the angle of that bolt, so it's a little bit easier to screw this on. And with it on place, I'm just gonna tighten this just a little bit. I don't want this to be too tight, or it won't be able to be put on our crossbar. Just like so. So loose enough where you can get this onto the crossbar. Now I'm just gonna flip over our crossbar. You'll be able to tell the difference, because, this one just has this rubber track through here. And if we flip it over, this rubber track's gonna be more towards the center, and there's also gonna be a ruler on the bottom as well. Now in our case, we don't have a rubber track on our crossbar, since it's been in the shop for quite a bit. But you'll probably have to remove yours for this next step. And we're just gonna take off this end cap just by sliding it off. And grabbing our tower. Making sure the side with the hardware is facing out. And sliding that block through this channel. And with it on there, just slide it all the way to the other side. And you repeat that same process with the other one too, making sure it's facing the opposite direction. And with it on, just make sure you put your end cap back on, and we can go over to the next step. Now we're gonna get our M1 measurement and that's gonna be the total distance from one of our towers to the other tower. And what I like to do is just go from the center that'll be be marked with an arrow on your crossbar, and just measure half that distance. In our case, the full distance is gonna be 38 and an eighth. And once you have everything measured out, I'm just gonna tighten things just slightly on this bolt that's in this channel. I don't wanna tighten this all the way, because some of these measurements can be slightly off. And I'm still gonna have to adjust for the pitch, too. And to find the pitch, you're gonna refer to your instructions and find that P1 measurement for your make and model of vehicle. You wanna make sure it is also in relation to this arrow. So we want this arrow to be pointing forward. And we're gonna come over here, and for our vehicle today, we want this on the pit setting of A. So I'm just loosening that up just a little bit, so I can adjust that. Just gonna be sliding it towards me, just a little bit. And once you adjusted everything that you need to, and you can tighten everything back down. And then you can repeat that same process on the other side. Now we're gonna grab our bases to our fit kit. And we're gonna put 'em on our towers. We wanna make sure that that arrow is facing away and out. And you're just gonna place this on this bar. And clicking it into place. Might have to put a little bit of force behind it. Once you hear it click into place, you know you'll be on track. And now, we're gonna adjust our toe. And how you do that is you just come over to this bolt right here. And, you can loosen it up, so you can adjust it. And how you adjust it, it's just gonna be rotating where we just put this base for our fit kit. You notice this is gonna change a little bit. But in our case today, our toe is gonna be on two, that center line. And once you have it in place, just tighten it back down. And then you repeat that same process on the other side. Now would be a good time just to trim up those rubber strips, and put 'em underneath your crossbar. And after when you've done that, we can get our M2 measurement. And this is just gonna be the distance from the top of our windshield to where the base of our tower is gonna sit. And once we've got that, your kit will come with some stickers, and you can kinda use that to mark where to place your crossbars. In our case, we don't have any stickers with this, so we're gonna just have to find another way of marking it. Now we're just gonna take our crossbars, and kinda get like a test, to see how it's gonna fit up there. When you're putting it up there, just make sure you're putting it in the right orientation. So we want this fatter side facing the front of our vehicle, and this thinner side facing behind us. And all you have to do is lift up. Kinda place this where you left your markers at. And set it down. Now there's a good chance this isn't gonna fit exactly how you measured. So, after this, you can check and make some adjustments. We're just gonna grab our hardware now, this is gonna be this clamp. And we're just using the B43 one. And we're gonna come over to our back of the hardware. We're gonna open up this access door. And we're gonna just slide this through this channel at the bottom. And that drive bolt's gotta hook on to this clamp. Now in some cases, this is gonna be a little bit difficult to get fitted on your gutter, so you might have to loosen up your drive bolt and swing bolt. But once they are loosened up and you can get this in there, you just have to tighten this up just a little bit, just tying up that drive bolt some. And then coming over to your swing bolt as well. You might have rotate this sometimes, 'cause it can get stuck in that bolt. And tighten up the swing bolt just a bit. We don't wanna tighten it all the way, because we don't want it to pull too much on one side. And we're just gonna tighten it down, once you've tightened both sides back and forth. And you get it down all the way, it'll start making a clicking sound. (bolt clicks) Just like that. And make sure you just do the same thing on both your dry bolt and swing bolt. Just like that. We wanna make sure we shut this access door. And to finish it off, putting on the end caps to our towers. Oops. There are a lotta hook-on points, so you might have to take a couple tries to get it on there. Just lining everything back up into place. And with it lined up, we can just push it right on, it'll click into place. And now, we can get the measurements to put on our rear crossbars. Next up we're gonna be finding the M4 measurement, and that's gonna be our crossbar spread. In our case, that's gonna be 32 inches. So I'm gonna just take the measurement from the front of the base, of our tower, to where the front of the base of the other one's gonna sit. And that's gonna be just right about here. And this will be a good time to get out one of those stickers and leave a marker here. Now, for the rear crossbar, there's just gonna be a few differences. Our M3 measurement, from tap base to base, it's gonna be 36 instead. But again, there might be some changes with that, so keep that in mind. And as for our toe and pitch, those are gonna be set on two and B. So right now we're looking pretty good. And our clamps, for our fit kits, are gonna be B49 instead. And once you've adjusted all those, we can put that on top of our vehicle. And when you have the second one on there, I'll just double check to make sure everything's sitting in the correct distance away. So in our case, we want it to sit 32 inches from one another, and we'll make good in that respect. And now we're gonna start cinching everything down by putting those clamps in. And to finish it off, just make sure you put your end caps on your towers. And with those in place, just give it a good shake test, make sure everything feels secured. And when it does, you take it for a ride. But if you liked everything you saw today, that was just a look at the install, and some of the features of the Yakima JetStream roof rack system on the 2023 Nissan Rogue.
Customer Reviews
Custom Fit Roof Rack Kit With Y01156 | Y03541 | Y06179 | Y28TR | Y48FR - Y59BB
Average Customer Rating: 4.8 out of 5 stars (212 Customer Reviews)
Heavy-duty crossbars mount to Yakima towers (sold separately) to create an aftermarket roof rack. Top and bottom channels let you add channel-mount accessories. Tie-down points in endcaps let you easily secure cargo.by: TimN03/19/2024
Chevrolet Silverado
Excellent solution for my 2023 Chevy Silverado. In the past, I have had rails installed on the roof of my pickup trucks, but I find the BaseLine towers to be a better solution, since they don't permanently change the truck. Plus, they are much more solid than SkyLine system on the rails.
by: Eric04/26/2024
2010 Chevrolet Impala
I purchased clips that were stated as being compatible with our 2010 Chevrolet Impala. The front clips fit well, however the rear clips do not.


by: Maureen02/12/2024
etrailer was a great place to order, quick and easy. Yakima products however are over priced and overly complicated.
by: 04/01/2024
Follow the instructions, and you can't go wrong on the self installation
by: Dave02/11/2024
Love my Yakima roof rack!! It exceeds my expectations.great product. Also thank etrailer for the tec support! great staff always there to help thanks again!!
by: Mike D07/16/2023
The customer service in ordering theses par tea was amazing!! I spoke with a wonderful specialist named Kate F, and she was super helpful and patient answering all my questions and helping me make sure I had the correct parts I needed for my type of car. The bars are very sturdy and have proven very worth the money!!
by: Paul08/16/2023
Ackage came 2 days early the install was somewhat easy (did it by myself)
Did not get to mount anything to it but seems really sturdy. One thing I can say is mark out your mounting points with provided stickers then put up and make adjustments to the roof rack.
by: Layne 02/11/2024
These adapters were easy to install and made my system fit together nicely.
by: Wade 03/09/2024
Your service is nothing short of excellent! Thank you
by: Bill K07/01/2023
Hyundai
I ordered the Yakima roof rack for a 2019 Hyundai Ioniq. I went with the heavy duty one for extra strength but it is quite a bit thicker, likely increasing wind noise. So I might have chosen the aerodynamic lighter weight one if I was to do it again. Also, I needed to get larger bolts for my kayak holder to get around the crossbar. The instructions and video on website were very helpful but they did not explain well how to adjust the toe and pitch. For the toe adjustment, you have to push the metal post with the tool before tightening. That was not obvious. For the pitch, it helped to do that once the towers are attached to crossbar. Then you can tilt tower while cross bar is laying flat (upside down). I ended up having to add tilt on both front and back crossbars for them to be flat when installed. Website said only front one would need to be pitched. I am very pleased with the look and sturdiness of the product. My Hyundai Dealer had zero options for this car.


by: Todd06/24/2023
Really easy to install & work as specified. So happy with the customer support/service at etrailer.


by: Paul 07/15/2023
Easily supports the RoofNest! The Customer Service with Roger was Excellent!
by: Roland01/08/2024
Well packaged and on time
by: Hans09/11/2023
Toyota Prius
These were very difficult to find to fit my Prius C. It took awhile to get them but I am very happy with the fit.
by: Richard R02/20/2023
GMC Canyon
So far so good. Purchased these towers to use on a 2022 GMC Canyon with HD bars that I already had, primarily to carry my canoe. Yakima's fitting instructions worked perfectly and the whole system seems really solid.
by: John 09/06/2023
Your notice of schemes was a lot better than the yakima site provided. They did not suggest the scheme you did.
But when the products arrived, the instructions were by yakima. Generally worked as instructed except the tower to tower transverse mounting dimensions needed to be tweaked for a perfect fit.
by: Dan 11/06/2023
Great company. Fast delivery.
by: Robert07/13/2021
The Yakima products are doing great. Just got home yesterday from a 18 day trip using them in Michigan's upper peninsula. Love them. Great products. Thanks again.


by: Moparnut22808/20/2023
Great product fast shipping
by: Andrew08/01/2023
Great! Easy to install!
by: Sandra04/22/2022
Love my roof rakes just put them back on for this seasons kayaking very easy application was able to apply them myself


by: Ryan 06/20/2023
This part adapted like no other adapter
by: Ian 07/02/2023
Mazda
Solid build quality and easy installation on my '21 Mazda CX-5.
by: Vincent 05/20/2023
Have worked quite well for what we need. Very happy.
by: Greg 06/07/2023
Nicole was beyond helpful!!!
25
680
Show More Reviews
See what our Experts say about this Yakima Roof Rack
- Long Crossbar Roof Rack for 2017 Honda HR-V to Install Thule Hullavator Assisted Kayak CarrierThe Thule Hullavator part # TH898 can fit aftermarket roof racks like the Rhino Rack you have but the bars of the rack have to stick out past the feet of the rack 4 to 8 inches. If you need a longer crossbar roof rack the longest option we have is the Yakima JetStream bars # Y00425, # Y00145 and # Y06023 which will give you 60 inch long crossbars. To add locks you'd need just the part # Y07204.
view full answer... - What Crossbars Allow Me to Use the Hullavator # TH711420 on My 2022 RAV4 with Flush Rails?I recommend looking at the Yakima HD Crossbars - Aluminum - Black - 55" Long - Qty 2 # Y01156, which also requires Towers # Y53TR, Adapter # Y03541, and Landing Pads # Y98FR. This will fit your 2022 Rav4 with flush factory rails and should give you 4" of crossbar overhang on each side to use the Hullavator. One way you can tell for sure is by measuring from mounting point to mounting point on your roof. If that measurement does not exceed 47 inches, the Hullavator will have enough length.
view full answer... - Recommend Roof Rack for a Bike and Kayak on a 2018 Honda CR-VIn order to add a roof rack to your 2018 Honda CR-V I recommend using the Yakima Roof Rack made of parts # Y01156, # Y53TR, # Y03541 and # Y00245. This system has heavy duty yet lightweight aluminum cross bars that are durable and rustproof. This option will also be far more cost effective than an OEM roof rack as I am sure you will come to find out. If you need a kayak carrier then I recommend the Rhino-Rack Nautic Roof Kayak Carrier part # RR570. It is side-loading and it comes with...
view full answer... - Can Two 68 Pound Kayaks be Carried on the Roof of a 2016 Ford FusionThe strongest roof rack we carry for your 2016 Ford Fusion maxes out at 125 pounds so it will not be the best option for your 2016 Ford Fusion and two 68 pound kayaks. The components are limited by the capacity of your vehicle as the individual parts are rated higher. I do have a solution for you but none of the available roof racks for your Fusion are rated high enough. The only remaining option is to use what is called a roof rack on wheels. This is basically a trailer with a roof rack...
view full answer... - Thule Hullavator Kayak Carrier Mounting RequirementsTo install Thule's load-assist Hullavator kayak carrier # TH898 on a vehicle's roof rack the ends of the bars must extend out past the roof rack feet by at least 4-inches. You can see this requirement illustrated in the linked diagram. The comparable Yakima ShowDown carrier # Y04081 also has a similar bar space requirement. If your roof rack is a Subaru factory type whose bars do not extend past the rack feet/rails then you can still use the Hullavator but you'll need to add a different...
view full answer...
- Are Thule Accessories Compatible With Yakima HD CrossbarsThe Yakima HD Crossbars are 3" wide x 1-1/2" tall, so most Thule accessories are compatible with them, so long as the Thule accessories mount to channels or bars of that width (you didn't mention the specific accessory for me to verify). The Yakima HD crossbars come in a number of different lengths: - 55" Long: Yakima HD Crossbars # Y01156 - 60" Long: Yakima HD Crossbars # Y01157 - 68" Long: Yakima HD Crossbars # Y01158 - 78" Long: Yakima HD Crossbars # Y01159 I have added a link...
view full answer... - Does Thule Hullavator Fit Yakima HD Crossbars Using T-SlotsYes, you can absolutely mount your Thule Hullavator Pro Kayak Carrier # TH898 into the T-slot channels of the Yakima HD crossbars. The HD crossbars are available in the following sizes: - 55" Long: Yakima HD Crossbars # Y01156 - 60" Long: Yakima HD Crossbars # Y01157 - 68" Long: Yakima HD Crossbars # Y01158 - 78" Long: Yakima HD Crossbars # Y01159
view full answer... - Does Mounting Kit for Thule Flat Top Ski Carrier Fit Yakima HD CrossbarsThe Mounting Kit for Thule Flat Top Rooftop Ski and Snowboard Racks # 7533998 is designed to work on crossbars that are narrower than 3-3/4 inches, and since the Yakima HD Crossbars like the 55 inch # Y01156 and 60 inch # Y01157 are 3 inches wide, the Mounting Kit will absolutely work with the HD Crossbars. I have added a link below to a video review for you to check out if you'd like of the Mounting Kit for Thule Flat Top Rooftop Ski and Snowboard Racks # 7533998.
view full answer... - Recommended Ladder Rack for 2005 Hummer H2 SUT for Rooftop TentThe Reese Towpower TransRACK Workmate Truck Bed Ladder Rack - 800 lbs # RP7063500 will not be compatible with your 2005 Hummer H2 SUT. There isn't a confirmed fit from any of our manufacturers so you will likely need to have something customized. The closest option that may be compatible is the Yakima Overhaul HD Adjustable Truck Bed Rack - Aluminum - 500 lbs # Y01151 which is height adjustable to also utilize the roof rack rear crossbar and has a base that is more easily mounted. Then...
view full answer...
- High Capacity and Aerodynamic Roof Rack Recommendation for 2019 Honda PilotFor a quiet and higher capacity roof rack for your 2019 Honda Pilot for carrying a roof tent the Yakima HD roof rack part numbers # Y01156,# Y53TR, # Y03541, and # Y00245 is the way to go. The bars are aero shaped for quietness and also have the highest weight capacity as well.
view full answer... - Roof Rack Recommendation for 2017 Ram ProMaster City to Use Rhino Rack Batwing AwningLike you mentioned the Rhino Rack Batwing Awning part # RR33200 that you referenced does require a roof rack with top channels so for your 2017 Ram ProMaster City with a naked roof you would need a rack like the Yakima HD Roof Rack # Y01156, # Y53TR, # Y03541, and # Y00233 which does have a track on top of the crossbars.
view full answer... - Recommendation for Crossbars Compatible with Malone J-Load Kayak Carrier on 2020 Volvo XC40Since you had trouble with the Thule Aero style bars previously I recommend sticking with the square bar set up you have been using. We have two options of square bars that will fit the 2020 Volvo XC40 and are compatible with the Malone DownLoader Kayak Carrier # MPG114MD. The first is the Thule SquareBar Evo Crossbars 47" Long # TH712200, with the Evo Flush Rail Feet # TH710601, and the Fit Kit for your Volvo XC40 # TH186010. This is going to be the most economic option we have available...
view full answer... - 2016 Lexus GX 460 Flush Mounted Rails Fit KitFor your 2016 Lexus GX 460, you will need the Landing Pad 30 for Yakima SkyLine And Control Towers - Qty 6, part # Y25ZR, and not a RidgeClip. This kit works for Yakima HD Crossbars - Aluminum - Black - 55" Long - Qty 2 part # Y01156. You will also need the HD Bar SL Adapter for Yakima BaseLine, SkyLine, TimberLine, and RidgeLine Towers - Qty 4, part # Y03541. The last thing you will need is the Yakima RidgeLine Towers For Yakima Crossbars part # Y00145. This rack will have a weight limit...
view full answer... - Is Yakima MegaWarrior Cargo Basket Compatible With Yakima HD CrossbarsYou can absolutely use Yakima HD crossbars with the Yakima MegaWarrior Large Roof Rack Cargo Basket # Y07080. The two are compatible, but you will need to use the clamps to install the MegaWarrior as there is not a way to mount this basket in the bars' channel. The only thing I do recommend adding to this basket, in order to protect your investment, is the Locking Brackets with SKS Cores # Y07064. As for the Yakima HD crossbars, they are available in a number of different sizes: 55 inches...
view full answer... - How to Fit the Whispbar WB-400 Kayak Carrier on a 2016 Subaru Outback WagonWe do have some solutions for you to use a J-Style carrier on your 2016 Subaru Outback Wagon, but if your current crossbars don't have a T-Slot then the (discontinued) Whispbar WB-400 J-Style kayak carrier isn't compatible with your current roof rack system. To use this system with your Outback Wagon you need to upgrade your OEM crossbars to Yakima JetStream or HD crossbars which do use the T-Slots. For a complete roof rack system you need the SkyLine Towers # Y53TR and the Landing Pad...
view full answer... - Which Bars Do I Need For Yakima BedRock HD Towers for Truck Bed Rails The Yakima BedRock HD Towers part # Y01160 for Truck Bed Rails will only work with the Yakima HD crossbars part # Y01156 for 55" part # Y01157 for 60" and part # Y01158 for 68" bars so the Thule Xsporter bars would not be compatible.
view full answer... - Off-Road Roof Rack Recommendation for 2019 Jeep CompassBasically all of the roof racks aside from the ones offered by Thule have been rated for 165 lbs for your 2019 Jeep Compass. Since you'll be going off-road I recommend going with the Yakima roof rack system that utilizes HD bars: Yakima 55" HD Crossbars - # Y01156 SkyLine Towers - # Y53TR HD Bar SL Adapter - # Y03541 Landing Pad 19 - # Y00245 (these mount to the sides of your raised rails as opposed to inside an opening like what you mentioned) This roof rack is on the higher-end when...
view full answer... - High Capacity Roof Rack Recommendation for 2017 Honda CR-V for Off-Road ApplicationFor an off-road application there's only one roof rack I can recommend for your 2017 Honda CR-V with flush rails and it's the Yakima HD roof rack part # Y01156, # Y53TR, # Y03541, and # Y00245. This rack has a 500 lb capacity and sits far enough off of the roof of the vehicle (see picture) that you'd never have to worry about flex in the bars. You should note that the capacity of this rack is not the capacity of your roof. You'd still be limited by the weight capacity of your roof but this...
view full answer...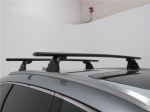
- How To Carry 1 Canoe And 1 Sea Kayak On A 2003 Dodge Caravan With Bare RoofIf you have the factory tracks running front to back and do not have raised rails, then the longest option is Yakima HD Crossbars - Aluminum - Black - 55" Long - Qty 2 # Y01156 which measure 55" long and have a weight capacity of 150lbs. To install these onto your roof you will also need Rhino-Rack Vortex Aero Crossbars - Aluminum - Black - 49" Long - Qty 2 and Rhino-Rack SX Series Legs for Vortex Aero Crossbars - Raised Factory Side Rails - Qty 4, parts # RRVA126B-2 and # RRSX100. When...
view full answer... - Recommended Crossbars to Mount a Thule Hullavator to a 2024 Subaru Outback Touring XTBruce, to mount the Thule Hullavator # TH898 on your 2024 Subaru Outback Touring, you're just going to need to add a set of crossbars. I recommend going with an Aero style, personally, like the Thule WingBar Evo Crossbars # TH711120 with the feet # TH710601 and the fit kit # TH37CE. These aren't any more or less special than the others, but I think the shape of these bars are much nicer and it will work with about every accessory that requires bars to mount.
view full answer... - Heavy Duty Roof Rack that Fits 2005 Toyota Corolla for Roof Top Tent If you installed a heavier duty roof rack on your 2005 Toyota Corolla like the Yakima HD roof rack part numbers # Y01156, # Y00146, # Y03541, # Y06136, # Y06148 you could use a roof top tent like you mentioned.
view full answer... - What Roof Rack Do You Recommend that Will Work with a Thule Hullavator on My 2021 Toyota RAV4?To mount the Thule Hullavator Pro Kayak Carrier and Lift Assist with Tie-Downs - Side Loading Item # TH898 on your 2021 Toyota Rav4 with flush rails, you will need a crossbar system that gives you at least 4 inches past the feet of the system in order to function. For a great system that will give you that clearance on your 2021 Toyota RAV 4, I recommend the following parts: - Yakima HD Crossbars - Aluminum - Black - 55" # Y01156 - SkyLine Towers for Yakima Crossbars - Fixed Mounting Points,...
view full answer... - Sturdiest Roof Rack Recommendation for 2018 Ford Explorer SportThe sturdiest roof rack we offer for your 2018 Ford Explorer Sport that has flush roof rails would be the Yakima HD roof rack part numbers # Y01156, # Y53TR, # Y03541, # Y00245 which would do a great job carrying a ladder like you mentioned.
view full answer... - Recommended Roof Rack for Mounting a Thule Hullavator Pro on a 2021 Toyota RAV4The Thule Hullavator Pro, part # TH898, does in fact need crossbars that extend 4" - 8" beyond the feet. To use the flush rails on your 2021 Toyota RAV4, you will need a roof rack that has feet that are compatible with the rails. With those two stipulations in mind, the Thule WingBar Evos don't look like they will provide enough clearance with their 47" of crossbar length. Instead, I recommend the Yakima HD Crossbars, part # Y01156. They are 55" long, so they will have the extension you...
view full answer... - Parts Needed for Removing Lock Cores for Yakima Same Key System SKS Baseline TowersYou're looking for the Replacement Control Key for Yakima Same Key System # Y8007835, which will allow you to move lock cores from your existing Yakima towers to your new Baseline towers. This disengages the splines on the lock cores to allow them to be removed from towers, bike racks or cargo boxes equipped with Yakima SKS locks. It looks like you've got a 2019 Ford Ranger so the complete Yakima roof rack kit for your vehicle that uses the Yakima 48" Roundbars # Y00408 you were looking...
view full answer... - 2018 Jeep Grand Cherokee Altitude Roof Rack RecommendationWe have an aero bar roof rack that fits your 2018 Jeep Grand Cherokee that has the solid black roof rack tracks but there isn't an flush bar rack that fits. So instead your best option is the Yakima Jetstream roof rack part numbers # Y00426, # Y28TR, and # Y06121 which gives you the most aerodynamic fit for your vehicle.
view full answer... - How To Use Yakima Round Crossbars on a 2011 Toyota CorollaIn order to use Yakima Round Crossbars like part # Y00408 on a 2011 Toyota Corolla you'll need the following: Yakima BaseLine Towers part # Y28TR Yakima Round Bar Adapters part # Y03536 Yakima BaseClip Fit Kit part # Y06144 Yakima BaseClip Fit Kit part # Y06153
view full answer... - Roof Rack System for Thule Hullavator Pro Load Assist Kayak CarrierBoth the Thule Hullavator # TH898 and the Yakima ShowDown # Y04081 are great kayak carriers but I prefer the Hullavator. Regardless of age, after a day of paddling the lift assist is awesome when it comes to helping you load your boat on top of your roof. You do need 4"-8" of overhang on your roof rack for this carrier to work. Your current roof rack on your 2010 Infiniti QX56 will not work. The only confirmed fit for your vehicle is a Thule Roof Rack system like Thule WingBar Evo Crossbars...
view full answer... - Roof Cross Bars That Fit A 2015 Chevrolet Silverado 1500 With An A.R.E MX Bed CapTo install a roof rack on your A.R.E MX Bed Cap on your 2015 Chevrolet Silverado 1500, you're going to need to install a set of tracks like: -Yakima Tracks for Roof Racks # Y01126 for 42" long tracks, -Yakima Tracks for Roof Racks # Y01127 for 54" long tracks, or, -Yakima Tracks for Roof Racks # Y01135 for 60" long tracks. From here you'll need an actual set of crossbars like the: -Yakima JetStream Crossbars # Y00429, with the BaseLine Towers for Yakima Crossbars # Y28TR, and the Landing...
view full answer... - Roof Rack Recommendation with 60 Inch Crossbars for 2017 Honda CR-V with Naked RoofRhino-Rack has their 59" Vortex Bars # RRVA150B-2 which are more likely to fit than their 65" Vortex bars for your 2017 Honda CR-V with a naked roof. The Vortex bars have limited space on the underside where they fit with the feet so even if you cut the 65" bars it wouldn't change where that spacing is at. Since Rhino-Rack hasn't tested and confirmed the fitment of the 59" bars on your CR-V I recommend going with the Yakima JetStream roof rack system instead. It uses crossbars that have...
view full answer... - Will Yakima JetStream Crossbars Work With Thule Rooftop Cargo Box?Almost certainly, yes. You did not specify which Thule rooftop box you have, but a fit should not be an issue due to the small 3-1/8" wide x 1" tall JetStream aero bars. The roof rack you are talking about for your 2017 Ford Edge is made up of BaseLine Towers # Y28TR, Fit Kits # Y06102 and # Y06139 as well as the JetStream Crossbars # Y00425 and will have a spread of 32 inches when installed on your Edge. I do recommend using the Yakima SKS Lock Cores # Y07204 to secure the rack to...
view full answer... - Can I Use the Rhino-Rack Vortex with the Yakima BigCatch Kayak Saddle on a 2019 VW Golf 5 DrI'll try to tackle these in the order you asked them: 1) No, the # RRRS605B will not mount where the plastic tab is and will instead mount 7-7/8" towards the front of the vehicle from the line where the front and rear door meet- the # RRRS605B will clamp into the door jams on your 2019 VW Golf 5dr 2) It's generally a no-go when it comes to opening your moon roof with a roof rack attached to your roof. Luckily this roof rack is fairly easy to install and remove so you'll likely want to...
view full answer... - Best Roof Rack Recommendation for a 2019 Toyota HighlanderThe Yakima JetStream Crossbars # Y00425 (black) will give you the peace and quiet and aerodynamic wind resistance you need. My research on your 2019 Toyota Highlander revealed that your vehicle has either flush factory rails or naked roofs. On your naked roof, in addition to the bars, you will need: - BaseLine Towers for Yakima Crossbars - Naked Roofs # Y28TR - BaseClip Fit Kit for Yakima BaseLine Roof Rack Towers # Y06130 (you will need to order two sets of these) For mounting two...
view full answer... - Recommended Roof Rack for 2018 Ford Edge with Moonroof and without Factory Side RailsFor your 2018 Ford Edge without the factory side rails and a moonroof I recommend taking a look at the Yakima JetStream roof rack system. This consists of # Y00425 for the two 50 inch long JetStream Crossbars, # Y28TR for the BaseLine Towers, # Y06102 for the Front Fit Kit, and # Y06139 for the Rear Fit Kit. This is confirmed to fit the naked roof of your vehicle and will work just fine with the moonroof. It has a 165 pound weight capacity. I have attached the written installation instructions...
view full answer... - How to Fit a Thule Hullavator Pro on a Tesla Model 3The Thule # TH898 Hullavator Pro can be installed on Aero cross bars on a Tesla Model 3 as long as the cross bars extend past the mounting feet by 4 inches to 8 inches, and the cross bars are separated by at least 24". If you do not already have crossbars you can use the Yakima parts # Y00426, # Y28TR, and # Y06173 for 60" JetStream Crossbars. i have attached links to each of these products and and install videos.
view full answer...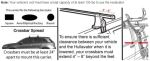
- Roof Rack and Kayak Carrier Recommendations for a 2015 Volkswagen Passat SE Sedan Naked RoofI personally like the Yakima roof rack systems over the Rhino-Rack roof racks because they are a higher quality, you don't have to cut the rubber strip in the top for T-Slot accessories, and Yakima has adjustments in the leg kits that help to fine-tune their fits. With that being said, if you like the look of the Rhino-Rack ROC25 Roof Rack # RR72MR a little more for your 2015 Volkswagen Passat SE then there is absolutely nothing wrong with going that route and you will be happy with the...
view full answer...
- Roof Rack for Carrying a Canoe/Kayak on a 2014 Subaru Impreza with a Naked RoofWhile we do have roof racks for your 2014 Subaru Impreza, the (discontinued) Custom Fit Kit WB-K473 you referenced is for various years and models of GM pickups and there isn't a Whispbar roof rack currently in production that fits your vehicle. If you like the higher quality of a Whispbar product then you'll want to go with a Yakima roof rack as they actually manufacture the Whispbar brand. From what you were looking at I'm guessing you have a Sedan that isn't the WRX. For this you'll...
view full answer... - Recommended Bike Rack Compatible with 2019 Audi A4For your 2019 Audi A4, we have one bike rack option available. The Seasucker Komodo Trunk Bike Rack # 298-BK1910-BK is the only option compatible at this time. This bike rack has 4 vacuum cups each rated for 210 lbs pull strength, so your bike will be secure. This rack is available in black as stated, but also available in other colors: Blue # 298-BK1910-AB Gold # 298-BK1910-GO Silver # 298-BK1910-SV You may also be interested in the bike wheel carrier # 298-BA1580, and the mounting...
view full answer... - Are Yakima HD and Corebar Roof Racks Overkill for 2018 Ford F-150I understand exactly what you are asking about. So with anything where there's a weight capacity involved (roof rack, towing, etc.) you are limited by the lowest rated component in the setup as the overall weight capacity. So if your roof capacity is 165 lbs the CoreBar rack part # Y00422, # Y28TR, and # Y06122 would give you the full capacity plus some and the HD Bar rack part numbers # Y01157, # Y28TR, # Y03541, and # Y06122 would be even more.
view full answer... - Can I Mount 80 Crossbars on My 2018 Chevy Colorado with Naked Roof?We have what you need. Yakima is the only manufacturer that carries 80-inch crossbars that are compatible with your naked roof on your 2018 Chevy Colorado. For that setup, you need the following parts: - 2 of the Yakima CoreBar Crossbar - Steel - Black - 80" # 8880656 - BaseLine Towers for Yakima Crossbars # Y28TR - BaseClip Fit Kit # Y06110 - Yakima Same-Key Locks # Y07204 While technically this setup fits your 2018 Chevy Colorado (both Crew Cab and Extended Cab models), you need to...
view full answer... - Roof Rack Recommendation for Thule Thule Portage on a 2016 Toyota CamryI recommend using a Yakima roof rack with the Thule Portage Canoe Carrier w/ Tie-Downs # TH819 on your 2016 Toyota Camry. Yakima products have great quality and give you a very fine-tuned fit due to the adjustments in the legs that are made for the initial installation. Yakima offer their aero-style crossbars in 2 different options; the steel CoreBar which is a more cost-effective way to get aero-style crossbars, and the JetStream which is made of aluminum and is an upgrade to the CoreBar...
view full answer... - Best Roof Rack To Carry Two Kayaks On a 2017 Hyundai Accent SedanThe best roof rack for a 2017 Hyundai Accent Sedan is the Yakima JetStream Crossbar System part # Y00425, part # Y28TR, and part # Y06137. This system contains aero crossbars which are the least wind resistance and custom fit mounting clips for a sleek look. In order to carry two kayaks with the above setup you'll need to carry them on their side using a j-style kayak carrier, the Yakima JayLow Kayak Carrier part # Y04073 with the Yakima Bow/Stern Tie-Down Ropes part # Y04031 and the...
view full answer... - Roof Rack for 2014 GMC 1500 Crew CabYakima offers a roof rack option for your Sierra. You can construct a rack using the following parts: 58 Inch Round Crossbars, part # Y00409 BaseLine Towers, part # Y28TR RoundBar Adapters, part # Y03536 BaseClip Fit KIt, part # Y06122 (you need two kits) You can see current pricing by clicking the links to the product page for each of the items mentioined above.
view full answer... - Will the Inno Locker Watersport Roof Rack and Surfboard Carrier Work w/ Yakima Corebar Crossbars?Yes, they both will. The Inno Locker Watersport Roof Rack w/ Crossbar Pads item # INA446 and the Inno Board Locker Surfboard Carrier item # INA744 are both compatible with the Yakima CoreBar Crossbars item # Y00421. I have listed the parts recommended for a Yakima Corebar roof rack kit below for a 2013 Honda Civic Couple: Yakima CoreBar Crossbars - Steel - Black - 60" Long - Qty 2 item # Y00422 BaseLine Towers for Yakima Crossbars - Naked Roofs - Qty 4 item # Y28TR BaseClip Fit Kit...
view full answer... - 2019 GMC Acadia Roof Rack and Kayak Carrier Recommendations for 2 KayaksThe Yakima JetStream roof rack system is a great option for the naked roof on your 2019 GMC Acadia: 50" JetStream Crossbars - # Y00425 BaseLine Towers - # Y28TR BaseClip Fit Kit - Kit # Y06138 and Kit # Y06132 Lock Core Kit - # Y07204 (optional) The note about not carrying something side-by-side actually just refers to surf/sail/paddleboards and doesn't apply to kayaks. If you don't already have a kayak carrier I really like the Yakima JayLow # Y04073 which comes with tie-downs for 1...
view full answer... - Can 2 Yakima ShowDown Carriers be Used on a 2018 Jeep Grand CherokeeTo use the Yakima ShowDown # Y04081 you would need a roof rack where the crossbars extend past the legs at least 3-1/2". From what I can tell, the Mopar roof rack for your 2018 Jeep Grand Cherokee has crossbars that end where the legs fit. I do have a solution for you to carry your kayaks but when I reached out to my contact at Yakima she said you would need to at least use their 70" crossbar and that 2 of the ShowDown carriers will be at least 80" wide when placed side by side. Because...
view full answer...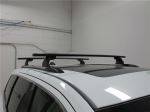
- Paddleboard Carrier and Roof Rack Recommendation for 2017 Mazda CX-5The Yakima Paddleboard Carrier SUPDawg part # Y04075 that you referenced will be a great option, but let's get you set up with a roof rack on your 2017 Mazda CX-5 first. For that the Yakima aero bar roof rack that consists of part numbers # Y00425, # Y28TR, # Y06130, and # Y06154 is a confirmed fit and would work well. The bars of this give the least amount of wind resistance which means minimal wind noise.
view full answer... - Roof Rack for 2018 Honda CR-V With Bare RoofFor your wife's 2018 Honda CR-V with a naked roof we have a great roof rack option, the Yakima Jetstream rack part numbers # Y00425, # Y28TR, # Y06188, and # Y06189.
view full answer... - Recommended Yakima HD Bar Set for my Retrax Pro Tonneau CoverYes this can be easily accomplished. I've put together the list of components needed below but in all reality we just switch the JetStream bars with the HD bars and the SL adapters. HD Bar SL Adapter for Yakima Towers part # Y03541 SkyLine Towers for Yakima Crossbars part # Y53TR Landing Pad 1 for Yakima Control Towers part # Y00221 Yakima Same Key System (SKS) Lock Cores part # Y07204 Yakima 68" HD Crossbars part # Y01158
view full answer... - BaseClip Fit Kit for a Yakima Roof Rack on a 2022 Ford F-150I would be happy to help you. To attach the BaseLine Towers for Yakima Crossbars item # Y00146 to your 2022 Ford F-150 naked roof you will need the following parts: HD Bar SL Adapter for Yakima BaseLine, SkyLine, TimberLine, and RidgeLine Towers - Qty 4 item # Y03541 BaseClip Fit Kit for Yakima BaseLine Roof Rack Towers - Qty 4 item # Y27FR The correct crossbars are item # Y01157.
view full answer... - 2019 Ford F-250 Super Duty Yakima HD Crossbar Length Recommendation for Truck BedI recommend going with the 78" Yakima HD Crossbars # Y01159 for your application. These will be a bit longer than the width of your bed so you you'll have enough room to fit it with your towers. If you already have the towers that fit directly to your retractable tonneau cover then don't forget to pick up the HD Bar SL Adapter Kit # Y03541 so the HD bars will fit the Yakima towers you have. We haven't had a chance to install this on a 2019 Ford F-250 as of yet (March 2022) but I did install...
view full answer... - Are Yakima HD and Corebar Roof Racks Overkill for 2018 Ford F-150I understand exactly what you are asking about. So with anything where there's a weight capacity involved (roof rack, towing, etc.) you are limited by the lowest rated component in the setup as the overall weight capacity. So if your roof capacity is 165 lbs the CoreBar rack part # Y00422, # Y28TR, and # Y06122 would give you the full capacity plus some and the HD Bar rack part numbers # Y01157, # Y28TR, # Y03541, and # Y06122 would be even more.
view full answer... - Long Crossbar Roof Rack for 2017 Honda HR-V to Install Thule Hullavator Assisted Kayak CarrierThe Thule Hullavator part # TH898 can fit aftermarket roof racks like the Rhino Rack you have but the bars of the rack have to stick out past the feet of the rack 4 to 8 inches. If you need a longer crossbar roof rack the longest option we have is the Yakima JetStream bars # Y00425, # Y00145 and # Y06023 which will give you 60 inch long crossbars. To add locks you'd need just the part # Y07204.
view full answer... - What Crossbars Allow Me to Use the Hullavator # TH711420 on My 2022 RAV4 with Flush Rails?I recommend looking at the Yakima HD Crossbars - Aluminum - Black - 55" Long - Qty 2 # Y01156, which also requires Towers # Y53TR, Adapter # Y03541, and Landing Pads # Y98FR. This will fit your 2022 Rav4 with flush factory rails and should give you 4" of crossbar overhang on each side to use the Hullavator. One way you can tell for sure is by measuring from mounting point to mounting point on your roof. If that measurement does not exceed 47 inches, the Hullavator will have enough length.
view full answer... - Roof Rack Recommendation for 2022 Mercedes Benz Sprinter 2500 High RoofYes we have the Yakima HD roof rack that fits your 2022 Mercedes-Benz Sprinter 2500 with part numbers # Y01158, # Y00148, # Y03541, and # Y00221. What's great about this rack is that it has a much higher weight capacity, is still aerodynamic shaped, and also has a lifetime warranty.
view full answer... - Recommend Roof Rack for a Bike and Kayak on a 2018 Honda CR-VIn order to add a roof rack to your 2018 Honda CR-V I recommend using the Yakima Roof Rack made of parts # Y01156, # Y53TR, # Y03541 and # Y00245. This system has heavy duty yet lightweight aluminum cross bars that are durable and rustproof. This option will also be far more cost effective than an OEM roof rack as I am sure you will come to find out. If you need a kayak carrier then I recommend the Rhino-Rack Nautic Roof Kayak Carrier part # RR570. It is side-loading and it comes with...
view full answer... - Replacement Adapter for Yakima Jetstream CrossbarWhile similar the two part numbers are different. The part # 8880637 is for the Yakima Jetstream style of crossbars whereas the part # Y03541 is for the Yakima HD bars. Because you have the Jetstream bars you would want the part # 8880637.
view full answer... - Roof Rack for Roof Tent on a 2019 Ford F-450 Super Duty Crew CabWhile there are no roof racks that have a weight capacity of 400 lbs, I still believe we have a solution for your 2019 Ford F-450 Super Duty Crew Cab with the Yakima HD roof rack. This consists of the HD Crossbars # Y01157, BaseLine Towers # Y28TR, HD Bar SL Adapter # Y03541, and Fit Kit # Y06185. If you are looking to use a tent that has a 400 lb weight capacity like the Yakima SkyRise HD # Y07436 then you actually just need to make sure that the roof rack is rated for 165 lbs like the...
view full answer... - Thule Hullavator Kayak Carrier Mounting RequirementsTo install Thule's load-assist Hullavator kayak carrier # TH898 on a vehicle's roof rack the ends of the bars must extend out past the roof rack feet by at least 4-inches. You can see this requirement illustrated in the linked diagram. The comparable Yakima ShowDown carrier # Y04081 also has a similar bar space requirement. If your roof rack is a Subaru factory type whose bars do not extend past the rack feet/rails then you can still use the Hullavator but you'll need to add a different...
view full answer... - Lightweight Hitch Cargo Carrier for 2019 Tesla Model XThe Curt cargo carrier part # C18100 is a lighter weight carrier due to it being made mostly out of aluminum. For a lighter weight option for your 2019 Tesla Model X with a hitch like the Draw Tite part # 76143 installed this would be a really great option. It weight just under 30 lbs. For a hitch lock that doubles as an anti-rattle device the part # 63232 would be a great option as well. This holds the shank of the carrier to the hitch tube so that movement and noise is removed. I attached...
view full answer... - Yakima Parts to Fit American Roll Cover Tonneau Cover on a 2020 Chevy Silverado 1500I'd be happy to help! The Yakima SkyLine Towers # Y53TR are compatible directly with the JetStream crossbars so no adapter kit is needed, but if you're installing this over a truck bed you need the Yakima HD bars which do require an adapter. Unfortunately, crossbars and leg systems aren't compatible from one manufacturer to the other so you'll need to stick with Yakima crossbars for your application. If you already have the fit kit (which I believe is 2 of the Landing Pad # Y00221) for...
view full answer... - Roof Rack Ladder Rack For A 2021 Chevrolet Silverado 1500 Short Bed Crew CabA roof rack for your 2021 Chevrolet Silverado 1500, crew cab, short bed I recommend the following: Rhino-Rack Vortex Aero Crossbar - # RRVA150B Rhino-Rack 2500 Series Legs - # RRRLKVAH Rhino-Rack T-Load Hitch Mounted Load Assist - # RTL002 Custom DK Fit Kit - # DK427H With this set up, you have the black cross bar, the feet for naked roofs which do not require drilling, the attachments for rails on a camper shell if needed, the T-load hitch mounted load assist with cross bar and has a...
view full answer... - Parts Needed to Add Yakima Crossbars to Retrax Tonneau Cover with T-Slot RailsFor your setup I recommend the TrackTowers for Yakima Crossbars and Platforms - Track Mount # Y52AV which includes everything you need to mount Yakima crossbars to your Retrax cover (unless you plan on using the Round or HD bars - then you'll need an additional adapter). To mount the SkyLine Towers # Y53TR to your tonneau cover you would need the 2 of the Landing Pad 1 # Y00221 kits as well which is why I recommend the first kit I mentioned. Most truck ladder racks use longer crossbars...
view full answer... - High Capacity and Aerodynamic Roof Rack Recommendation for 2019 Honda PilotFor a quiet and higher capacity roof rack for your 2019 Honda Pilot for carrying a roof tent the Yakima HD roof rack part numbers # Y01156,# Y53TR, # Y03541, and # Y00245 is the way to go. The bars are aero shaped for quietness and also have the highest weight capacity as well.
view full answer... - Roof Rack Recommendation for 2017 Ram ProMaster City to Use Rhino Rack Batwing AwningLike you mentioned the Rhino Rack Batwing Awning part # RR33200 that you referenced does require a roof rack with top channels so for your 2017 Ram ProMaster City with a naked roof you would need a rack like the Yakima HD Roof Rack # Y01156, # Y53TR, # Y03541, and # Y00233 which does have a track on top of the crossbars.
view full answer... - Parts to Install Yakima 78 HD Crossbars and Watersport Carriers on a 2014 Jeep Wangler UnlimitedTo use your 78" Yakima HD Crossbars, part # Y01159, on your 2014 Jeep Wrangler Unlimited, you will need the Yakima 42" Tracks, Skyline Towers, HD Bar SL Adapters, and Landing Pad 1s. The Track Pads, part # Y01126, are designed for use on naked roofs (those without rails). They give a more flush look for the roof rack system. This will require some drilling into the hard top, but they allow you to slide the crossbars along the length of the Jeep. The Skyline Towers, part # Y53TR, are designed...
view full answer... - Recommendation for Crossbars Compatible with Malone J-Load Kayak Carrier on 2020 Volvo XC40Since you had trouble with the Thule Aero style bars previously I recommend sticking with the square bar set up you have been using. We have two options of square bars that will fit the 2020 Volvo XC40 and are compatible with the Malone DownLoader Kayak Carrier # MPG114MD. The first is the Thule SquareBar Evo Crossbars 47" Long # TH712200, with the Evo Flush Rail Feet # TH710601, and the Fit Kit for your Volvo XC40 # TH186010. This is going to be the most economic option we have available...
view full answer... - Roof Rack For Roof Top Tent On A 2007 FJ CruiserSince your roof rack on your 2007 FJ Cruiser is rather large compared to others, I recommend getting the Yakima HD Crossbars # Y01157 with these feet # Y33TR. They wrap around your factory roof rails and will ensure a tight fit. You'll need these adapters # Y03541 for the feet to connect properly to the HD bars. This is the strongest bar setup and is the best for a Roof Top Tent Setup. Since you have a roof rack, you won't be able to get a platform on your roof and these HD bars are built...
view full answer... - 2016 Lexus GX 460 Flush Mounted Rails Fit KitFor your 2016 Lexus GX 460, you will need the Landing Pad 30 for Yakima SkyLine And Control Towers - Qty 6, part # Y25ZR, and not a RidgeClip. This kit works for Yakima HD Crossbars - Aluminum - Black - 55" Long - Qty 2 part # Y01156. You will also need the HD Bar SL Adapter for Yakima BaseLine, SkyLine, TimberLine, and RidgeLine Towers - Qty 4, part # Y03541. The last thing you will need is the Yakima RidgeLine Towers For Yakima Crossbars part # Y00145. This rack will have a weight limit...
view full answer... - How to Fit the Whispbar WB-400 Kayak Carrier on a 2016 Subaru Outback WagonWe do have some solutions for you to use a J-Style carrier on your 2016 Subaru Outback Wagon, but if your current crossbars don't have a T-Slot then the (discontinued) Whispbar WB-400 J-Style kayak carrier isn't compatible with your current roof rack system. To use this system with your Outback Wagon you need to upgrade your OEM crossbars to Yakima JetStream or HD crossbars which do use the T-Slots. For a complete roof rack system you need the SkyLine Towers # Y53TR and the Landing Pad...
view full answer... - Off-Road Roof Rack Recommendation for 2019 Jeep CompassBasically all of the roof racks aside from the ones offered by Thule have been rated for 165 lbs for your 2019 Jeep Compass. Since you'll be going off-road I recommend going with the Yakima roof rack system that utilizes HD bars: Yakima 55" HD Crossbars - # Y01156 SkyLine Towers - # Y53TR HD Bar SL Adapter - # Y03541 Landing Pad 19 - # Y00245 (these mount to the sides of your raised rails as opposed to inside an opening like what you mentioned) This roof rack is on the higher-end when...
view full answer... - High Capacity Roof Rack Recommendation for 2017 Honda CR-V for Off-Road ApplicationFor an off-road application there's only one roof rack I can recommend for your 2017 Honda CR-V with flush rails and it's the Yakima HD roof rack part # Y01156, # Y53TR, # Y03541, and # Y00245. This rack has a 500 lb capacity and sits far enough off of the roof of the vehicle (see picture) that you'd never have to worry about flex in the bars. You should note that the capacity of this rack is not the capacity of your roof. You'd still be limited by the weight capacity of your roof but this...
view full answer... - What Is The Part Number For The BaseClip 179The part you need is the BaseClip Fit Kit for Yakima BaseLine Roof Rack Towers - Qty 2, part # Y06179.
view full answer... - Recommendation For A Roof Rack And Kayak Carrier To Carry Two Kayaks For A 2006 Toyota Prius CBased on your information, I recommend getting a roof rack and kayak carrier that fits your 2013 Toyota Prius C. For a roof rack, I recommend the Yakima Roof Rack System which uses the following parts: Round 48 Inch CrossBars, Item # Y00408 Baseline Towers, Item # Y28TR Round Bar SL Adapter, Item # Y03536 BaseClip Fit Kit for Towers, Item # Y06135 BaseClip Fit Kit for Towers, Item # Y06179 I recommend adding Lockable Same Key Systems (SKS) locks cores, Item # Y07204, to keep the rack...
view full answer... - Required BaseClips for a 2016 Toyota Prius C Yakima Roof Rack KitFor your 2016 Prius C, you'll need both sets of BaseClips. Your complete kit will be the following: Yakima JetStream Crossbars, Black 50 Inches, part # Y00425 Yakima BaseLine Towers, part # Y28TR Yakima BaseClip Fit Kit, part # Y06135 Yakima BaseClip Fit Kit, part # Y06179 You will need BOTH BaseClip kits, part # Y06135 and part # Y06179. One will be to fit the front bar, and one for fitting the rear bar. The LoadWarrior, part # Y07070 is a direct fit for these bars, though you'll want...
view full answer... - Can Toyota Prius C Install Thule Hullavator Assisted Kayak CarrierYes you can install the Thule Hullavator assisted kayak carrier part # TH898 on the roof of your 2014 Toyota Prius c if you install a roof rack first. For that you'd want the Yakima roof rack part numbers # Y00425, # Y28TR, # Y06135, and # Y06179 or the Rhino Rack roof rack part numbers # RRVA106B-2, # RRRLKVA, and # DK351 which both have a top channel that's compatible with the Hullavator. I attached an install video for the Rhino Rack roof rack on a Prius C just like yours as well as...
view full answer... - Parts Needed to Use Yakima Round Bars on 2013 Toyota Prius cSometimes we are able to find older Yakima fit info but I checked and they do not have a Q clip setup for the 2013 Toyota Prius c so the only option we have would be a new rack that would allow you to use your round bars. The complete rack for your vehicle consists of: BaseLine Towers for Yakima Crossbars # Y00146 BaseClip Fit Kit # Y06135 BaseClip Fit Kit # Y06179 Round Bar Adapter # Y03536
view full answer... - Square Crossbar Roof Rack Fit For 2021 Nissan RogueThule doesn't offer a square crossbar roof rack fit for the 2021 Nissan Rogue at this time, I'm sorry to say. The only roof rack fits we offer are from Yakima, you could construct a roof rack using the following parts: • JetStream 50 Inch crossbars, part # Y00425 • BaseLine roof rack towers, part # Y28TR • Fit Kit, part # Y06179 • Fit Kit, part # Y06161 Yakima doesn't offer a fit kit that uses the fixed points in your Rogue's roof. The fit kits use clips that grab the inside top of the...
view full answer... - Roof Rack Recommendation for a 2021 Nissan Rogue with a Bare RoofI have a great roof rack solution for you. Unfortunately, Rhino-Rack has not yet engineered a fitment that will work for a 2021 model Nissan Rogue. However, there is a great Yakima crossbar system that will work with your bare roof. For this route, here is the following parts you need: - Yakima JetStream Crossbars - Aluminum - 50" Long - Qty 2 # Y00425 - BaseLine Towers for Yakima Crossbars - Naked Roofs - Qty 4 # Y28TR - BaseClip Fit Kit for Yakima BaseLine Roof Rack Towers - Qty 2 #...
view full answer... - Recommended Roof Rack for 2016 BMW X6 with Naked RoofI have two roof rack systems that I can recommend for you: Thule and Yakima. The Thule Roof Rack system consists of Wingbar Evo Crossbars # TH711420, Evo Clamp Feet # TH710501 and Fit Kit # TH145145. I'm a fan of the 53" WingBar Evo crossbars in this system, especially how the T-tracks are designed. Most moderns bars have T-tracks, but Thule stepped it up in their latest edition where you just slide the endcaps off to mount accessories and the rubber in the channels adapt to your equipment....
view full answer... - What Yakima Towers do I Need for a Yakima Roof Rack on a 2019 Nissan Rogue?While we do have a great Yakima roof rack that fits your 2019 Nissan Rogue, Yakima does not have a roof rack that fits your Rogue that uses Q Towers. This is because Yakima discontinued the Q Towers a few years back. We do have some great crossbars that use different towers for your Rogue. For a great crossbar system setup for your Rogue, the parts you need depend on if you have raised factory rails or a bare roof. If you have raised factory rails, I recommend the following Yakima roof...
view full answer... - Does the Rhino-Rack HD Crossbars # RB1375 Fit a 2021 Nissan Sentra?I have a great alternative for you. Unfortunately, the Rhino-Rack Heavy Duty Crossbars # RB1375 will not fit your 2021 Nissan Sentra. For heavy-duty bars that are confirmed to fit your 2021 Nissan Sentra with a bare roof, I recommend the following parts: - Yakima HD Crossbars - Aluminum - Black - 55" Long - Qty 2 # Y01156 - BaseLine Towers for Yakima Crossbars - Naked Roofs - Qty 4 # Y28TR - HD Bar SL Adapter for Yakima BaseLine, SkyLine, TimberLine, and RidgeLine Towers - Qty 4 # Y03541 -...
view full answer... - Parts Needed to Swap the Yakima CoreBar Crossbars from an Acura MDX to a 2022 BMW X6Assuming you're wanting to use the Yakima CoreBar Crossbars # Y00421 you're looking at, then yes you're just going to need the BaseClip Fit Kit for Yakima BaseLine Roof Rack Towers # Y06179, BaseClip Fit Kit for Yakima BaseLine Roof Rack Towers # Y06161 as well as the BaseLine Towers for Yakima Crossbars # Y28TR.
view full answer...
- Can Longer Rhino-Rack Crossbars Be Fitted on a 2018 Toyota Prius cIt looks like the Rhino-Rack crossbars that fit your 2018 Toyota Prius c have the 42" length. Sometimes you can use slightly larger or smaller Rhino-Rack crossbars but since you're wanting to use 54" crossbars that are 12" longer than what fits your vehicle we'll need to find you a different system. and for that I recommend Yakima JetStream system as it's the only roof rack system that doesn't have restrictions on upgrading the crossbars. Here are the parts you need: 50" JetStream Crossbars...
view full answer... - Recommended Roof Rack for a 2022 Nissan Sentra w/ No Roof Rails I would be happy to help you! To add a roof rack that stops at the mounting legs to the naked roof of your 2022 Nissan Sentra, I recommend the roof rack by Yakima which includes the following parts: Yakima BaseLine FX Roof Rack for Naked Roofs - Aero Crossbars - Aluminum - Black - Qty 2 item # Y89UV BaseClip Fit Kit for Yakima BaseLine Roof Rack Towers - Qty 2 item # Y06161 BaseClip Fit Kit for Yakima BaseLine Roof Rack Towers - Qty 2 item # Y06179
view full answer... - Availability of Yakima BaseClips 179The part you need is the BaseClip Fit Kit for Yakima BaseLine Roof Rack Towers - Qty 2, part # Y06179. These are sold in pairs like you need as well.
view full answer... - Do You Recommend the Thule Motion XT XL or the Thule Motion XT XXL for My 2021 Nissan Rogue?In order to determine the compatibility of either the Thule Motion XT XL # TH629806 or the Thule Motion XT XXL # TH629906, it truly depends on if you have a bare roof, raised rails, or a factory roof rack currently installed. The reason why this matters is because not only do crossbars come with different heights and widths, but your roof has different available length based on what roof setup you have. The roof setup is important in determining if you can fully open the rear hatch of your...
view full answer... - Recommended Roof Rack System For Roof Top Tent On 2014 Toyota Prius cFor your 2014 Toyota Prius c I recommend the Yakima Baseline Roof Rack System which uses 50" Yakima JetStream Crossbars # Y00425, BaseLine Towers for Yakima Crossbars # Y28TR, BaseClip Fit Kit # Y06135, and BaseClip Fit Kit # Y06179 as long as you do not have a glass roof or a sunroof. This system offers a 165lb weight capacity, and will give you 50" of useable crossbar space. If your Prius c does have a glass roof or sunroof, I recommend the Rhino-Rack Aero Bar Roof Rack System which...
view full answer... - Recommended Crossbars for a 2023 Nissan Rogue I'm not seeing any options for a roof with fixed mounting points. The only options I'm able to find is for flush rails in which you could use the Yakima JetStream Crossbars # Y00425 with the SkyLine Towers for Yakima Crossbars # Y53TR and the Landing Pad 31 for Yakima SkyLine Towers # Y68AV. Or, for a naked roof, in which you can use the Yakima JetStream Crossbars # Y00428, with the BaseLine Towers for Yakima Crossbars # Y28TR and the BaseClip Fit Kit for Yakima BaseLine Roof Rack Towers...
view full answer... - Roof Rack Recommendation for a 2013 Toyota Prius cThe Rola roof rack 59729 is designed to fit the Toyota Prius V but not the Prius c. We do have roof rack options that fit the Prius c. I have included a link to the main page for you. The most economical option is Rhino-Rack roof rack made of crossbars # RRVA106B-2, feet # RRRLKVA, and custom clamp kit # DK351. As far as design is concerned the compatible rack that is closest to the Rola rack is made up of Yakima CoreBars # Y00421, with BaseLine Towers # Y28TR, front clips # Y06135,...
view full answer... - Recommended Roof Rack System And Kayak Carrier For 2021 Nissan Rogue With Bare RoofAbsolutely! Since your 2021 Nissan Rogue has a bare roof, I recommend the Yakima BaseLine Roof Rack System which uses 50" Yakima JetStream Crossbars # Y00425, Yakima Baseline Towers # Y28TR, Fit Kit # Y06179, and Fit Kit # Y06161 which Yakima was able to confirm will fit your vehicle. Adding the Yakima Same Key System (SKS) Lock Cores # Y07204 will secure the roof rack to the roof of your vehicle. Since you mentioned wanting to install a kayak carrier, I recommend the Yakima JayLow Kayak...
view full answer... - What Yakima Towers do I Need for a Yakima Roof Rack on a 2019 Nissan Rogue?While we do have a great Yakima roof rack that fits your 2019 Nissan Rogue, Yakima does not have a roof rack that fits your Rogue that uses Q Towers. This is because Yakima discontinued the Q Towers a few years back. We do have some great crossbars that use different towers for your Rogue. For a great crossbar system setup for your Rogue, the parts you need depend on if you have raised factory rails or a bare roof. If you have raised factory rails, I recommend the following Yakima roof...
view full answer...
Do you have a question about this Roof Rack?
Info for this part was:

Edited by:
Daron K

Written by:
Alex H
At etrailer.com we provide the best information available about the products we sell. We take the quality of our information seriously so that you can get the right part the first time. Let us know if anything is missing or if you have any questions.
Product Experts Available Now!
Call 1-800-940-8924
Thank you! Your comment has been submitted successfully. You should be able to view your question/comment here within a few days.
Error submitting comment. Please try again momentarily.