

 Arrives before Christmas
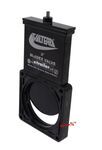
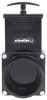
 If you're tired of dealing with leaks from your RV's black-water tank, the Valterra Bladex Waste Valve is your solution. Featuring precision-engineered seals and a robust 3-inch diameter passage, this valve ensures that wastewater flows freely without unwanted spills. It’s specifically designed to fit Valterra, Bladex, Bristol, and Anonda valves, eliminating leaks and maintaining a clean, hassle-free RV experience.
Say goodbye to concerns about flimsy handles with the die-cast aluminum handle of the Valterra Bladex. This durable feature not only provides a comfortable grip but is also built to last, making it a reliable partner for your camping adventures. The aluminum handle ensures smooth operation every time, even in extreme weather conditions ranging from -5°F to 110°F.
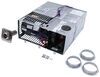
Enjoy a straightforward installation process with the Valterra Bladex Waste Valve, which includes all necessary seals, nuts, and bolts. Whether it's replacing an existing valve or a full installation, the provided hardware makes it easy and quick, saving you time and effort. You'll have your RV back in working order in no time, ready for the next adventure.
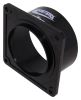
With the Valterra Bladex Waste Valve, one size truly fits all. This versatile product is compatible with a range of waste valves including Bladex, Bristol, and Anonda, making it an ideal choice if you’re looking to ensure seamless integration with your RV’s plumbing system. It’s designed to be your go-to replacement no matter the valve brand.
Encountering a faulty valve can put a damper on your camping plans. The Valterra Bladex Waste Valve simplifies maintenance, allowing quick swaps for both black and gray water tanks. Its robust design ensures that once installed, the need for frequent replacements is a thing of the past. Keep your RV's plumbing in top shape with minimal effort.
California residents: click here
Videos are provided as a guide only. Refer to manufacturer installation instructions and specs for complete information.
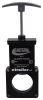
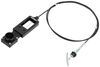
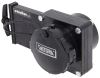
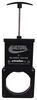
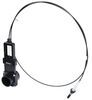
Today we're going to be taking a look at the Valterra Bladex Waste Valve. This is a three inch valve. It's going to allow you to replace, repair, or upgrade to a new dependable valve. It's got a metal handle right here on top. Very strong, durable design. You shouldn't have to worry about that ever breaking.
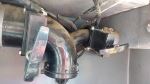
That's going to sit on top of a stainless steel shaft that's going to be strong and durable, as well as highly resistant to rust and corrosion. Now, these valves are interchangeable with most other brands. It's going to include the valve, the seals, the nuts and bolts for your full installation. The seals are made from a santoprene construction that's designed to resist chemicals and corrosion. Now, when you're ready to install the unit you'll need to remove your old valve and seals. Place the new seals over the lip of the existing flanged fittings. Insert the new valve, being careful not to dislodge the seals.
Then, tighten everything down for your full installation with the included hardware. A few measurements to go over with you real quick. I do want to mention just how easy of an operation it offers. Really nice design. Allows you to easily open and close the unit. You've got the T-grip handle right here and it just operates really nice and smooth.
Now, the overall length of the unit with it in a closed position is going to be about nine and a half inches. With it open we're looking at about twelve and three quarters of a inch. The width is going to measure about four and three eighths of an inch. Then, it's got four mount holes that's going to be a square pattern, so the distance that we have between each hole, measuring on center, is going to be about three and three quarters of an inch. That's going to be the same separation between each hole. That's going to do it for today's look at the Valterra Bladex Waste Valve..

Do you have a question about this RV Waste Valve?
Info for this part was:
At etrailer.com we provide the best information available about the products we sell. We take the quality of our information seriously so that you can get the right part the first time. Let us know if anything is missing or if you have any questions.


Thank you! Your comment has been submitted successfully. You should be able to view your question/comment here within a few days.
Error submitting comment. Please try again momentarily.