


To see if this custom-fit item will work for you please tell us what vehicle you'll use it with.
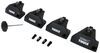
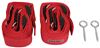
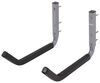
These custom clips and pads let you mount Thule Evo Flush Rail or Edge Flush Rail feet on your vehicle with flush, factory side rails. Clips attach to a mounting bolt in the foot assembly and tighten together. Includes 4 clips and 4 pads.
Features:
Specs:
Secure, Clamp-On Installation

To complete installation, place the fully assembled rack on your flush rails and tighten the rack in place with the torque tool included with the feet. The inner and outer clips in each foot tighten with a single mounting bolt to ensure an even, secure grip on your rails. An audible click from the torque tool indicates the rack is secured properly.
Protection for Your Rails
The rubber-coated steel clips and molded rubber pads protect your side rails from scratches and abrasions. The pads easily slide onto the bottoms of each foot, and they're designed to fit the shape and contour of your vehicle's flush rails.
California residents: click here
Videos are provided as a guide only. Refer to manufacturer installation instructions and specs for complete information.
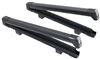
Hey, neighbors, how's it going This is Ed here with etrailer.com and today we're gonna take a look at the Thule WingBar Evo roof rack for our 2024 Hyundai Palisade. Now, when you add a roof rack to your vehicle, what that does for you, it allows you to increase your cargo area by taking advantage of the negative space on top of your vehicle. So let's take a quick look at some of the features and how it works on our vehicle. As far as our bars, these are going to go 50 inches across and it's gonna give you the adjustability to kind of have hangover if you need it, if you had, like, a awning or something like that, or a road shower. You also can attach those T channel track items using the track that's included. A cool feature on this, it comes with rubber insulation that's gonna basically cut the wind, and the design of it itself is similar to a airplane's wing.
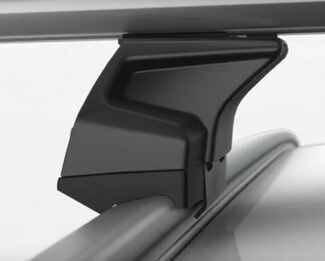
All these things are to help cut down on that wind noise that you're gonna experience. If you look at your towers here, these guys right here are gonna give you a nice low-profile, at the same time, giving you a secure connection between the rooftop and your bar. Out the box, you're gonna have these plastic knockout locks. But if you wanted to go for extra security, you can add on the Thule lock cores and have your Thule accessories, like your rooftop boxes or bike carriers, all keyed alike. The pad right on top of our flush-mounted rails, this guy is rubberized and it's gonna allow you to have that seal with the top of the roof.
If you make sure that you don't have any gaps, this is another way to reduce wind noise when you're going down the road. But as you see, that's a super tight fit, almost custom. As far as the setup on this. Only thing that you're really gonna need is a tape measure. You're gonna have an included tool from Thule.
Now, as far as what this does for you, it helps get that issue of, how can I increase my cargo area out the way so you can really get down to making memories. And speaking of memories, it'd be cool if you sent the photo in and added it below, showing us how you're gonna use your crossbars. Now, as far as the installation, grab your tape measure and we'll get this guy installed. I went ahead and installed my rear crossbar just to get a feel for the installation, and it's pretty straightforward. You're gonna start with removing your end cap, so you can easily add on your tower.
You wanna make sure that you have the bolt end pointing away from the inside. That way, you can make your adjustments and add on your hardware. Also, if you have your measurement, you can use the included strip here to set it to the measurement for your cross spread. And from here, you're gonna have to pay attention to your parts. You have the A bracket where the two hooks are gonna go into your tower with the bolt coming through. From here, you're gonna put on your rubber pad on the bottom, and you're gonna have little notches that are gonna align with the holes at the bottom of the foot. And this is just gonna give you that overall grip. And then you're gonna add part C to the top of the clamp A. Now you just have your hole sticking through and you're gonna use your bolt here and just start the threading from here. So now you have your assembly put together and this is gonna clamp around your flush rails. So now we're gonna head to the top of the vehicle and place it on top. Now, I already went ahead and figured out where I wanted my spread, so I'm just gonna rest it across on my other rail here. And we're gonna drop this guy into place. And you're gonna notice that your hardware right here is just gonna wrap around the raised rail and grip along the side. Now we're gonna use our included torque wrench to get this guy fastened down. Now, before you actually go 100% down, where you getting your clicks, you wanna make sure that you have your crossbar even on the roof and you want to go from side to side as you tighten, just to make sure that you're not gonna have any pull from one side or the other. And now I don't have to worry about overtightening 'cause my tool tells me right where to stop. And then we're gonna put our cap on our tower here. Once we have all that secured, we're good to go and ready for our adventure. These guys are aluminum, so they're lightweight and they're gonna be rustproof out in the real world and at the same time, super easy to install. I've used these guys a couple times on my personal vehicle and I found them to be pretty quiet, so you really can't go wrong going with the WingBar from Thule. So again, this is Ed with etrailer.com taking a look at the Thule WingBar on our 2024 Hyundai Palisade. Have a great day.

Do you have a question about this Accessories and Part?
Condition: Like New
Notes: May have damaged packaging or minor cosmetic blemishes.
Info for this part was:
At etrailer.com we provide the best information available about the products we sell. We take the quality of our information seriously so that you can get the right part the first time. Let us know if anything is missing or if you have any questions.


Thank you! Your comment has been submitted successfully. You should be able to view your question/comment here within a few days.
Error submitting comment. Please try again momentarily.