
To see if this custom-fit item will work for you please tell us what vehicle you'll use it with.
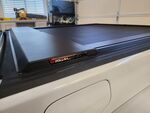
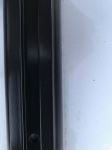
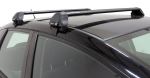
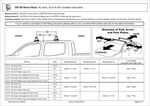
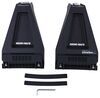
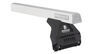
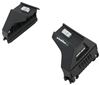
These heavy-duty, aluminum crossbars work with Rhino-Rack legs to create a sturdy roof rack. The square bars have top channels for mounting Rhino-Rack contractor-grade accessories. Installs to the rain gutters on your vehicle.
Features:
Specs:

California residents: click here
Videos are provided as a guide only. Refer to manufacturer installation instructions and specs for complete information.
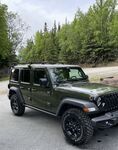
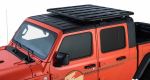
Hello, neighbor, this is Curt with etrailer, and today we're gonna be taking a look at the Rhino-Rack heavy-duty roof rack. We're gonna see how it fits with our 2023 Jeep Wrangler. The Jeep Wrangler is absolutely a vehicle made for adventure. If you have a full compliment of passengers, that cargo space is pretty limited and can get filled up pretty quickly. Also, on your adventures, you may be taking items that just simply won't fit in the vehicle, or they're items that you don't want in the vehicle. There's all sorts of things that you could take with you, and a roof rack is gonna really help you out with that as far as getting that extra cargo space.
Roof racks have all sorts of accessories to go with them. Rooftop baskets, cargo boxes, kayak carriers, bike carriers, ski and snowboard carriers, all sorts of things that you could do with a roof rack on your Wrangler. And these heavy-duty crossbars are no exception. One of the great things about these crossbars, they do have a pretty high load capacity at 220 pounds. However, you always want to double-check the owner's manual to see what the weight capacity is on the hard top of your Jeep.
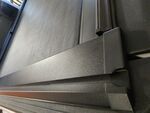
Whatever number is lower, that is going to be your weight limit. With these crossbars, they are a square style. There is a channel mount at the top. However, it's a wider channel and it's only gonna take specific heavy-duty accessories. It won't take your standard T-slot accessories.
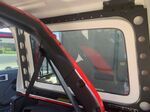
What these crossbars are really made for, in my opinion, is carrying some of those heavier loads, a bigger roof basket, a couple of kayaks, things like that. And these are perfect for it. Let's take a look at just how these fit up here on our hard top. We're gonna take a look at the crossbar spread. We did specifically set this up at a 32-inch spread just simply because a lot of rooftop accessories are gonna work that way.
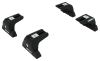
But as you'll see a little later in the installation, you're pretty free to set these bars up wherever you need to. Now the bar length on these is 59 inches, so that's gonna be 59 inches of this T-channel you'll be able to use. However, when it comes to the clamp-mounted accessories, you really only have an inch of overhang outside the towers on these. So the majority of the time, you're gonna be loading up in between the edges of these towers with those clamp mounts. So with that, what you're gonna end up with is about 50 inches of usable bar space to use those clamp-mounted accessories. We're also gonna take a look at just how much height this is gonna add to your Wrangler. We'll come here to the middle of the roof, and this is gonna add just a hair under three inches of height to the vehicle. So if you're concerned with roof clearance and you know your overall vehicle height, add that three inches, plus the height of whatever accessories you're carrying, and you'll get your overall roof clearance. So you could be very careful whenever you're going through a low clearance area, like maybe there's some low-hanging trees or you need to get into a parking garage, you'll know exactly what you got up there. The other thing we'll take a look at is our clearance underneath the bar. Now underneath the bar, we're gonna have about 1 1/2 inch of clearance, and that is not a lot of room when you compare it to a lot of other roof racks. It does cut down on the overall vehicle height, generally, but you're gonna be have to be careful if you have any accessories with kind of larger clamps. And the other thing, speaking of clamps, is that you do wanna know the dimensions of these bars. These are gonna be about 1 inch and, call it 1 5/8 inch tall by 1 5/8 inch wide. So whatever the dimensions are of the clamps for whatever roof accessory you're interested in putting up here, just make sure it's something that's gonna be able to accommodate both the size of the bar and have the clearance underneath to be able to use it. Now, since we took a look at just how it fit up here, let's go ahead and take a look at the installation. I'll walk you through how we did that right now. (transition whooshing) To begin our installation, first and foremost, we are just doing a test fit, not a permanent install or an install for this vehicle. We'll be removing the rack right as soon as we're done. So there are a few steps and we're not gonna go all the way through on. One of those involves the weather stripping. Now the weather stripping outta the box is located inside the channel of the crossbar. If you're going to use this, it creates a really nice cushion up on top of the bar for anything you're putting on it. So from a sports and recreation standpoint, all of your clamp-mounted accessories, roof boxes, kayak carriers, things like that, I would probably use this piece right here in order to do that. If, however, you plan on using some of the heavy-duty T-slot accessories that you can get for this bar, such as eyebolts, ladder rollers, or load stops, those are gonna fit into this channel up here, and I would just, you know, not even use this piece if that was the case. But however you're going to use it, you'll wanna either use the weather stripping or leave it completely removed. So I'm just gonna put this back into the channel that it was in from outta the box and we'll move on to the next step, which is going to be to go ahead and grab your tower here. Now, inside of your kit, you're gonna get this L-tool, this security tool, and what you're gonna wanna do is loosen each of these bolts up. They're gonna be in there pretty tight, so just get them loosened up. And what we're trying to do is create some slack, some spacing right in here. So I'm just gonna loosen both of these bolts up until we get that gap. On the back, back here where that bolt is running through, we've got this cylinder here. So I'm gonna loosen this up until the end of my bolt here is pretty much flush with the inside of that cavity on the cylinder 'cause I want to create as much slack as I can to get around the gutters up there on my hard top. So I'm gonna get both of 'em to about this point right here. With it opened up, you could see, it's kind of the way the clamp's made in here, it's kind of layered. Just a heads up. Every once in a while, when you do this and you try to pull this apart, this can kind of get caught up on the threads a little bit. It just happened to me. All I did was take a little flathead here and kind of pry it a little bit loose. But this is what the end result should be is looking just like this. You do have this rubber pad here in your kit. That's just gonna go right across this section here on our tower. And this will just make a good grip and a good cushion up in the gutters up on the roof. So with that all being complete, what we're gonna do is just turn our bar over to its underside, like this. And underneath here, we've got this channel block, and you can see that the edges are a little bit rounded. What we're gonna do is just drop that right into the channel, turn it clockwise, and what it's going to do is lock itself into place there. Now we can still slide it back and forth until we tighten it down, and that's good 'cause we want that adjustment when we get it up on the roof. Now this can be a little tricky if you're on your own. If you got somebody with you, it makes it a lot easier. But essentially the way this is gonna drop into your gutter is gonna be just like this. This end here is gonna go inside the gutter, this end here is gonna go out and underneath it, like this. Now we're not gonna tighten this down quite yet. There is one thing that we need to do before that, and that is to double-check our overhang on our bar. This is gonna be able to slide back and forth before you tighten it down. So what you want to do is make sure that we've got the same amount of overhang on our passenger's side here as we do on our driver's side. So what we did was we took a measurement from the inside of the tower right here, and we measured right to the edge of the end cap, where the end cap starts right here. What you'll end up with is a measurement of 4 1/2 inches. Once you get to that 4 1/2 inches, go ahead and grab yourself a 16 millimeter socket. The bolt to tighten it is located right underneath the bar and tower right here, and you can get that tightened down. This'll keep it in place for you. But there is a torque spec for these bolts in your instructions that you're gonna want to follow. It's gonna be a lot easier to torque them back on the table, or you were assembling it at. But once you get it tightened down enough to where it's not gonna shift on you, it'll be really easy to bring this back up here and just drop it into place. But since we're not doing a permanent install today, we're just putting this on and taking it right back off once we show you how it goes on, we're not gonna do that torquing down. Instead, we'll move right onto our crossbar position. Now when it comes to bar position, we're pretty free using the gutter on the hard top to position our crossbar really kind of wherever we want. There's just something you want to keep in mind though. All rooftop accessories, cargo boxes, bike carriers, kayak carriers, they all have a minimum and a maximum crossbar spread, or distance between the crossbars, that is gonna be allowed in order to use that accessory. So what I usually aim for is somewhere in the 28 to 32 inch area. Most rooftop accessories are gonna fit that spread. But there are plenty of people out there who have a Jeep like this who might even add a third bar up here if they carry some longer items. So there's all kinds of ways we can do this. For me though, what I'm gonna set this up at is about a 32-inch crossbar spread. And in order to do that, I need to make sure that my towers are going to be positioned directly across from one another when it comes to the passenger and the driver's side. If I do that on both bars, that'll guarantee that my bars are gonna be parallel and I'll be able to load up safely and carry my stuff to my destination. So in order to do that, I think the best method is to just pick an anchor spot. So for me, my anchor spot is gonna be the end of the gutter right here, and I'm gonna measure that to the end of the clamp. Not the end of this tower piece right here, but the clamp right underneath. And what I'm gonna come up with for that is gonna be right at two inches, okay So I've got two inches on the passenger's side. I'm gonna go take that same measurement on the driver's side before I tighten these down. I did the same thing back here on the back bar using this door seam to the front of the underside of the clamp there to get 4 1/2 inches. I've got the same measurement over there on my driver's side already, so I know this bar's good to go. We're back with our L-tool that came in our kit, and what I'm gonna do is I'm gonna just kind of incrementally tighten both of these bolts down until it's snug. I just want to get it to where I just start feeling a little bit of resistance, but I'm not gonna tighten it down all the way yet. When you over-tighten one side compared to the other, it can get a little bit wonky. You usually have to undo everything and start over again. So to avoid that, it's just gonna require a little bit of patience. But I am just getting this to the point where I just start to feel a little bit of resistance, so that I know that this is snug. Now gonna go and do the same thing over on the driver's side. And once I'm done with that, I'm gonna keep going back and forth, back and forth between these and back and forth with the clamp over on the other side until I get it tightened all the way down. As you finish getting these tightened up, check your instructions. There is a torque spec for these bolts as well. So once you get this to the point where you got it good and tight, go ahead and torque them down. That's another step that we're gonna be skipping with our test fit today, but that's just gonna ensure everything is up here, good and solid. So once that's all done, a lot of times I like to get up and just kind of give it a good shake test. Make sure the only thing moving back and forth is the vehicle. My crossbar's not moving, my towers aren't moving. Double-check the other one as well. Everything should be parallel, and we're safe to load up and hit the road. (transition whooshing) So that's about it for the installation. It's not too difficult, but there are some bits, as you saw, that might require just a little bit of patience and maneuvering. But if after watching this video, you've still got some questions about the heavy-duty Rhino-Rack roof rack, or if you've picked it up and you've used it and you've got some experiences to share, go ahead and drop those in the comments below. We would love to share your stories and your questions with other neighbors just like you so they can make the best decision for themselves. Once again, this is Curt with etrailer. Thanks for stopping by.


Do you have a question about this Roof Rack?
Info for this part was:
At etrailer we provide the best information available about the products we sell. We take the quality of our information seriously so that you can get the right part the first time. Let us know if anything is missing or if you have any questions.


Thank you! Your comment has been submitted successfully. You should be able to view your question/comment here within a few days.
Error submitting comment. Please try again momentarily.