
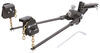
These Through feet help you mount 2 Inno Aero crossbars to your vehicle's naked roof to create an extended-length roof rack. Locking covers secure system to roof.
Features:
Specs:

Videos are provided as a guide only. Refer to manufacturer installation instructions and specs for complete information.
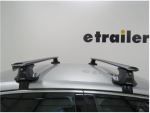
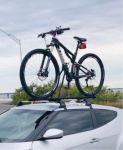
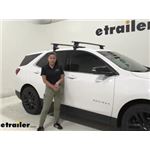
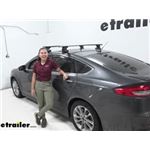
Hi, everyone. It's Evangeline here at etrailer. And today, we'll be taking a look at our Inno Roof Rack system with the 54 inch long crossbars, the Through Feet for naked roof, and the Custom Fit Kit for your 2020 Chevrolet Equinox. If you wanna carry cool items like kayaks, or surfboards, paddle boards, or if you wanna carry a roof-mounted bike rack, or have extra cargo options with a roof box or a roof basket, what you first need is an aftermarket roof rack, just like this. So, this is designed to create that roof rack system, even though you have a naked roof on your Chevrolet Equinox. So we'll talk about how it does that, as well as how to install it, right here in this video.
So the crossbars we have here, are the 54 inch long crossbars. So there's different options for you, depending on what you're carrying. If you want the longer kit, that's gonna be this. If you want something that's more low profile, feels more flush, that's gonna be the 51 inch long crossbar kit. I prefer this length, because it gives you more overhang.
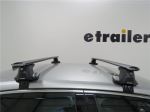
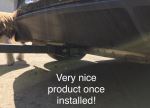
So measuring from the end of the tower to right before the end cap, we have 2 1/2 inches of overhang. So for some accessories, you're able to clamp them around the edge, and that makes it easier to reach whatever you have up on there. Now with a naked roof rack, though, you are limited when it comes to the crossbar spread. Now that's because this is custom fit, so it has hooks that fit around the contours of your vehicle. So, you wanna make sure they're in the perfect spot.
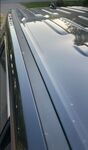
So measuring from crossbar spread, which is center to center it would sit at two feet and a half inch, so 24 1/2 inches apart. So, if you have accessories that have your clamps in a specific spot, just double check the appropriate crossbar spread to see if it fits with your roof rack. Next is gonna be the height added to the top of your roof. So, measuring from the top of the roof to the top of the crossbar, we have it at 4 3/4 inches, or about that measurement. And that's gonna be where your cargo sits.
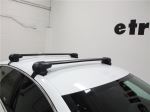
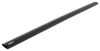
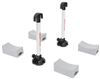
So let's say you're carrying skis and snowboards, you're gonna have those sitting up on there, plus on top of your accessories. If you have extra large bindings, you wanna make sure you have enough clearance between your cargo and the top of the roof, so it doesn't hit your vehicle. This does have a weight capacity of 140 pounds. So, if you're carrying around your different cargo, make sure to add up the weight of the cargo and the weight of your accessory, and make sure that doesn't exceed 40 pounds. Another thing with this is that this is made of aluminum. So, that means your roof rack system itself is going to be lightweight, although your towers will probably be the heaviest part of the system. These are gonna be the Inno Aero bars, and I pretty much like how our more modern bars are designed to be aerodynamic like this. If you had the traditional round or square cross bars and you went down the highway, you would remember hearing all that wind drag and wind noise. This helps reduce that wind drag and wind noise. Plus, it has a T-track system. So once you take the end caps off, or if you don't have enough clearance for underneath for your clamps, you just slide your T-track accessories into it, you don't have to do any cutting or fitting around the accessory, tighten it down. That way you can utilize the entire 54 inch long crossbar, and you're not limited to where the clamps can fit around. So, this system utilizes the Through Feet towers, that allow you to have those crossbars that have overhang. One thing I really like about these towers, is how they have integrated locks. So, some other brands require you to add lock cores, to get everything in place and secure. This one has two keys included and four lock cores, so one for each tower. That way, with that end cap locked in place, people don't have access to the hardware to take off your roof rack. Now, this does not lock your crossbar itself, though. So if you want to lock your accessories, like the T-track accessories that are mounted onto your crossbars, you may wanna consider cable locks, locking straps, or accessories that have their own locks. So, this has a custom-fit kit. That's why it's very important to use our fit guide here at etrailer.com on our website, to make sure you get the right fit for your vehicle. So for example, we have these pads that fit around the contours of our roof. Then we also have these hooks that fit perfectly into our doors. So with everything lined up, if you follow all the measurements correctly, you can install it and then even slam your door on your roof rack without any worries. So this kit is gonna include everything you need to install it, but there's some other things that I use just to make it a little bit easier for me. One of them is gonna be the Moki doorstep. This clips right into the side of your door, gives you that extra height helpful for strapping things down. And speaking of straps, we also have the etrailer cam buckle straps. You can pick up a pair here etrailer, if you have other cargo and accessories to make it easier to strap things down and secure it. Now, the process itself may be a little bit involved, so let's take a look at that. The install process will look kinda confusing at first, and that's just how it is with naked roof racks. But that's what this video is for. Honestly, this is gonna be a very easy to do process, as long as you follow the instructions properly, and get your measurements right. So the first thing we're gonna do, is figure out why are there different numbers for the pads, as well as the hooks. And then we can figure out what our front crossbar is gonna look like, and our rear crossbar is gonna look like. I already installed the front crossbar, let's install the rear one together. So, underneath the foot pads is gonna be a number. So this is 423, and that's gonna fit right onto your towers. And you're gonna wanna make sure it faces the right way. So to make that easier, we are going to install the towers, and notice how this has tabs on top, as well as a bolt. That's gonna line up with our plate. So the plate fits right into this opening here. So you're gonna slide that all the way out to the edge of your crossbar, right over there. Then you're gonna fit the plate into that tray. So just follow or line up those tabs and those openings, and then slide it back through. Now fit your crossbar over the plate. So remember, that's going to line up with that bolt, and then use your included tool. This is gonna be an Allen key, included with your kit, to slightly tighten down that bolt onto the plate. So we're gonna put the pad onto the tower now, and if you're not sure which way it should face, there are little bolts or screws there, just line that up with the holes on the pad. It should pop right through. Then you're gonna measure for where these towers should go. So you just press on that lever on the inside, and then you push the tower through, line it up with the measurements given in your instructions, and make sure it's the same on both sides. Just double check that before you tighten it down with the included tool. Once you have those towers secured to the corrected measurements, let's go check it out on top of our vehicle. I don't put the hooks on just yet. We want this at 500 millimeters away from our center stave, or center portion of our door, so let's just get it roughly up there. So once you have everything lined up, you've double checked that your measurements are good, and you'll also see that you did this right if you can see how this pad is perfectly flushed against the ridges of our roof. So now, our next step is just to line up the hook. We have the metal washer, the plastic washer, and then the bolt. Just slightly throw that on by hand before you tighten it down. Remember when tightening down, try to tighten it down like 75% on one side, then you go to the other side, just go back and forth so you don't over tighten it and skew it. You're gonna use an Inno torque tool. So this one is set to three newton meters, so you wanna use this so you don't over tighten down your roof rack. So, you wanna keep tightening it until you hear it click, and then make sure it clicks twice. Kinda like a gap cap. There we go, that was a click. Once you've tightened down everything, and just double checked that all four towers are good and that all the pads are flush on the ridges of your roof, your final step is to put the end caps on. There's two different end caps. One is gonna be the tower, so that just kinda clips into that hinge. You have it in the unlocked position, turn it to the locked position to secure that end cap. Then you have the nice end caps for the cross bars. Those just pop right in. Do all four tower end caps, all four crossbar end caps. Once everything's in place, that's it, you ready to load this up and hit the road. And this right here was a look at our Inno Roof Rack system with the 54 inch long crossbars, the Through Feet for naked roofs, and the Custom Fit Kit, for your 2020 Chevrolet Equinox..


Do you have a question about this Accessories and Part?
Info for this part was:
At etrailer we provide the best information available about the products we sell. We take the quality of our information seriously so that you can get the right part the first time. Let us know if anything is missing or if you have any questions.


Thank you! Your comment has been submitted successfully. You should be able to view your question/comment here within a few days.
Error submitting comment. Please try again momentarily.