
To see if this custom-fit item will work for you please tell us what vehicle you'll use it with.


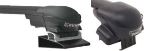
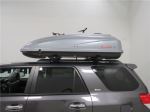
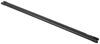
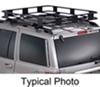
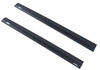
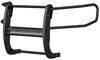
This sleek, aerodynamic roof rack provides space to carry gear on your vehicle. Crossbars with push-down rubber strips in top channels work with channel-mount and clamp-on accessories. Installs to raised rails on your vehicle's roof.
Features:
Specs:

Videos are provided as a guide only. Refer to manufacturer installation instructions and specs for complete information.
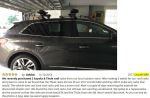
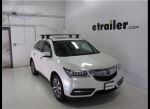
Hey, everyone, it's Evangeline right here at etrailer. Today we have the Inno roof rack, and we're gonna see how it fits here on our 2024 Hyundai Santa Fe. If you are looking for a very easy to use, easy to install, but also premium roof rack, this might be the choice for you. But there are two choices within this style. So let's go take a look at what might be the best fit for your adventures. Your two-size options for this is gonna be the 54-inch long crossbars, which is what Inno actually recommends for the Santa Fe.
Or you can get the slightly, very slightly longer 57 inch crossbars, also available as a kit, for the raised rails on your Santa Fe. So the main difference you're gonna get there is gonna be overhang. So here we have about an inch, an inch-and-a-half of overhang. If you want a little bit more space to carry around more things, that could be an option for you. I think both options look great either way.
With this, you're going to get an aerodynamic design. I actually got myself an Inno roof rack purely because of these shiny end caps. I think they look great, but the way they function is that they secure the end of the roof rack. So if you we inchesre to mount things to your aero bars, you could either clamp around in a spot where you have enough space for the clamps or you could secure your mounts inside the channels or the T track. By pushing in this rubber strip, you can slide your accessory through.
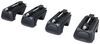
And then the other part of this kit is gonna be your tower, and this tower secures around the raised rail. You also get keys included with the system, something that not every roof rack manufacturer provides. And it's also a tool-free install where it's a lever that secures this rubber strap that has a metal strap on the inside. Now, some other measurements that you have to keep in mind are gonna be your roof clearance measurements. There's two measurements there.
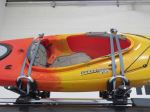
The first is how much space do you have from the roof to the bottom of the crossbar. And in our spot over here, it's gonna be about 3 3/4 of an inch. And that's gonna be very helpful 'cause most of those clamps are going to fit around your crossbar, even your wing nuts and U-bolts. Just make sure you're not scraping up your roof if the bolts are too long. The next measurement's gonna be how much does this add to the height on the top of your roof So here we have just a little past 4 3/4 inches, and that's gonna be where your cargo sits. So imagine, you're carrying around skis with extra tall bindings, so make sure there's enough clearance for those bindings. And if you find that there's not, you can then get ski carriers with extra height here at each trailer. So the height this sits at is pretty normal. You still have a sleek look, but a lot of compatibility with most accessories. Earlier in this video, I mentioned this is designed for raised rails on your roof. And if you're not sure what type of rails or roof you have on your Santa Fe, what I recommend doing is looking over, seeing if you have a rail, and if you can fit your hand underneath. If you can, then yes, you have a raised rail. And I would like pretty much any vehicle with a raised rail because you can then put your roof rack pretty much anywhere you want or wherever makes sense for your cargo carrier. And this makes it very versatile with most brands of roof racks. So with what I have here, while you can put the crossbars anywhere, I do recommend at least starting where I put it today. My focus was the front crossbar. I wanted to put it in between the glass panes on top of the vehicle. And that way, if I did drop something while securing it around the bar, it would be fine. So with that in mind, I then went back 29 inches for a 29-inch crossbar spread. And that means some accessories require very specific spread. 29 inches is a very good, versatile number for most accessories, but for certain situations, you might need more or less crossbar spread. So go ahead and adjust your crossbars wherever you need them to go. Your maximum spread, if you put the front crossbar as far forward and the rear crossbar as far backward, you can then get up to 54 inches of space. And that's a general gist of this roof rack. If you are curious about how I installed it, stick around and I'll show you in a second. But before we get to that, let's discuss the other options you may have for your Hyundai Santa Fe. When you have large rails like the one you have here, I highly recommend taking a look at raised rail roof racks that utilize a strap that goes around those rails. And that's why I really like the Inno Through feet for that reason. Now an alternative to this brand would be the Yakima brand, and they've always made high quality roof racks and accessories. I would recommend taking a look at that if you need especially long crossbars because they do not have a limit for crossbar length and/or if you have yak accessories and you want them all keyed alike to stay within the ecosystem. However, Yakima is a premium brand at a premium price. You get really good function out of that roof rack, but if you don't need that extra bonus features and you just want something straightforward and easy to use, that's when your Inno roof rack comes in handy. And from that point, you can then decide if you want the shorter bars like what we have here or slightly longer ones. Getting this put together is gonna be super simple, no tools are needed. If anything, use the tape measure which is actually included with your kit. Now I already installed the front crossbar, and we are gonna install the rear crossbar together. We'll start by getting the crossbar prepped. So you're gonna have the top of the crossbar. I like to put the end cap on right away so I don't forget, and I turn the crossbar over so we can see if this sliding track. So we're gonna slide the track all the way to the inside. It's gonna be stopped by this button, press that button, keep sliding until this is open. You're then going to get your tower or the feet, whichever you call it. We'll take that end cap off, and then we'll look at the tower. You'll see you'll have these tabs here. Well, those tabs will line up with the track, so I just fit the tower over with the lever facing out, make sure it's seated. Then you can just slide it and you're secured. So do that for both sides. Now we're gonna get this loaded onto the roof. You're gonna want the taller part facing the front and the tapered end facing the back. Now since you have raised rails, there isn't really a requirement for where you load your roof rack. It's really just where your strap's gonna fit over. This is gonna be easier with two people. What I'm gonna do is I'm just gonna rest the roof rack in the general area where I want to put it. Your straps are gonna fit around the rails and then go ahead and push that tower up so it sits flush against the rail, and then fit the strap into the tower. You're then going to measure on both sides. You wanna make sure that it's the same amount of length on each side of the crossbar. And then you also wanna make sure that your tower is in the same spot on your rail. Once you've confirmed that, which I did right before this shot, I'm then going to tighten down the tower by just turning this lever. And you're going to continue until that strap is tensioned against the rail, and you can see visibly that's pulling tight. I prefer this spot for mounting the crossbar simply because I like to carry around longer items, like really long kayaks, and I wanna make sure that I can still get a good enough clearance for opening up the hatch, but it really is up to you and wherever you feel is the sturdiest as well as the most appropriate spacing for what you're carrying. Also, technically, I know that the side of the Santa Fe can be pushed in to use as a handle to get up onto the roof, but really, I haven't been able to use it as often with roof-mounted stuff. Being able to stand in the threshold has been perfectly fine for me. So with all that being said, once you've tighten down your towers, then give them the good old shake test to make sure that they're secure. And then put the end cap over the tower, turn the key, and it's locked into place. Make sure you've locked down all four towers. You do get two keys. One can go inside your car, the other can go on your key ring. And with that being done, that's gonna be it for the install. Super quick, super easy. You're now ready to load up your roof rack and go. And whenever you do need to take it off, you can just take off the end cap, loosen that lever, and that's gonna be it. Hopefully, this video helped you out with seeing how this roof rack will look like on your Hyundai Santa Fe. And if you need any other accessories, whether it's a kayak carrier or a cargo box or even a roof-mounted bike rack, well, all of those are available here on our website. Just check out our website or give us a call if you have any questions or need any advice for what will work best. But today, what you saw was the Inno roof rack with the 54-inch long aero bars and the Inno Through feet for raises rails here on our 2024 Hyundai Santa Fe.
Ratings & Reviews


Info for this part was:
At etrailer we provide the best information available about the products we sell. We take the quality of our information seriously so that you can get the right part the first time.


Thank you! Your comment has been submitted successfully. You should be able to view your question/comment here within a few days.
Error submitting comment. Please try again momentarily.