


Mount this twin air compressor under your Jeep's seat so you can run air lockers or air up your tires after a long day on the trail. Hardware, plumbing, and electrical components included.
Features:
Specs:

California residents: click here
Videos are provided as a guide only. Refer to manufacturer installation instructions and specs for complete information.
Hi everybody, Andy here with etrailer.com. Let's take a look at this ARB Twin Motor On-Board Air Compressor. Now this on-board air compressor has been designed for your 2007 to 2018 Jeep Wrangler JK, and this twin on-board air compressor system is going to let you run air lockers or air up your tires. And as you can see, I went ahead and installed this air compressor onto this bracket just to kind of give you an idea of what this is going to look like when you install it. But as you can see, we have the air compressor underneath and the manifold is going to hold pressurized air, providing air to actuate your air lockers. So with this air compressor, the maximum air pressure is 150 psi.
The maximum airflow is 6.16 cubic feet per minute. This has 100% duty cycle. So let me just kinda give you a overview here real quick, but you're going to get everything, but the bracket will come uninstalled from this compressor, so you will have to install it. But I just kind of wanted to give you an idea of what this was going to look like when you have the bracket mounted to the compressor. The thermal protection on the motor is gonna keep the compressor from extreme temperature damage.
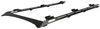
Safety valve's gonna keep the unit from pressure build up. And then the in-line fuses here and the wiring harness here is going to prevent this from overloading or short-circuiting. We do have measurements of the compressor listed on the product page if you needed that information. Now this mounting bracket itself is gonna obviously let you mount your compressor under your seat on your Wrangler. And some drilling is gonna be required.
The bracket's gonna also act as a heat sink to dissipate heat away from the mounting point. And so this includes everything that you see here laid out on my table before me. You're gonna get all the hardware that you need. You're gonna get the plumbing parts. You're going to get the electrical components.
You're gonna get these two elbow fittings, these two adapter fittings, this foot long reinforced stainless steel braided hose, and then the hose coupling that I have mounted to this bracket here along with the switch. So everything that you see here, as well as the instructions to guide you through the installation and operation. I think that's going to wrap up our quick look today. I do hope that it was helpful for you. Again, my name is Andy. Thank you for joining me.
Info for this part was:
At etrailer.com we provide the best information available about the products we sell. We take the quality of our information seriously so that you can get the right part the first time. Let us know if anything is missing or if you have any questions.


Thank you! Your comment has been submitted successfully. You should be able to view your question/comment here within a few days.
Error submitting comment. Please try again momentarily.