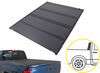
WeatherTech Mud Flaps - Easy-Install, No-Drill, Digital Fit - Front and Rear Set


To see if this custom-fit item will work for you please tell us what vehicle you'll use it with.
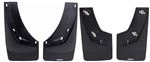
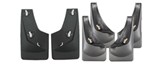
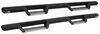
These premium mud flaps are easy to install and digitally designed for a perfect fit. Protect your vehicle and your trailer from road debris. Flaps are constructed of durable thermoplastic resin with stainless steel fasteners.
Features:
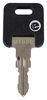
Precision fit, durable components and ease of installation make WeatherTech NoDrills your first choice in mud flaps. Installing mud flaps has never been this painless. Patent-pending QuickTurn stainless steel fasteners makes installation quick and easy - no drilling required.
 Alternate Instructions
Videos are provided as a guide only. Refer to manufacturer installation instructions and specs for complete information.
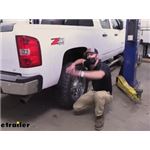
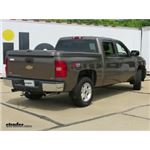
What's up everybody, Adam here with etrailer today on my dad's 2012 Chevrolet Silverado. We're gonna be taking a look at the front and back kit for your WeatherTech mudflaps. Mudflaps are gonna be a necessity in my opinion, just because it's gonna prolong the life of this back little panel. And it's just gonna prevent it from getting a bunch of mud and rock chips and stuff. And this does tend to kind of rust out on any type of truck. So kind of protecting that.
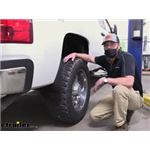
It's gonna be nice, but also if you're hauling stuff, we're not gonna be throwing rocks and stuff back at whatever we're hauling. So it's gonna keep everything back there safe as well. This is gonna be a custom fit. As you can see, it is literally perfect. It completely contours to the edging of our rear quarter panel here.
And that's something I really like. It has a nice clean look. And it does have this little bolt right down here, which is a little bit different than the Husky Liners. I would definitely compare these to the Huskies. I think they all do the same exact job.
There isn't really a whole lot of difference when it comes to the finish. They're all made of thermal plastic resin. So they're gonna be extra strong, they're gonna be impact resistant. But one of the main things on the mounting side of it, is this is gonna be a little bit easier than the Huskies. So with the Huskies, you're just gonna have to reuse the hardware.
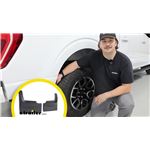
But with these, it has stainless steel, little quick turn knobs, which gets it installed in a matter of seconds. So that is one thing that is a little bit better with the WeatherTechs is just on the back, we are gonna have a little bit easier installation process, but at the end of the day, they're all gonna do the same exact thing. And it all just kind of comes down to, if you want the really quick install, go for this. And if you don't really care, you can just go with the Huskies. I like the Huskies just because it's more of a flat face, but that isn't really a major, major difference. They're all pretty much the same thing. And for the front, it's basically the same thing, same exact shape and everything like that. Same exact nice custom fit, but the only difference is just gonna be the mounting. So if you come around inside the wheel, well, we basically just reuse the hardware that came with the truck. So, that is one thing you'll do with the front here. And you will have to start kind of turning your wheels to get them all to fit. But at the end of the day, it's gonna do the same exact job as back there. But with this, it's really gonna help prevent some of the different rust spots and paint chips that you get. And if you do have some nice running boards too, it's gonna protect those as well. This typically rusts out, I know it kinda does on the vehicle that I have, and you can kind of start to see and feel some of these chips that's already been here because of this. So, I would definitely recommend grabbing these. It's just gonna, again, protect your truck. Between the backs and the front, the fronts are gonna take a little bit more time to install. So, if you wanna see how we install them, you go ahead and stick around, we're gonna show you. First thing you wanna do is clean up the spot where the flaps are gonna go. As you can see the flats that we had on here before, it's just leaving a lot of debris. So we really wanna clean that up. Let's take whatever you got. Soak it real good. And then take like a shop towel or whatever to clean it off. Yikes, so a lot of that was dirt, but more of that was just kind of this little nicks and the sides. That's something that we're gonna try to prevent with these flaps. So now that that's done, there is a little sticker that comes in the kit, which will protect this from that happening. They didn't have it on here before, and that's why it looks like that. But basically we're gonna have a left-hand side and a right-hand side. You can take a little insert. We're not keeping those on here, so I'm not gonna use this. But basically you put it kind of like right there and that'll just protect all that from happening. So once that's done, we are gonna have to kind of move our wheels around to be able to access all of this. So, depending on what side you are, it's gonna let you know where you're gonna need to turn your wheels. So, once that's done, we just need to remove all of the hardware holding the old mud flap or just our wheel liners in. So get all those out. I took out most of them when we took these off, but there's gonna be a little tab right here. You could do your best, take a tool or a Flathead screwdriver, and you know how these go, they just kind of pull out like that. And you can pull up the core and we will use these later. So we just wanna set that to the side for now. And then we can go ahead and try and hold these up. And we can use the hardware that we took off before, just to kind of re-install these. So what I'm gonna do is I'm just gonna start with the one I have right next to me. put that in, and then insert this back in there. And I'm just using the hardware that was here before. I'm not gonna completely tighten them down yet. I'm just gonna get all of them in and then tighten them all at the same exact time. And then for the very last one, which is way in the back right here, one, we're gonna have to turn these wheels to access it. But if you have just a straight through hole, they do give you a screw and a lock nut that you can put through there and then thread this on, on the other side. But with our case today, this actually has a threaded hole and there was hardware in there before. So I'm just gonna replace that. But if that's not the case, it does come with one for each side. And then we can go ahead and repeat that same exact process on the other side. And now let's just head to the back. So again, we're gonna clean this surface and put the sticker on just like the front. But with these, we're not gonna really have to worry about the hardware, basically as this kind of rotates. So it'll start out like this. And then as it rotates this is gonna go around and this is gonna fit right in this inner lip. So it's pretty simple stuff. And then this right here, this little tab and that's just gonna go on the edge right here. So it's very, very simple. All you'll do is just kind of put it in there, make sure everything's kind of rotated in the unlocked position, get it put up into place. And then we can kind of push in and rotate around, until we can feel it kind of locked into place. Once it's locked, give it a couple more turns, make sure it's nice and tight and do the same exact thing for the bottom. And that's literally it. So this is nice and solid as you can see. And then you do that same exact process for the other side. So, once you have the front and the back done, you're basically done with the install of the WeatherTech mudflaps on a 2012 Chevrolet Silverado..
Ratings & Reviews

Excellent fit and finish, great customer service and follow up.
Info for this part was:
At etrailer we provide the best information available about the products we sell. We take the quality of our information seriously so that you can get the right part the first time.


Thank you! Your comment has been submitted successfully. You should be able to view your question/comment here within a few days.
Error submitting comment. Please try again momentarily.