
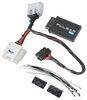
etrailer Trailer Hitch Receiver - Custom Fit - Matte Black Finish - Class III - 2"


To see if this custom-fit item will work for you please tell us what vehicle you'll use it with.
Thank you! Your comment has been submitted successfully. You should be able to view your question/comment here within a few days.
Error submitting comment. Please try again momentarily.


Hit the road with confidence! Whether towing a camper, hauling gear, or getting the job done, this hitch is built for adventure. A fourth layer of matte black powder coating resists corrosion, ensuring strength and durability for every journey.
Rated for 5,000 lbs of gross trailer weight (GTW) and 750 lbs of tongue weight (TW), this hitch is built to handle mid-size trailers, campers, multi-bike racks, and cargo carriers. Whether you're heading out for a weekend getaway or hauling extra cargo, this hitch provides the durability and security needed for worry-free towing.
Unlike standard glossy hitches, etrailers hitch features a matte black carbide finish, making it more resistant to scratches and better at hiding dirt and scuffs. The added fourth layer of powder coating ensures superior corrosion resistance, making it ideal for long-term use in various weather conditions.
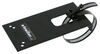
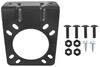
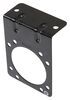
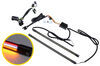
No drilling or welding required - this hitch mounts directly to your vehicle's existing frame attachment points. The included complete hardware kit and straightforward instructions make it a great DIY-friendly option.
Designed to accommodate a wide range of hitch-mounted accessories, this 2-inch receiver is ideal for multi-bike racks, cargo carriers, and a variety of towing setups. The standard sizing ensures compatibility with most hitch accessories on the market, making it a go-to choice for adventure and utility needs.
The square-tube construction enhances durability and provides a clean, streamlined appearance. This design ensures a strong and stable connection while integrating seamlessly with most vehicles for a factory-like fit.
Built with precision robotic welding and high-quality steel, this hitch ensures long-lasting strength, a precise fit, and consistent performance. Designed for reliability, it meets rigorous quality standards to provide a dependable towing solution for years to come.
When you purchase a hitch from etrailer, you have access to lifetime technical support from towing enthusiasts. Whether you need installation guidance, troubleshooting tips, or advice on accessory compatibility, our team is here to help every step of the way.
California residents: click here
Customer Satisfaction Score:
98% were satisfied with this product
2% of customers were not satisfied
Ratings & Reviews

Received hitch the other day. Installed it yesterday. Hitch was delivered in perfect condition, no scratches,scrapes or flaws. The coating and cover make it look factory. I pick the hitch for the finish and the fact that is almost hidden,the flat finish blends in well. The shiny enamel finishes would stand out like a sore thumb. Very happy with my choice. Waiting on wiring harness from hyundai to finish this project. Thanks
Mason recommended going with the etrailer brand hitch. Perfect fit. Took two of us about an hour to install and test out. One tough bolt to get at, but all good. Torqued down to 50 pounds on each bolt.
Snug as a big in a rug!
Exact fit. Fast shipping
36in. Outside edge between brackets should be 36 and 1/4 but still works
This is a very high quality hitch that came with high strength bolts and very thick locking style flat washers and also came with great instructions. I installed it in less than 1 hour.
Went in just like the instructions said. Great Service from Elijah
Easy to install and works great
Bolt install around the exhaust area if somewhat of a pain.
well packaged, speedy delivery, fit as intended
Nice black matte finish matches with my Santa Cruz and easy to install.
As far as I know I have the right thing. We will see when I show up at the installer.
Perfect fit. Fairly easy to install
Awesome thanks so much
Very fast and exact
Perfect fit and fairly easy to install
I received this item in very poor condition which included chips, dings, and stripped paint. Will certainly lead to premature rust. The box was also torn and completely wide open when it arrived.

Mason

5/14/2026
Not only did I receive the first hitch I ordered in rough condition, but the replacement sent to me does not fit my car. I’m now several hours of effort and time deep into trying to make this hitch work between having to get a replacement and off the return as well as the installation problem. I ordered the exact part number that should fit my 2026 Hyundai Santa Cruz and it is an inch short on both sides of the mount. This hitch should not be advertised to fit the Santa Cruz. PN: e59ZV ordered straight from the website saying it should fit the 2026 Hyundai Santa Cruz. CLEARLY it does not.

Fast, correct. Good job.
Info for this part was:
At etrailer we provide the best information available about the products we sell. We take the quality of our information seriously so that you can get the right part the first time.


Lazer S.
9/30/2025
Looks great on your Santa Cruz, Stephen! And I agree, the gloss finish most other hitches use clashes with the look of most vehicles. That's one of the reasons I tend to recommend our hitches when I can. Plus, ya know, they are ours. : P What will you be using the hitch for? You mentioned waiting on the wiring from Hyundai, so I would imagine you are towing, but still figured I would ask.