
To see if this custom-fit item will work for you please tell us what vehicle you'll use it with.


Hit the road with confidence! Whether towing a camper, hauling gear, or getting the job done, this hitch is built for adventure. A fourth layer of matte black powder coating resists corrosion, ensuring strength and durability for every journey.
Rated for 7,500 lbs of gross trailer weight (GTW) and 750 lbs of tongue weight (TW), this hitch is built to handle large trailers, campers, multi-bike racks, and cargo carriers. Whether you're heading out for a weekend getaway or hauling extra cargo, this hitch provides the durability and security needed for worry-free towing.
Unlike standard glossy hitches, etrailers hitch features a matte black carbide finish, making it more resistant to scratches and better at hiding dirt and scuffs. The added fourth layer of powder coating ensures superior corrosion resistance, making it ideal for long-term use in various weather conditions.
No drilling or welding required - this hitch mounts directly to your vehicle's existing frame attachment points. The included complete hardware kit and straightforward instructions make it a great DIY-friendly option.
Designed to accommodate a wide range of hitch-mounted accessories, this 2-inch receiver is ideal for multi-bike racks, cargo carriers, and a variety of towing setups. The standard sizing ensures compatibility with most hitch accessories on the market, making it a go-to choice for adventure and utility needs.
The square-tube construction enhances durability and provides a clean, streamlined appearance. This design ensures a strong and stable connection while integrating seamlessly with most vehicles for a factory-like fit.
Built with precision robotic welding and high-quality steel, this hitch ensures long-lasting strength, a precise fit, and consistent performance. Designed for reliability, it meets rigorous quality standards to provide a dependable towing solution for years to come.
When you purchase a hitch from etrailer, you have access to lifetime technical support from towing enthusiasts. Whether you need installation guidance, troubleshooting tips, or advice on accessory compatibility, our team is here to help every step of the way.
California residents: click here
Videos are provided as a guide only. Refer to manufacturer installation instructions and specs for complete information.
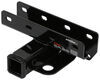
Hello neighbors, it's Brad here from etrailer, and today we're taking a look and installing the etrailer Trailer Hitch Receiver on a 2023 Jeep Grand Cherokee L. And the cool part of this hitch is it's going to replace your bumper beam, and that means that it's gonna look like this when you're towing, but when you're not towing, you can simply put the cover back on and it's gonna be completely hidden. This receiver is a two inch by two inch, which is gonna be great because it's kind of the standard size for trailer hitch receivers. So when you're looking for a bike rack, a cargo carrier, or even a ball mount for towing, you're gonna have tons of options available. Now, something you're gonna wanna pay attention to is if those accessories come with a pin and clip, because the hitch does not. So you're gonna want to pick up a 5/8 pin and clip and something I might recommend if you plan on leaving your accessories on your Jeep long term, you might wanna look at a locking pin and clip, becomes a good deterrent for anyone walking by.
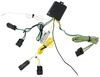
They can't just take out your pin and clip and take the accessories with them. Safety chain loops are nice and easy to hook up. A standard S hook or even a larger clevis style is gonna work on here. And something I'll point out is gonna be wiring is a great thing to add if you are planning on towing. And this is a kit that I would highly recommend doing at the same time as your hitch, because you're gonna have the fascia off, making it super easy to get it all installed.
Now, as far as capacities go, this is rated pretty well. So gross trailer weight rating is gonna be the weight of the trailer plus the accessories loaded, and it comes in at 7,500 pounds. Tongue weight rating is gonna be the suspended weight or the weight that's put down on the receiver tube opening, and that's gonna come in at 750 pounds. So what does that mean for you Well, if you're getting a four-bike bike rack loaded up or a cargo carrier loaded up, I really don't have any concerns that you're gonna overload it. It can be used with a weight distribution hitch, but the numbers are gonna stay exactly the same.
And even with high capacities, you may be tempted to hook up that 7,500 pound trailer, but check to see what the vehicle is capable of towing. Just because the hitch can do it doesn't mean that your drive train, suspension or brakes are gonna want to handle that weight. So double-check that and then compare it with the hitch capacities. The hitch pin hole is pretty well in line with the furthest point of the fascia. What does that mean Well, some bike racks and cargo carriers can stow in a vertical position and they don't work on all cars.
It kind of depends on, you know, if there's a huge gap or not. This one, I have zero worries that you're gonna have any issues with it folding up, but something to keep in mind is when you have those folded up, it's more than likely going, well, it's gonna make it to where you can't open up your rear hatch unless you lower it. Not a big deal, but it may block your backup camera, your license plates, and potentially your taillights. So just keep that in mind when you have them loaded. Something else that's gonna be important is gonna be ground clearance, and this one comes in at a very healthy 22 1/2 inches. So, that's not really my concern that ground clearance is gonna bottom out accessories or anything along those lines, because this one is super high. But that means you're gonna want to probably get a drop configuration if you plan on towing a trailer. And the way to figure out what drop you need, get your trailer all set up, level on the ground and measure from the ground to the top of the coupler and then compare that with our measurement, do some math, and that's gonna figure out that drop necessary so that way you get everything nice and level going down the road. Finally, really it comes down to the installation of this. This is a little bit more than you might expect because the fascia does come off, but that's how you're able to get this nice clean fit and be able to hide it when you're not using it. And I think that is totally worth it because you spend a little extra time for the install, but you're gonna get all the usability, some really high capacities and when you're not using it, you can't even tell it's there. So when it comes to that installation, I'm gonna walk you through step by step and make sure that you have the tools necessary to be able to get this all installed on your own. But if you decide I don't have the place, the time, the tools, or even the want to do it, I totally understand, but you can have someone else get this installed for you by finding someone close to you using our dealer locator. You'll simply put in your zip code and have a list of shops available for you to be able to get that installed. For you DIYers, stick around and I'll show you how to get it all installed on your Jeep, and in no time, you'll be out there towing or having your accessories loaded up. A few things before we get started on the installation, we're gonna be removing a decent amount of hardware, so I recommend having a nice organized spot to keep all of that. That way when you reinstall it, it'll be a lot easier. You won't be missing any hardware. We are gonna be removing the fascia, but it's totally worth it on this one because the receiver's gonna sit back here. But with that being said, you do want to have at least an extra set of hands to be able to pull this off, but a safe place to keep that fascia as you're installing the hitch. Another thing is if you're planning on doing wiring and you're gonna tow a trailer, you're gonna want to do that at the same time because a lot of this is much easier to do with that fascia off, so you might wanna tackle that at the same time. First thing to get the installation rolling is underneath our fascia, we have two 10-millimeter bolts on this side and two on this side, so we'll get those taken off. (tool whirring) Now, we'll head to the wheel wells, and we're gonna be doing this on both sides of the vehicle. You're gonna want an eight-millimeter socket and we're gonna remove four screws that are on this wheel well liner. (tool whirring) Now, once that's removed, we're gonna grab the wheel well trim. Now, be careful, you don't wanna pull this back too much 'cause if you put a crease in the plastic, it's probably gonna be permanent. So the best thing is just kind of take your time, and there's a series of clips that are fairly easy to do and they have just a green latch on them, but as you pull that back, there's also white clips, and those really are pretty easy to break, and I found the best way to get them off easily is you can grab that eight-millimeter socket and just put that on the tabs there, on it, and just push. And that'll compress those tabs, making this a lot easier. So there's one there, there's also one that's located up here. (tab thuds) The green clip ones are pretty simple, and all we're doing with that socket on the back end is as I push this on it brings those in, makes it easy to pop out. And once we're back this far, we're really just trying to gain access to this 10-millimeter bolt that we have. So I'm gonna just put shop towels back here, kind of hold this back for us. And then with my 10 mil, I'll get this screw taken off. Once that's off, we'll just repeat the same steps on the other side. You're gonna want to head to each side underneath and you're gonna find this electrical connection. You just push on this gray tab and separate that out. We'll get that on both sides. Now, open up your rear hatch, and the plugs that are here, we're just gonna grab a small flat head screwdriver and get these to pop out. If you want to, you can put a little painter's tape if you need to prevent scratches from occurring, but you should be able to get behind it and pop that out. So, it's got this tab, so I would recommend prying not on this side, maybe the top or bottom, and that'll expose the 10-millimeter bolt, we'll get that taken out. And then repeat on the other side. (tool whirring) We also have this plastic cover by our taillight and this plastic push, I would recommend trying to get it from the backside of the plastic, so, the trim panel tool or a flathead screwdriver, just kind of wedge that back there, pop it, and then the rest of this should come out fairly easily. There's some clips there, but again, once you get this one out, it should be easy. That's gonna expose the T30 Torx Bit screw, hold it in the taillight, so we'll get that taken out. (tool whirring) And then the taillight, we're gonna wanna kind of just wiggle this back and forth to loosen up the alignment tabs, especially if there's built-up dirt or things along those lines, it can make it a little bit more difficult. So I'll see if I can't get this loose by hand. (taillight thudding) And the alignment tab, you can see the way that it faces on both ends. So if you just kind of pull back here, just be careful because sometimes the corners of the taillights can scratch the paint or chip the taillights in the process. So just pull it back this way. And then we're gonna separate the plug, so that red tab, just pull that back, push in the tab, and then we can separate this. We're gonna do the same thing on the other side. Now, we're getting ready to remove our fascia. And what I like to do to just prevent scratches as we pull this off and also put it back on, just run some painter's tape along the edges of not only the fascia, but I'm also gonna put it along the rear quarter panel. It's just a nice easy way to, you know, prevent a scratch from happening, because the whole installation could go really well, but if you scratch your car, you're not gonna be very happy. So let's try to prevent that from happening. Now, to get the fascia removed, again, if you want an extra set of hands on this, it's pretty big, so it can be cumbersome, but just reach back, just put your hand in between the wheel well trim and the rear fascia, and then it's just clips along here. It's actually fairly easy to get. Just keep pressure closest to the clips. And once you get to this point, these should all unhinge. You may have to lift it up over the tab that's located right here, and you're gonna get the other outside portion to the same spot as here. And then that middle should pop out. (tabs rattling) Just pull straight back. A little bit of force, and there we go. Once that pops, we should have all of our electrical connections separated. We can set our fascia aside. Now, our hitch is gonna go where our bumper beam is, it slides in the frame and these are gonna be the bolts we need. But on ours today, the exhaust is in the way. So if that's the case for you, 13-millimeter socket, we'll get this taken down. (tool whirring) And that's just gonna be enough space for us to kind of move this, at least to get a wrench in here. So we'll be removing the two bolts on this side and the two bolts on the other side. And we'll be removing the bumper beam, which will not go back in. This is gonna be a 21-millimeter socket to get these taken out. (socket rattling) (bolt rattling) Once the side bolts are out, there's also gonna be one on the bottom, so we'll get that taken out as well. (socket rattling) (hitch clanging) Now, we'll grab our hitch and we're gonna slide this into place. (hitch clanging) And on our L today, we're gonna be using the farthest away from the body holes. So as we slide this in, we're gonna be looking to see if we can get these to align. (hitch rattling) And our goal is to get carriage bolts passed through there. So I'll raise this up, and it looks as if these are gonna be the holes that we use. And I'm gonna just reach in here, pass my carriage bolt in, and get my serrated flange nut started on both of them. (nut rattling) And this one, it's a little bit further, I can get my hands in there to pass it, but if you weren't able to get that easily, you can use the pole wires that they supply and I'll show you how to do that technique now. So uncoil this, and we're gonna grab the coil then and feed it through the carriage bolt hole and then feed this towards the outside here. You can then thread the bolts on that coiled section. (bolts clanging) And then I just pull this through. We have to chip the hitch a little bit, but that'll get that bolt passed in for you. (bolt rattling) And then you can take off the pole wire, get your serrated flange nut started. (nut whirring) And that covers those two, on the bottom, we have that where our bottom bolt was. We also have a carriage bolt that we're gonna pass in as well. (bolts rattling) And then we're gonna repeat that same process on the other side. Now, once we have everything started, we're gonna snug these down. 3/4-inch socket is gonna accomplish that, and I'd recommend doing the bottom ones. It'll really start to draw this up nice and straight. And then you can get your side ones. No need to get crazy here. We're gonna come back with a torque wrench, so just get everything snug. (tool whirring) The torque setting's gonna be found in the instruction manual, and we'll just go through, get these all torqued down. If you need a torque wrench, you can get one here at etrailer. You can generally go to an auto parts store and rent one for free. But this will ensure that it's gonna be tight enough for all of your towing needs long term and not too tight, putting stress on anything. Now, if you're doing just a hitch, you've officially installed your hitch, so at this point you can get your exhaust hanger bolted back up and then just reinstall everything in the reverse order. But as I mentioned earlier, now is the perfect time to get all your wiring ran so you can get your four-pole nice and clean, you can zip-tie it and easily plug into where your taillights are. So if you don't have your wiring right now, you at least know how to take your fascia off if you have to, 'cause these do get a little bit tricky to run those cables up. So, I'm gonna get mine all installed, get everything put back together. And then from there, all you'll have to do is load up your accessories, put in your pin and clip, and you're ready to hit the road. That's gonna do it for a look and installation of the etrailer Trailer Hitch Receiver on a 2023 Jeep Grand Cherokee L.

High quality hitch, and the installation guidelines were very straight forward. Couldn't be happier with the purchase.
Fits well, instructions were easy to follow and installation was difficult just as the instructions said they would be. I did have to remove the spare tire from under the car to make the hitch rack fit.
Fit perfectly. Instruction video was very helpful and support staff was knowledgeable and friendly.
Was delivered fast! It fit perfectly!!
Do you have a question about this Trailer Hitch?
Info for this part was:
At etrailer we provide the best information available about the products we sell. We take the quality of our information seriously so that you can get the right part the first time. Let us know if anything is missing or if you have any questions.


Thank you! Your comment has been submitted successfully. You should be able to view your question/comment here within a few days.
Error submitting comment. Please try again momentarily.