
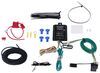
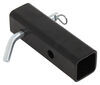
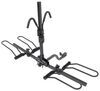
Draw-Tite Max-Frame Trailer Hitch Receiver - Custom Fit - Class III - 2"


To see if this custom-fit item will work for you please tell us what vehicle you'll use it with.
Thank you! Your comment has been submitted successfully. You should be able to view your question/comment here within a few days.
Error submitting comment. Please try again momentarily.


Fully welded vehicle trailer hitch is strong and durable. Draw-Tite's Tested Tough guarantee ensures that this hitch exceeds industry standards. The combination of an e-coat base and a powder coat finish provides excellent rust protection.
Features:
Specs:
Draw-Tite's Tested Tough program provides testing standards far superior to those outlined by the Society of Automotive Engineers (SAE), the go-to source for engineering professionals.
Each Draw-Tite trailer hitch receiver undergoes extensive fatigue testing and static testing with the ball mount that is either supplied or recommended for use with that particular hitch, thus ensuring results that are applicable to real life use. Fatigue testing is also conducted on hitches rated for use with weight-distribution systems.
In addition, Draw-Tite performs static testing on a simulated automobile, as opposed to the rigid fixture used for SAE testing, resulting in a more true-to-life scenario.
At etrailer.com we're committed to the products we sell, and to our customers. Our experienced and knowledgeable staff are available via both phone and email to address your questions and concerns for the lifetime of your hitch. The technicians at etrailer perform hitch installations on a daily basis, making them a valuable resource for do-it-yourselfers. The one-on-one, personal service you'll receive comes straight from an expert in the towing and automotive field. We've installed it, we've wired it and we've towed with it, so whatever your question, we can answer it.

California residents: click here
Videos are provided as a guide only. Refer to manufacturer installation instructions and specs for complete information.
Hey, everyone, Ryan here at etrailer. Today on our 2024 Hyundai Kona, we're gonna be showing you how to install the Draw-Tite trailer hitch receiver. Let's take a minute and check it out for us so. So for those of you wanting to use an accessory, like a bike rack, or cargo carrier, or even pull a small trailer around, having this back here is going to allow you to do that type of thing. I do like how the hitch looks on the back of the Kona, almost a factory-type option in my opinion. And that's because you can only see the receiver tube opening.
The rest of the hitch actually connects to the frame rails is all hidden behind the bumper panel there. And as far as fitment goes, it's gonna work with all the different types of Konas, with a few exceptions. If you happen to have an electric model, an N line, or any of those N models, this is not gonna be a fit. But the good news is, there is a hitch available that will work with those. The hitch is gonna have a two-inch-by-two-inch opening.
It's a good thing, real common size, and so a lot of things will work with it. It's going to use that standard 5/8 pin and clip. Keep in mind though, one doesn't come with the hitch. If you need one, not a big deal, get it here at etrailer. A lot of times too, if you end up buying a new accessory, they'll come with one.
So something to look out for there. And the safety chain openings are really thick, they're loop style. And just about any size hook that you might have on your trailer should work out just fine. As far as the weight capacities go, the hitch is gonna have a 200-pound maximum gross tongue weight rating. That's the amount of weight pushing down on the hitch, so that's good for those one to three, maybe even four bike racks, just to give you an example there.
And for the maximum gross trailer weight rating, that's gonna be 2,000 pounds, or the amount of weight pulling on the hitch. That is the weight of the trailer, plus anything that you might have entered on it. Now, with all that said, I do always like to recommend, never a bad idea just to grab your Kona's owner's manual. That way you can check in there and make sure it can handle that amount of weight safely. We'll grab a couple measurements. And these will help us figure out what type of accessories will work best. You go from the ground to the top inside edge of their receiver tube opening. It's gonna be about 14 1/2 inches, which is pretty good ground clearance. So if you have an accessory, like a bike rack that has a straight shank, I think you'd be just fine. If you have one with a rise in it, even better, buy you more ground clearance. If you're gonna be pulling a small trailer, you can probably get a ball mount that has a very slight rise in it, inch or so, work well in most scenarios probably. And if you go from the center of the hitch pin hole to the edge of the rear bumper, that's gonna be about six inches. And if need be, you can use that to help figure out exactly if any of those folding-type accessories can be stored in that upright position without hitting the back of your Hyundai. There is another hitch available for the Kona, it's made by Curt. And to compare this one to it, they're pretty similar, not a ton of differences. Really can't go wrong with either one. The Curt hitch has a slightly different appearance. And really it just comes down to the finish, it's more of a gloss black, as opposed to the Draw-Tite that somewhere in the middle, like a semi-gloss almost. So either one that you go with work out just fine. As far as the installation goes, it's really not too bad. You lower the exhaust down some, clean out your attachment points, and raise the hitch into position. Sometimes it can be a little tricky to get one or two of the bolts started, but I'll show you what I did to hopefully make that process a little bit easier on you if it's something that you do run into. But if this is something you don't wanna mess with, or have the time or place to work on it, I definitely understand that, you can always use our dealer locator network and that can help you find a shop in your neighborhood that can do something like this for you. But if you're gonna do it yourself, hang around, we'll go ahead and get started on it now. To begin our installation, we're gonna be underneath the back of our Kona and since we need to lower the exhaust down some to give us a little extra room to work, it is a good idea to take a strap or something like that just to help keep it supported and help us control how fast and how far we let it come down. To lower the exhaust, we have a few rubber isolator hangers. This one here, there's one just like it on the other side of the muffler. And what you wanna do, you can spray 'em down with soapy water or some type of lubricant. You can take a pry bar. (metal clanking) And just work one end of that rubber hanger off of the metal portion. The third one is right here. And just do the same thing to get it off. And now we should be able to loosen up our strap some, and let the exhaust come down a little bit. Now we can locate and clean out the attachment points that we're gonna use to secure the hitch and they're gonna be the same on each side of your vehicle. And from this point on, whatever we do to one side we're also gonna do to the other side, gonna be set up the same way. We have one threaded hole here in the bottom, and then two threaded holes on the side. And I do suggest taking some sort of penetrating oil and a toothbrush, just kinda cleaning those threads out. That way they're clean and won't hang up whenever we go to put the hardware in. As far as the hardware that we're gonna use to secure the hitch, it's gonna be the same for all the attachment points. You're gonna have this bolt and a conical tooth washer. You put the washer on like this. That way the teeth on the washer will face up towards the frame. And you're just gonna lift the hitch up into position, and these are gonna thread right in. Now we can grab her hitch and raise it into position. It is doable by yourself, at least for me, but if you do have someone around that can give you a hand, probably not a bad idea. But we'll lift this up. (metal clanking) Get it held in place. And get one of the bolts started on each side. (bolt rattling) If you're having a hard time getting the bolts on the side to line up, one thing you can do is take a 17 millimeter and snug up this bottom one. (drill whirring) And that'll kinda draw the hitch up into position a little bit better. And usually by doing that, it makes it easier to get the bolts on the side started. And it's just one of those things. So this one went in easily back here. I'll get a few turns on it. But it almost feels like this one, the bolt's kinda wanting to go in a little crooked. So I'm just gonna loosen this now. (drill whirring) (bolt rattling) Now we're lined up perfectly here. So we'll get all the bolts started on each side of our hitch. Once all the bolts are started, come back with that 17, completely snug up this one. (drill whirring) And then we will snug down the ones on the side here. (drill whirring) You wanna make sure and come back with a torque wrench now and completely tighten down all of the hardware to the mount specified in the instructions. All that's left to do now is rehang our exhaust. So you can just spray the hangers down and pop 'em back into position by hand. And now that it's supporting itself, we'll get our strap out of the way. With that done, we're ready to use the hitch. So that'll do it for our look at and our installation of the Draw-Tite trailer hitch receiver on our 2024 Hyundai Kona.

Great service and very fast delivery
Great company. Great reps and communica tions.
The welds prevented the hitch from fitting tightly to the frame. The upper rear bolt couldn't fit. The tail pipe rattles on the hitch. Doesn't fit our 2026 Hyundai Kona turbo. I'll have to take it off a third time to provide clearance the tail pipe
Perfect Fit
It was difficult to install on a 2025 Hyundai Kona. Basically I had to dent the rearmost body seams to get the hitch to fit flush against the frame and allow all the bolts to thread in. Once I used a floor jack to force the hitch flush against the frame, and use the weight of the car to dent in the factory seems in the rear, I was finally able to get all six bolts to thread in.

Gwendolyn Y.
2/16/2025
Hey Timothy. I'm sorry to hear that you had such a rough time installing the hitch. Sometimes the hitch can arrived flexed for various reason like you're describing here. I have gone ahead and linked a help article that talks this in case you want to bookmark it for future reasons.
Helpful Links
The hitch is of good quality but it does not fit the 2025 Kona. There is a pinch weld or seam that interferes with the installation of the hitch. You cannot get the final bolt in because the hitch can’t rotate up far enough for the holes to align.

Brooke M.
3/12/2025
Hey Ben! I am sorry to hear that. I double checked the manufacturers site and they have this hitch listed as a fit so I am wondering if the hitch was bent a little out of square during shipping. It happens frequently enough we have a help article on how to correct it which I linked.
Helpful Links
The product scratched,with pilling paint , looks as it’s Returned .
The two top hole did not alignment properly, need to Modified it In order to install the product (extra one hour for installation,if you have a proper tools?)
In an end of the day works is designed
I believe it’s a little bit overpriced.
Info for this part was:
At etrailer we provide the best information available about the products we sell. We take the quality of our information seriously so that you can get the right part the first time. Let us know if anything is missing or if you have any questions.


Kate F.
11/12/2025
I’m really sorry you’re having trouble with the installation, Cheryl. Are you sure it’s the welds causing the issue and not that the hitch has flexed a bit? The hitches are made from flexible steel so they won’t damage your vehicle’s frame. Sometimes that flexibility can cause the holes to be slightly out of alignment. You can usually correct this by flexing the hitch back into place. Many people use something heavy and solid, like a dumpster or similar sturdy anchor point, to help with this. It might sound a little intimidating, but it’s actually easier than it seems once you start. Please let me know if this fixes the issue.