
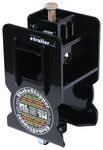
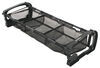
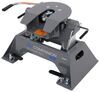
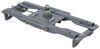
Draw-Tite Max-Frame Trailer Hitch Receiver - Custom Fit - Class IV - 2"


 Arrives before Christmas
 To see if this custom-fit item will work for you please tell us what vehicle you'll use it with.
Product Images


Show All (9) Product Images
Show Fewer Product Images
In Use/Installed


Show All (5) In Use/Installed
Show Fewer In Use/Installed
Customer Photos


Show All (5) Customer Images
Show Fewer Customer Images
Videos
Show All (2) Videos
Show Fewer Videos
Fully welded vehicle trailer hitch is strong and durable. Draw-Tite's Tested Tough guarantee ensures that this hitch exceeds industry standards. The combination of an e-coat base and a powder coat finish provides excellent rust protection.
Features:
Specs:
Draw-Tite's Tested Tough program provides testing standards far superior to those outlined by the Society of Automotive Engineers (SAE), the go-to source for engineering professionals.
Each Draw-Tite trailer hitch receiver undergoes extensive fatigue testing and static testing with the ball mount that is either supplied or recommended for use with that particular hitch, thus ensuring results that are applicable to real life use. Fatigue testing is also conducted on hitches rated for use with weight-distribution systems.
In addition, Draw-Tite performs static testing on a simulated automobile, as opposed to the rigid fixture used for SAE testing, resulting in a more true-to-life scenario.
At etrailer.com we're committed to the products we sell, and to our customers. Our experienced and knowledgeable staff are available via both phone and email to address your questions and concerns for the lifetime of your hitch. The technicians at etrailer perform hitch installations on a daily basis, making them a valuable resource for do-it-yourselfers. The one-on-one, personal service you'll receive comes straight from an expert in the towing and automotive field. We've installed it, we've wired it and we've towed with it, so whatever your question, we can answer it.

California residents: click here
WARNING: This product can expose you to chemicals including Chromium, which is known to the State of California to cause cancer and birth defects or other reproductive harm. For more information, go to www.p65warnings.ca.gov.
Videos are provided as a guide only. Refer to manufacturer installation instructions and specs for complete information.
Hello neighbors, it's Brad here at Etrailer. And today we're taking a look and installing the Draw-Tite Hitch Receiver which is gonna be a Class III on a 2022 RAM 1500. Now here's what the actual receiver hitch looks like installed. And this is gonna be a great option for those of you with the actual factory reinforcement large underneath. And it's gonna be a nice, quick way to get this installed and have a hitch working in about 10 minutes or so, instead of having to install a full hitch. Now, with that it does have a little bit lower weight ratings than some of your heavier duty hitches that are available for the RAM.
This one in particular has a gross trailer weight rating of 6,000 pounds, which is gonna be the weight of the trailer plus the accessories loaded up, which is a decent amount. You also have a tongue weight rating of 600 pounds which is the downward pressure on the receiver tube opening. So that's gonna be some of your extended accessories that you might load up and the weight that it can support. Now, this is a very quick installation because it does just bolt in to the factory spots and you have three bolts that you have to put in. So it's not too bad to do.
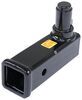
Now, if you are someone that tows heavy trailers with your RAM, you are gonna probably wanna look at something with a higher weight rating, and there's actually a bunch of Class IV and V hitches available, including ones from Draw-Tite and Curt that are awesome options for your RAM. Taking a closer look at the receiver, you're gonna see that it is a two inch by two inch receiver tube opening with a reinforced collar. Now this is gonna be great for a ton of different accessories whether it be your cargo carrier, bike racks, a ball mount for a trailer or whatever you want to put in here. Now it is all steel construction, so it's very durable and it has a black powder coat finish. So that's gonna keep it protected and looking nice for a long time to come even with road grind and salt kind of on it, so you have that protection.
Now this is a 5/8 hitch pin hole here. So this is gonna be able to put your accessories in and keep it in place. But this does not actually come with it. So you're gonna want pick up a hitch pinning clip, a lot of your accessories when you purchase them will come with their own. But if you wanted a locking version we have those available as well.
And that way, when you load your accessories in you can lock it and know that they're not gonna walk away in the hands of someone else. You're also gonna see a rolled style safety chain loop and that's gonna be great for when you hook up your trailer your standard hooks are gonna eat as we go on there as well as your large clever style as well. Now I'm doing some quick measurements here. We're gonna go from the center of the hitch pin hole to the furthest point of the bumper. And it does sit about flush at two inches. And that's important to note for some of your folding accessories to make sure that they don't make contact with the vehicle. I don't foresee it actually making contact with your bumper, but something to keep in mind when you lower your tailgate down, and when you have your accessories on, be careful of that. Now we're also gonna measure the ground clearance here. Now that's gonna be coming in at right about 19 inches. So I don't worry about the hitch making contact with the ground, but when you have some of your suspended accessories, like your cargo carriers, your bike racks, as you go up in incline, those can actually tuck down close to the ground. So it's something to keep in mind but this is a decent amount of ground clearance and you shouldn't have any issues there. As far as the insulation goes it's gonna be really easy to do in your driveway or garage. And it's really only three bolts that go into a factory spot using a bracket. So I'll walk you through all the steps but I will say you are gonna have to torque these down to a pretty high torque rating. So, you might have to go rent a torque wrench that can go up to that. But other than that, the install is gonna be nice and quick. You'll have your hitch installed and ready to go within just a few minutes. So now we're going to actually begin our installation by taking our Receiver Hitch here and the hardware. And we're gonna actually kind of go through our threads here just to clean 'em out. So when this is powder coated from the factory sometimes they can actually get in the threads and it makes it really, really hard to hand tighten these in place or even kind of get the threads started. So I'm gonna take this, grab my impact and I'm gonna run the bolt through, just down to here is where it actually stops but that's gonna at least clear out those threads allowing our hardware to go in a little bit easier when installing on the vehicle. You also have a bracket here with two weld nuts we're gonna do the same thing with the bolts. We're just gonna run these through, make sure it goes through clean, and then we can actually start installing. So this bolt is gonna be a 1 1/8 inch. So I'm gonna just, like I said, with my impact, kind of run this down a little bit. And I should clean those out, go back it out. Now, right here we have our bracket and this is actually going to be a 3/4 inch. So we're gonna run this through as well. So now when we begin the installation we're gonna start by taking this cap off. Now we're just gonna take our large bolt and the lashon including the kit and drop this in. So now we're gonna take our bracket and you'll see it has weld nuts welded on here. You're gonna want those facing up. And this is just gonna slide right in here. There's gonna be two holes here from the factory safety chain loops. And that's gonna allow us to actually run our bolts underneath here. And, so putting this hitch on pretty simple, we're just gonna put this underneath, and we'll grab our bolt with a conical tooth washer and you'll see that the conical tooth washer actually has kind of a concave shape to it. So you're gonna want those teeth biting into the bottom of the metal. So just make sure that you have those face the right way. Now I'm just gonna feed this up. You kinda get these hand tightened into those, that bracket there. So now this is kinda hanging in place because we have our two bolts hand tightened on. So I might just lift this up, align our top bolt and I'm gonna get that one started. So now I'm gonna take my 3/4 inch socket and I'm gonna tighten these up. We're gonna hit it with a torque wrench later. So we don't have to really crank this down too hard. We just want it nice and snug. So now I'm gonna take my inch and 1/8 ratchet here and I'm gonna just go ahead and get this nice and snug as well. Now we have it kind of all in place, it's nice and snug. Now we get our torque wrench and we get these two torque to spec. So now we're gonna need to torque these down and we're gonna be using the torque settings that are in the instruction manual. And once you see the actual torque setting you're gonna realize this is a pretty high setting. So, having a standard torque wrench at your garage might not be enough to get up to there. So you are gonna need a pretty large one. Generally you can rent these at an auto parts store, or if you have a heavier equipment place around you and they let you just torque that down, that's gonna be the best option. But it is important because it's gonna make sure that these threads don't have too much stress on them by being over tightened, plus they're not gonna be loose over time. So, we're gonna go here and we're gonna get this torque to spec. There we go. So now we're gonna be twerking our bottom bolts and the torque setting does change significantly, so make sure that you, when your torque wrench to those settings, and we'll go ahead and just get these properly torqued as well. So our final step is to put on our cap that was included as our factory one will no longer go on, but as I put this on here, it's not quite seating low enough for it to stay in place. Just a quick little bump of my finger allows this to fall off. So my tip, if you do plan on using this which will be nice to kind of protect this over time, you can probably put a little bit of epoxy here and then just place it on there, press down and allow that to cure on that should hold it in place. And that was a look and install of the Draw-Tite Class III Hitch Receiver on a 2022 RAM 1500..

Looks great!! Installation was very simple. This receiver hitch is just what I was looking for.1328098
Took me 10 minutes to assemble and fix the Hitch Receiver to the Pickup. Tools are needed. The instructions are clear.1121466

Good hitch. Easy to install & etrailer good about email updates to the shipment. Bought a hitch adapter as well later on. Recommend Etrailer.1536157
Fit perfect! Exactly what I was looking for.
Shipping was super fast.1299690
Easy install, fair price, loved the videos you all did on how to install it, helped save me almost $2001047894
The package came extremely fast it was exactly what I wanted and installation only took five minutes.921234
Shipped quickly! Appreciate the great customer service!1487399
definitely solid as a rock 1542694
Sales rep was very personable. Item was exactly what I was looking for.1485920
3441492
It fit well and installed easy. 1098183
No problems. 1192855
1532037
Easy install 1277843
1203424
1209334
1498405
1191676
1162998
1526372


Do you have a question about this Trailer Hitch?
Info for this part was:
At etrailer.com we provide the best information available about the products we sell. We take the quality of our information seriously so that you can get the right part the first time. Let us know if anything is missing or if you have any questions.


Thank you! Your comment has been submitted successfully. You should be able to view your question/comment here within a few days.
Error submitting comment. Please try again momentarily.