
To see if this custom-fit item will work for you please tell us what vehicle you'll use it with.
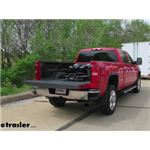
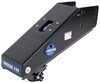
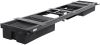
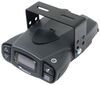
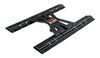
This hitch manually slides to give you 14" of clearance for tight turns. Sturdy wraparound jaw has a locking bar for added security. Pivoting head allows easy hook up and helps limit chucking. Polyurethane bumpers ensure a smooth ride.
Features:
Specs:

California residents: click here
Videos are provided as a guide only. Refer to manufacturer installation instructions and specs for complete information.
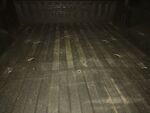
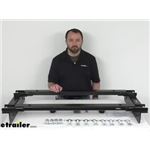
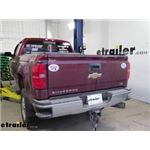
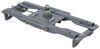
Hi there Silverado owners. Today on our 2018 Chevrolet Silverado 2500 we're going to be installing Demco's Underbed Rail Installation Kit for the Demco Hijacker 5th Wheel or Gooseneck. If have a gooseneck trailer, the underbed rail kit will also work with Demco's Hijacker Gooseneck Hitches. This underbed rail kit is going to allow you to install a Demco 5th wheel or a gooseneck hitch on your Silverado.With your new 5th wheel or gooseneck hitch installed you can haul that toy hauler, or 5th wheel trailer that you've been wanting to haul, or you can go ahead and put it to work out at the job site. The rails will work with any Demco Hijacker 5th wheel or gooseneck hitch. You'll want to make sure you pick the appropriate hitch for your needs.One of the things that I really like about this kit is that it installs underneath your bed so when you take your 5th wheel or gooseneck out you have a nice clean look.
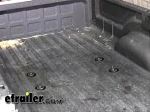
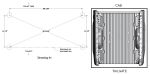
Unlike raised rails that will stick up above your bed.I also like how easy it is to install. You use the existing holes in your frame so there's no drilling required, which really cuts down on the install time and the amount of fatigue you're going to have putting it in.Another thing I really like about this kit is that it'll allow you to use the Demco Hijacker 5th wheel, which works out great for tighter turns than you'll get with other ones. Especially if you have a short bed truck due to it's auto slide feature.We'll begin our installation in the bed of our truck by marking out the locations where we're going to drill to install our underbed rails. These measurements are going to vary depending on the length of the bed of your truck so you'll want to closely look at those measurements and mark it out like we've got here. You'll find specific measurements for your truck in your instructions.Well now I need to drill four holes using a two-inch hole saw.
We're going to do it at each corner where we marked. You can see this in the diagram in your instructions. We'll now repeat that for the three remaining holes. With all of our holes drilled out we can clean up the metal shavings now. Then we'll use some clear coat to prevent any rust and corrosion around our exposed metal where we drilled.
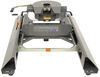
You can use some general purpose cleaner to clean off any of the markings that you made when determining where your hole location should be.Now that we've completed all the cutting we need to do in the bed, we can begin mounting our underbed rails. We're going to start with the side rails that are going to mount onto our frame here. Your rails are going to be labeled. We're on the passenger side. We've grabbed our passenger side side rail here.
We'll be using four of the longer bolts that come in your kit with hex heads. We'll then prepare these by placing lock washers and flat washers on them. We'll have four like this, for each side, prepared to install the rail onto the side of the frame by setting it on there and matching up the holes that's already existing in your frame, with the holes on our side rail. You'll see it's already got weld nuts in it. You simply take your bolt, slide it through and thread it into the frame. We're going to do this with the remaining three holes that have weld nuts. We'll repeat this on the other side.For our third holes that don't have weld nuts, we'll use the fish wire provided in the kit. We're going to go through the hole until it comes out the other side of the frame. You might have to finagle it around to get it through the other side. Then on the other side of your frame, we're going to slide a spacer over our fish wire. Then thread one of the carriage bolts, that come in the kit, onto the fish wire. First you'll feed in your spacer, then your bolt, then we'll just pull them through till it comes out the other side. Once you've got it pulled through, we'll place a nut on this side. We're going to repeat this with the other hole on this side and the two on the other side.You'll receive blue Loctite in your kit. You want to make sure you put some of that on all of your bolts.Next we'll be sliding our cross rails from one side of the frame across to the other but in order to get them to fit you are going to have to cut out a small section here. You don't need to cut it completely out. We're actually just going to cut it straight up. We're just going to go up like this. We're going to just be doing this around the section where you see the slits in your side rail. You want to make sure it's wide enough to fit your cross rail in. It's about three and a half inches. If you cut it there you could check to see if it'll fit. You may need to notch the sheet metal here at the bottom as well, in order to get it to fit.Now if it does get tight when pushing it in, you may need to loosen the bolts to your truck bed to get the extra clearance or if it's really close, like ours is, you could just take a piece of wood or a rubber mallet and tap it in. We're going to do the exact same process for our front rail. With both of our rails in place we can take the hardware that comes in our kit. We're going to be using the shorter large diameter hex head bolts with a flat washer on it. This is going to slide up through our slide rail. We're going to place a spacer plate underneath the rail. This has got to go through the front most hole, through the side rail, through your spacer plate and then into your cross rail. On the top we're going to place a nut. We're going to repeat that for the three remaining holes for both of your cross rails.We'll now tighten down all of our hardware using a one-inch socket. You may need a one-inch wrench to hold the nuts on some of them. Before you torque everything down, it's not a bad idea to take your 5th wheel, set it onto your base rails, to make sure that it's going to line up properly. If everything then you can go back and torque all the hardware to the specifications found in your instructions. If your 5th wheel doesn't fit you may need to loosen the hardware and slightly shift the rails until it lines up. Now with your rails torqued down you can install your Demco 5th wheel or gooseneck and hit the road.That completes our installation of Demco's Underbed Rail Installation Kit for the Demco Hijacker 5th Wheel and Gooseneck on your 2018 Chevrolet Silverado.


Great product
As described
Do you have a question about this 5th Wheel Hitch?
Info for this part was:
At etrailer.com we provide the best information available about the products we sell. We take the quality of our information seriously so that you can get the right part the first time. Let us know if anything is missing or if you have any questions.


Thank you! Your comment has been submitted successfully. You should be able to view your question/comment here within a few days.
Error submitting comment. Please try again momentarily.