

Installing Specialty Recreation RV Shower Pan
Updated 11/13/2025 | Published 10/20/2025
Products Featured in This Question
Question:
I have studied the photos, listened to the video and read the install instructions. To look at the design, it would appear the wall panels would go inside of the lip so that water all stays in the pan. But the instructions say to set the walls and then screw through the lip into the wall. If you so that it would be impossible to get a good seal as water running down the shower walls will go in any tiny space between the wall and the lip. Am I missing something on the installation?
asked by: Bob E
Expert Reply:
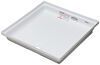
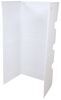
Hi Bob; the walls referenced in the instructions are the literal walls, different from a surround/panels like # SR75RR which would be installed after you get the Specialty Recreation RV Shower Pan # SR23RR in place.
Regardless, you need to use ABS compatible, silicone based sealer or caulk sealer once it is in place to seal everything up and keep water from getting through any of those spaces you're referring to. I would expect to see caulk in your existing shower at the connecting edges unless you have something that is one solid piece.
We don't have any good videos on shower installation but there are quite a few out there on RV channels so I would check them out. A lot of the time those real world experiences result in better installation methods, or at least a better order of operations for the steps, compared to the instructions.


(click to enlarge)

Product Page this Question was Asked From
Specialty Recreation RV Shower Pan - Front Center Drain - 24" Long x 24" Wide - White

- RV Showers and Tubs
- Shower
- Shower Pans
- Easy Step
- 24L x 24W Inch
- Front Drain
- White
- Specialty Recreation
more information >
Featured Help Information
Instructions

Continue Researching
- Search Results: 32l x 24w inch rv showers and tubs
- Search Results: shower pan
- Search Results: 24 x 32 shower pan
- Search Results: tub
- Q&A: Is there Pre-Cut Holes for Water Supply and Shower Head on the Specialty Recreation RV Shower?
- Q&A: Availability of Door for Specialty Recreation RV Shower and Tub Surround
- Video: An In-Depth Look at the Specialty Recreation RV Shower and Tub Surround
- Video: All About the Better Bath RV Shower Pan
- Video: Review of Specialty Recreation RV Showers and Tubs - Bathtub Right Hand Drain - SR78RR
- Video: Review of Specialty Recreation RV Showers and Tubs - Indoor Shower - SR55RR
- Q&A: Can Specialty Recreation RV Shower Pan be Used with Other Brand Wall Surrounds
- Shop: Specialty Recreation RV Bathtub - Left Hand Drain - 40" Long x 24" Wide - White
- Shop: Better Bath RV Shower Pan - Right Hand Drain - 40" Long x 24" Wide - White
- Shop: Specialty Recreation RV Bathtub - Left Hand Drain - 32" Long x 24" Wide - White
- Shop: Specialty Recreation RV Shower Pan - Center Drain - 32" Long x 24" Wide - White
- Shop: Better Bath RV Shower Pan - Left Hand Drain - 40" Long x 24" Wide - White
- Shop: Specialty Recreation RV Shower Pan - Left Hand Drain - 36" Long x 24" Wide - White
- Shop: Better Bath RV Shower Pan - Right Hand Drain - 32-1/8" Long x 24" Wide - White
- Q&A: Drain to Use with 2 inch Hole of Better Bath Shower Pan part # LC325246
- Q&A: Replacement Water Heater Recommendation for a Truma Model DLE60C
- Article: What are the Common Types of Propane Fittings Used on RVs?
- Q&A: How to Determine Correct Replacement Ceramic Kodiak Brake Pads
- Q&A: Difference Between Trailer Tire Sizes ST205/75R15 and ST225/75R15
- Article: Trailer Wiring Diagrams
- Article: Wiring Trailer Lights with a 7-Way Plug (It's Easier Than You Think)
- Article: Brake Controller Installation: Starting from Scratch
- Article: Brake Controller 7- and 4-Way Installation Kit (ETBC7)
- Article: How to Measure a Trailer Axle
Robin H.
11/13/2025
Hey Bob, how did things go with sealing the shower pan and wall panels after using the silicone-based caulk? Your update could make it easier for others working through the same installation steps.