

Installing an Electric Trailer Brake Controller from Scratch on a 1997 GMC Sierra 1500
Updated 12/01/2010 | Published 11/29/2010
Products Featured in This Question

Question:
how to hook up a voyager in a 1997 gmc sierra 1500
asked by: Deris
Expert Reply:
To install the Tekonsha Voyager Brake Controller, # 39510, or any brake controller in your 1997 GMC C/K series 1500, there are a couple of items you will need in addition to the brake controller.
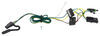
First, if the truck does not already have a 4-Way trailer connector, you will need to add one, # 118315. Installation is easy. This harness plugs in line with the vehicle tail lights. After making that connection, you will just need to attach the white ground wire to a clean, bare metal surface. I have included a link to the installation details below.
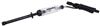
Next, you will need to install a 7 and 4 Way Installation Kit, # ETBC7. First, mount the 7-Way using the included bracket. Next, plug the 4-Way installed earlier into the 4-Way plug coming out of the back of the 7-Way. Now there are 4 wires remaining that need to be hardwired. First, ground the white wire to the vehicle frame. If the trailer has reverse lights or you need an auxiliary circuit, you will attach the yellow (sometimes purple) wire to the reserve light circuit. If not needed it can be taped up and stowed out of the way.
Next, take the included duplex cable and attach the black wire inside to the black wire on the ETBC7. Attach the white wire in the cable to the blue wire on the ETBC7. Then, route the duplex cable under the vehicle, avoiding areas that may pinch or burn the wire, up through the engine compartment near the battery.
Under the hood, separate the 2 wires. Route the white wire through the fire wall and over to where you plan to mount the brake controller. Clip off any excess wire as it will be needed later. Under the hood, mount the 40 amp circuit breaker in a location near the battery. Route the black wire to the AUX post. Cut off any excess wire. Connect the black wire to the AUX post using a ring terminal. With the extra black wire, attach one end to the BAT post and route the other end to the positive battery terminal and connect it.
Back in the cab, attach the white wire routed earlier to the blue wire on the brake controller. The Voyager has a plug on the end. You can either clip it off or use the Replacement Brake Control Plug-In Harness, # 20127.
Next, using the extra white wire, attach one end to the white wire on the brake controller. Route the other end through the fire wall and connect to the negative battery terminal. Back in the cab, take a length of excess wire and attach it to the black wire on the brake controller. Route it through the fire wall, and over near the battery. Next, mount the 20 or 30 amp circuit breaker (see brake controller instructions for which size to use). Attach the recently routed wire to the AUX post. Then, route another length of wire from the BAT post to the positive battery terminal and attach.
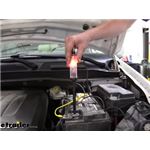
Last, you will need to use the circuit tester (# PTW2993 if one is needed) to find the correct attachment point for the brake controller red wire. On the brake switch located above the brake pedal, find the wire that carries a signal ONLY when the brake pedal is pressed. The wire should not have any signal at any other time (such as when the lights are on, or a blinker is engaged). Once you find this wire, attach it to the brake controller red wire. After mounting the brake controller installation will be complete.
I have included an FAQ article below on installing a brake controller from scratch along with a video that shows the installation of an ETBC7 kit.


Featured Help Information
Miscellaneous Media


Continue Researching
- Search Results: hydraulic jacks trailer jack
- Search Results: bearing buddy
- Search Results: wheel chocks
- Search Results: trailer brake controller
- Shop: Trailer Wiring
- Search Results: timbren bump stop
- Search Results: winch
- Search Results: 3rd brake light camera
- Shop: Curt T-Connector Vehicle Wiring Harness with 4-Way Flat Trailer Connector
- Shop: Curt T-Connector Vehicle Wiring Harness with 4-Pole Flat Trailer Connector
- Article: How to Install a Brake Controller on Chevrolet / GMC 1999-2006 Pickups
- Shop: Gen-Y Hitch Extreme Duty Aluminum Loading Ramp Set - 7' Long x 15" Wide - 10,000 lbs
- Shop: Curt Powered Tail Light Converter with 4-Pole Flat Trailer Connector
- Shop: Curt T-Connector Vehicle Wiring Harness with 4-Pole Flat Trailer Connector
- Shop: Malone LowBed MicroSport Trailer - 78" Crossbars - 800 lbs
- Shop: Gen-Y Hitch Aluminum Loading Ramp Set - 8' Long x 15" Wide - 14,000 lbs
- Article: Wiring Trailer Lights with a 7-Way Plug (It's Easier Than You Think)
- Q&A: Brake Controller Recommendation for a Truck with Air Brakes and a Trailer with Electric Brakes
- Q&A: Will The Replacement Cooking Rack # 324-000151 Fit a HighPointe Convection Microwave?
- Q&A: Recommended Replacement Cylinder Kit for a Dexter Hydraulic Drum Brake Kit
- Q&A: Replacement Trailer Clearance Lights PM-108-15 SAE-AP2-79
- Q&A: Recommended Replacement For A Marshall 605H LP Regulator
- Article: Brake Controller 7- and 4-Way Installation Kit (ETBC7)
- Q&A: Are Spacers in 5th Wheel Installation Kit RP50082-58 Required for Installation
- Q&A: Wire Color and Functions of Bargman 7-Pole, RV-Style Connector # 50-67-103
- Article: Troubleshooting Brake Controller Installations
- Article: Trailer Wiring Diagrams
- Article: Brake Controller Installation: Starting from Scratch
- Article: Brake Controller Installation on a Full-Size Ford Truck or SUV