


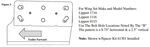
Kit is required for use with Sidewinder rotating turret RP61300 if the pin box on your trailer measures 12-1/2". Pin boxes that meet this criteria include Fabex 500, 503, 520, 530, 560 and 765; Lippert 0115, 1116 and 1716; and RBW 7019 and 7028.
Features:
Note: When used with RP61300 rotating turret, this item replaces ST100 rotating turret for Sidewinder and 5th Airborne pin box couplers.

California residents: click here
Videos are provided as a guide only. Refer to manufacturer installation instructions and specs for complete information.
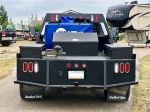
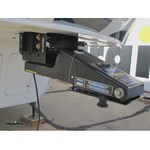
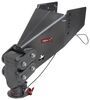
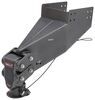
Today, we're going to take a look at and show you how to install the Reese Rotating Turret for the 5th Airborne and Sidewinder 5th Wheel Kingpins. Now, when we use this with part number RP61301, which is the spacer kit, it's an exact replacement for the ST100 rotating turret. In that configuration, it'll fit the Fabex 500, 503, 520, 530, 560, and 765, as well as the Lippert 1116, 1716, 0115, and the RBW7019, and 7028. Now, here's what our turret's going to look like. We're just going to be replacing the existing turret that was on our customer's Airborne Sidewinder here. Basically, what has happened is he's switched to a different camper and this doesn't give him the width we need, so we need to go with one just a little bit wider to make up that spacing.
Nice thing about it, we have several different turrets available. In this case, if like this customer, if you are switching campers, we can just simply get a new turret to put on there to fill up that gap. We don't have to buying the whole Sidewinder kit again. These work really well with the Sidewinder or with the 5th Airborne Sidewinder kits. They're just a replacement. Here, we've got four bolts that we're going to remove.
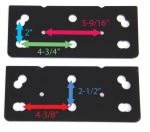
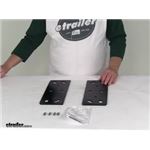
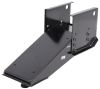
We have already added on one of our side plates here. Once we have it installed, we'll show you how to add the other one on. It's really straightforward, really simple. With the side plates that we've got here, part number RP61301, this is actually going to turn our turret right into that ST100 that was previously offered. This'll sit right here on the side.
We'll show you how that goes on in a minute. Let's get the turret installed on the Sidewinder. We want to remove the four existing bolts right here on the top. Hang on to them, because we're going to be reusing them. Lift that plate up.
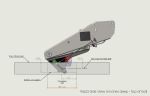
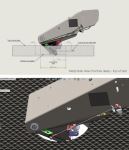
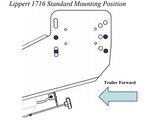
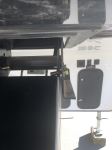
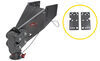
With the plate should come our ring. Our turret kit's going to come with a new ring, so we won't need to hang onto that. Keep that for backup. Grab both sides of the turret, lift straight up on it. See there it's going to slide right off. We'll set this aside. The new turret is going to slide right down on it. This cutout here should be facing toward our truck. We're going to place our ring right down on top. See, that's going to allow it to spin freely there. Our top plate's going to come down on, then we'll snug those bolts down and torque them to the specifications that we'll find in our instructions. Now, for our side plates, simply take the roll pins that are provided. We want the notched side to be facing downward. We'll line up the small holes, see we've got two here in the side plate. There's going to be two in the side of the turret. I'm just going to set our side plates down on a flat surface. Use the roll pins and a hammer, and we'll just tap these in. Once we've got them started there, line them up with out turret. Then, we can just simply knock them on in. We want to make sure those roll pins are flush with the outside edge here. As we slide this in place, our pin box is going to slide down the outside. If those pins we're sticking out at all, they're going to cause it to hang up on us. Let's go ahead, head out and get it installed on the camper. Depending on which pin box we're going into, or which set of brackets we're going into, that's going to vary which hole location that we'll be using now. We're doing the Lippert 1716, so we're going to use hole pattern or configuration B, which is going to be the low hole closer to the middle on the bottom, then the hole closest to the middle on the top. You can see I just used a little white paint marker, kind of marked them. That way, when we get it up in place we'll be able to kind of identify those. We'll be looking through the side plate, so we want to be able to identify that we've got those lined up. Now, let's go ahead and stick it up in there. Now that we've got our holes lined up, we'll take our bolt, we're going to take our provided hardware with the flat washer. Slide it through from the outside. Then, on the backside, we'll have a conical tooth washer. The teeth of that need to face outward towards the side plate. Then, we've got a hex nut that we'll put on there as well. Now, we'll just go through and snug down each one of our bolts, then we can torque them to specification. Now we've mounted our breakaway switch and our junction box back up into place. We're going to keep them mounted on the part that's attached to the camper itself. That way we don't have to worry about our wires being stretched too much. Remember, it's going to pivot here now instead of here on the front. We don't want to attach that stuff up here, because then it's going to be flexing that wire in and out all the time as it turns. With everything back in place and re-secure, that's going to complete today's installation of the Rotating Turret for the 5th Airborne and Sidewinder 5th Wheel Kingpins.


The gooseneck has been fantastic. Much smoother ride and no adverse bumps or noises. Installation was good, did have a few issues with how to line up the adapter plates and to put everything in the correct position accorfing to my tow vehicle needs. Only real issue has been the placement of the air pressure fill. You have to get into the bed and contort to put air into the filler port. Wish this one area could of had a better more accessible location. Over all a great product. It was so good my son purchased one for his fifth wheel. He has stated it was a night and day difference from his previous application.
The order was delivered fast, received my order in two days. I haven't had a chance to try it out yet, but everything looks great. Very happy with the way my order was handled.
Installation went well and can't wait to give it a tug !
Great customer service and fast delivery.
Installed on our 15 Montana 3750FL.
It fits great, works great and I haven’t had any problems with it.
Worked as advertised when replacing the stock 5th wheel hitch on my Keystone Raptor toy hauler with a Reese Goose Box.
This product is exactly what I was looking for and thanks to “etrailer” they assisted me in getting the right product for my specific application. Thank you all for your help and great customer service and support over the many years.
Plates work well and fit into the gap between the Lippert factory box and the Reese Goosebox. The crush pins could be easier to install but overall it worked well.
Adequate quality. Had one large burr that had to be filed off before installation. Used to adapt Goosebox to Lippert #1716. I realize that is made to fit many applications, but they really missed an opportunity to strengthen the connection. Recommended position is the lower bolt pattern, but the adapter plate could have been made taller and tied into all nine holes, making the whole assembly stronger. Same for the Goosebox. It just begs for the center two holes on each side to be drilled though and have 12 bolts instead of 8. Just like the OEM mount was.
I needed this to go with the goosebox I purchased, it worked great and was easy to install.
Good quality spacer kit and easy to install. The only reason I didn’t give it 5 stars is the lack of holes you are able to use. I know Reese only calls for 4 bolts per side, but I would prefer 6 per side. Etrailer is always quick on shipment and easy to deal with.
Spacer plates look good but unfortunately there were no roll pins in the package. Slightly disappointed as they are necessary to hold them in place while installing the new pin box.
Tiffany was wonderful, I needed some trailer parts in a hurry. She stayed in contact, letting me know that the parts where available for pick up and made sure that they were shipped ASAP, the parts were delivered quicker then I requested.
Thank you Tiffany
Received everything as ordered and installed it with help.
It works great, hitch, etc.
Received quickly, packaged very well and exactly as described! Instructions are clearly written and illustrated so there is no guesswork at all.
Exactly what I was looking for. Thank you etrailer!
Fills the gap. Non adjustable.
Great customer service and fast delivery. Thanks Jessica for your help.
Nice quality. Fits perfectly. I really like the ease of installing and removing it. The cost seems to match the quality.
Fit very snug, which is what you want a spacer to do.
The spacers work great once installed. I had trouble keeping the spacers in place while mounting. They kept falling off the roll pins. Ended up wrapping electrical tape around the spacer and the hitch to hold it while mounting.
Best decision I have made!
I haven't installed it yet, but everything looks good. Delivery was very fast.
Worked like a champ!
What I needed and decent price
Quality is awesome

Do you have a question about this Accessories and Part?
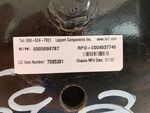
Info for this part was:
At etrailer.com we provide the best information available about the products we sell. We take the quality of our information seriously so that you can get the right part the first time. Let us know if anything is missing or if you have any questions.


Thank you! Your comment has been submitted successfully. You should be able to view your question/comment here within a few days.
Error submitting comment. Please try again momentarily.