
Summer Starts Here - Save up to 70%

Roof Rack Includes:
Part Numbers: Y59UV,Y06123,Y06135

Thank you! Your comment has been submitted successfully. You should be able to view your question/comment here within a few days.
Error submitting comment. Please try again momentarily.
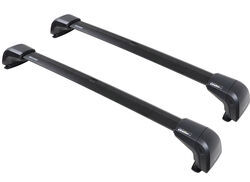
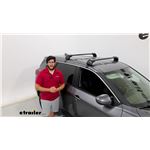
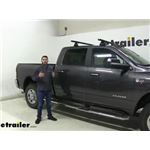
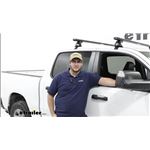
This aerodynamic, flush-mount roof rack lets you carry gear and cargo on your vehicle while maintaining a clean, factory look. Crossbars work with channel-mount and clamp-on accessories. Installs on your vehicle's naked roof.
Features:
Specs:
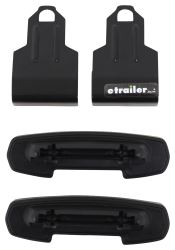
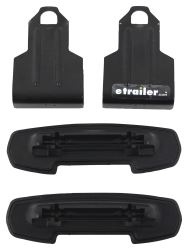
These custom clips and pads let you mount Yakima BaseLine towers on your vehicle with a naked roof. Clips attach to hooks in tower assemblies, and pads clip to bottoms of towers.
Features:
Specs:
DropHook System Installation
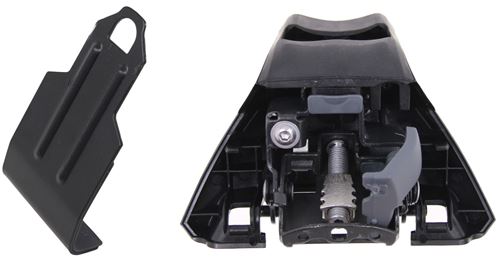
Custom-fit BaseClips let you mount BaseLine towers to your vehicle with a naked roof. To install, remove the tower's cover, open the gray door inside the assembly, and attach the clip to the DropHook inside.
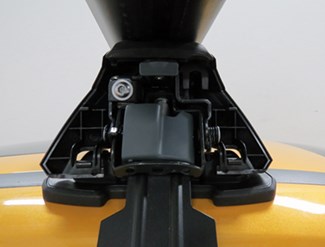
The clip adjusts on 3 axes during installation to ensure a perfect, secure fit on your door jamb. Once the tower and clip are seated correctly, simply tighten the clip down, close the door, and replace the cover.

The included molded rubber pads protect your roof from scratches and abrasions. The pads easily clip onto the bottoms of the towers and are specifically designed to fit the shape and contour of your roof.
These custom clips and pads let you mount Yakima BaseLine towers on your vehicle with a naked roof. Clips attach to hooks in tower assemblies, and pads clip to bottoms of towers.
Features:
Specs:
DropHook System Installation
Custom-fit BaseClips let you mount BaseLine towers to your vehicle with a naked roof. To install, remove the tower's cover, open the gray door inside the assembly, and attach the clip to the DropHook inside.
The clip adjusts on 3 axes during installation to ensure a perfect, secure fit on your door jamb. Once the tower and clip are seated correctly, simply tighten the clip down, close the door, and replace the cover.
The included molded rubber pads protect your roof from scratches and abrasions. The pads easily clip onto the bottoms of the towers and are specifically designed to fit the shape and contour of your roof.
Videos are provided as a guide only. Refer to manufacturer installation instructions and specs for complete information.
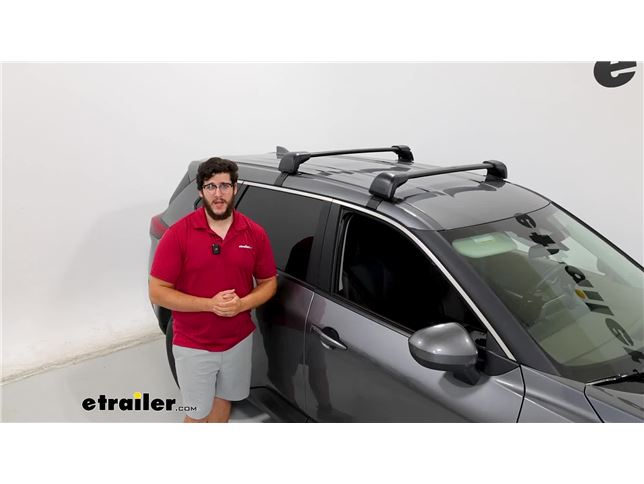
If you're looking for a great way to haul your accessories from point A to point B, you want a clean look to the top of your roof and you want something that's gonna be relatively pretty easy to install, then the Yakima FX Bars are gonna be a great option for you. And we're gonna have this on our 2023 Nissan Rogue. The Rogue does come in different options with different roofs. So we have a naked roof today and it also comes in an option for a flush rail roof and that's gonna give you a different fitment for different roof racks. So definitely double check. Really the difference you'll be able to notice is one's gonna have a raised surface to the side or on top of your roof.
But today we threw up a basket just to show you an example of what you can put up here. This is great if you wanna go on a road trip with your family, you put any of your extra luggage somewhere, your roof's gonna be a great point to place that because for the back of our vehicle, we're not gonna have a very high tongue weight, so we won't be able to carry a lot. We're actually gonna be able to carry more items on top of our roof. Earlier I talked about how this is gonna be easy to install and that's gonna be because this is actually only two parts. Typically when you have a roof rack, it's gonna be comprised of three parts.
You're gonna have the crossbars, you're gonna have the towers, and then you're gonna have the fit kit. Now we have the large FX Yakima bars and what that means is our crossbar and tower are gonna come together, built into each other, so you're gonna be less likely losing anything and it just makes that installation process easier. Now we can take a closer look at those crossbars. I'm gonna take a step up here and up top you're gonna notice we have this weather strip. I like this because this is built-in.
And this is gonna do a couple things for us. So if you have any accessories that you don't want to clamp around the bars, or you have accessories that work really well in this T-track, then you're gonna have that option. But this weather strip helps prevent any debris from getting in here and helps reduce that noise. It's also nice that it is built-in because you don't have to cut anything down to size and rearrange this. And you're probably thinking, "If the tower is connected to this, how are you gonna get those accessories on" You actually have a point in the very center that's cut out and you can put those accessories in, just applying pressure and sliding them into place.
Now you can put clamp on accessories on here and it's gonna work really well because the shape of these bars are gonna work with most things and they're pretty narrow. That's why they have this aero shape to 'em and that's also gonna help this be more aerodynamic to reduce that wind noise. And then we're gonna have the tower that connects to the crossbar. We can actually get a better look at the interior of it. if I remove this end cap. We're gonna have all the components that really tighten this down into place right here. And what I like about this is, this is pretty complicated stuff and it's not really nice to look at. So when you have this end cap at the very back of it, it just gives far more of a clean finish. Now you'll probably notice we have this lock core right here and this is just a plastic one. You can actually get this replaced later on with a metal lock core that can be key alike to any of your other Yakima accessories, so you only have to carry around one key and your gear is gonna be more secure this way. And this is gonna connect to your fit kit. And your fit kit's pretty simple. It's just gonna be this pad that is flush to our roof and we're gonna have this clamp that grabs around our gutter. and this actually gives us a really secure point of sitting on our roof. We get a few measurements. The first measurement I'm gonna get is gonna be the distance underneath our crossbars. Here in the center, that's only gonna be about two inches, which is fairly close to our roof. Now if you do have a sunroof, that's definitely something to think about, especially if you have any clamp on accessories on here because what can happen is if that sunroof expands up, it could make contact with your clamps. Now for the overall height, that's gonna be just about a little bit over three and a half inches, (tape measure snaps) which is pretty good. That's pretty nice, so what we're losing out underneath we're gaining up top, because this is overall gonna be pretty low profile. So if you are going through a lot of low clearance areas, you shouldn't have to worry about this as much. Definitely keep in mind if you have any accessories on top of here to include that measurement. So what I'd recommend doing is taking the initial height of your vehicle, your crossbars, and whatever you're hauling so you know what areas you can make it under. As for the space that's overhanging on our vehicle, we don't have to worry about that because that's one of the benefits of having more of this flush option. Now we are losing a couple of things there. What we're losing is the ability to put on any accessories on the very edge. So if you have any ski carriers, that's gonna be really hard to access and we're losing out on a little bit of space or real estate that we can put on our crossbars. We're also gonna have a weight capacity up to 165 pounds. Now it is really important that you check what your roof is rated for because if you overload your roof you could damage it. So what I recommend doing is just finding out what your roof is rated for. You can find that in your owner's manual and then going from the lowest rated component. But in my opinion, I think this is a great option if you're looking for a clean finish to the top of your roof and you're looking for that easier installation. Now this is gonna be a better option for those cases where you wanna haul baskets or boxes. If you have anything that's longer, that's harder to reach the further it is in, then I'd recommend some overhang options. Now if you want to keep to this more clean design on top of your roof, another really cool choice you can make is the Thule roof rack and what I like about that is actually the installation is a little bit easier than this because when we we inchesre installing this, we had to make a few changes. But what this has over the Thule is you actually only have two components you have to really worry about. That's gonna be the crossbar and tower combo and your fit kit. With the Thule, you have three separate pieces. But if you're curious to see what this installation looks like, just stay tuned, we'll walk you through it. Let's start off the installation. I'm gonna lay everything out. Now I'm just gonna have the front crossbar and what it needs out. We'll get to what we need for the rear crossbar when we get there. But we're gonna have the crossbar and its towers connected to it. We're gonna have the fit kit's bases and the clamps. And the clamps are gonna be the B43 clamps for the front crossbar. (clamp clatters) Next up we're gonna have this soft tape measure (tape measure clatters) and you're gonna have your included Yakima tool. To start off, I'm gonna start prepping the bases of this. So I'm just gonna flip this over. (bar clatters) You notice we already have this foot in place but it doesn't have a rubber pad on it. So we're actually gonna keep that. I wanna remove the rubber padding from the foot that comes with your fit kit. (foot clatters) We'll lay that to the side. And the way you wanna put this on is just matching the contours of that foot. You're just gonna press this into place and it should grab on. (parts rustle) And after that we're gonna remove this end cap. All you have to do is squeeze on the sides (foot clicks) and pull it right off. And after when that's done, you repeat that process on the other side. And now we're gonna get the M1 measurement. It'll be similar to the M3 measurement and that's gonna be on your rear crossbars. But where we're gonna go from is gonna be from one tower to another tower. So that's just gonna be that total distance. And if you don't know where to find that, you can find that in your instructions. The way I'm gonna do this is just check it to begin with. Measuring from this line right here, this is M1 and M3, and I notice mine's a little bit off, so what I'm gonna do is place my tape measure down. I'm gonna come over here to these bolts, (tool clicks) I'm gonna loosen both of them. (tool clicks) When both of them are loosened up, (tool thuds) I'm gonna adjust this tower and push it away, just roughly, and then measure again and see how close I am. And I'm still a little bit off. And what I can do actually is adjust the other side because we wanna make this pretty even. A good way to check if the things are even on both ends is actually go from the center of the crossbar. You're gonna have this arrow right here. And I'm gonna measure from this point in the center of it to where this cross, or tower begins. And I'm gonna just double check both sides are even. Once you have everything in place, we're gonna come back over here and then adjust our pitch. And that's gonna be this bolt that's closest to the interior of our crossbar. And if you reference your instructions, They'll let you know this is gonna be in the A position. And the way to figure that out, you're gonna have to do two things. One, you need to check where that arrow is on your crossbar to make sure that's pointing forward. And we wanna make sure that this bolt is gonna be furthest away from us now. I'm just gonna pull on this some. Once I've done that, I'll come back through and tighten this down. (tool winds) Once this is tightened all the way down, you'll hear a click. That's gonna be the torque device (tool clicks loudly) letting you know it's tightened all the way. And then we can adjust our toe. What's nice about our toe, for this setup we have today, is that's gonna be on the two position, so that's gonna be right in the center. So just make sure everything's centered up here and then we'll just tighten down this bolt all the way. Once you've made these adjustments, you can repeat this process (tool clicks loudly) on the other side. We got our crossbar up here and when you put it up here, you wanna make sure that this thicker side is facing forward (off-camera tool cracks) and this thinner side is facing behind us. And when you place it up here, we wanna try to make it even on both sides (off-camera item bangs) so you can actually reference your instructions, to find what this measurement should be. This is gonna be your M2 measurement. You're just gonna go from the front of where this base sits to the top of your windshield. After, when you've double checked it's the same on both sides, then we can open up this access door. You're gonna need a flathead screwdriver to do that because right now it's in the locked position. Just turn that over. And sometimes it can be a little bit tricky to open from this position, especially since it can slide around. So what I do is just get my flathead underneath this corner and lift up some, open up into place. And then I can grab my clamps. And like I said earlier, this is gonna be your B43 clamp. And to get this on, we actually need to open up our door. Gonna lift up and then to get this in here, (off-camera items bang) we just have to lift on this drive bolt, push underneath. You might have to lift up on here a bit, but as you can see, it's not attaching it. So what I'm gonna have to do is loosen up this bolt (tool winds) and now you can see that hook is lining up with the opening of that clamp. (tool clicks) So I'm just gonna take that out and now it's grabbed on. With that in place, we're just gonna come over here and we need to adjust two bolts. We're gonna have our drive bolt right here and then we're gonna have our swing bolt up in this corner. It's kinda hard to see. We'll tighten that swing bolt first. And what this is gonna do is, I'm gonna apply pressure downwards to the side of your vehicle. We just want it to make contact. Once it's making contact, then we can come over here to the bottom and tighten this down until this starts making contact too. Before we tighten this to the rest of the way, we wanna repeat this process on the other side because if we tighten this side too much, it's gonna give us an uneven fit on our roof. And what we're aiming to do here is just go back and forth to each side, tightening one side a little bit and then going to the other side too. Until we get to the point where this feels like it's about tightened. And the way you're gonna be able to tell, is like we we inchesre doing earlier, when you can hear that torque device built into your tool start clicking, (tool clicks) just like that, you know everything's tightened where it should be. I'll do the same thing up here for this swing bolt. (tool clicks) When that's done, I'm gonna close this access door. (door clicks) Make sure you do put this in the locked position and then you can put on this end cap. And this end cap can be a little tricky the first time because it's still- (end cap cracks) trying to learn the shape. Well after that's done, we can put on the rear crossbar. For the rear crossbar, there's gonna be a few differences. Instead of using that M1 measurement, like I said earlier, we'll be using the M3 measurement and that's just gonna be from tower to tower. And your pitch and toe is gonna be a little bit different. It's actually pretty easy because they're both gonna be in the center position being that B and two position. When you're ready to put your crossbar up here, it's gonna have a few differences from the front crossbar. So for this point we're gonna use the M4 measurement. That's gonna be the distance from the back of this crossbar or from the center of the crossbar to the center of your rear crossbar. Now we actually had to make some adjustments. Ours was a little bit too far out and what that was doing was, these pads weren't sitting on this track right here and actually we we inchesre on the outside of it. So to fix that we actually brought this closer to the front crossbar and right now we have about 28 inches, yours might vary, just so you can get this on top of your roof. And we're gonna use a different clamp. We're gonna be using the B49 clamps on each side. After when you have both sides tightened into place, then I can take my end cap and secure it down. And from this point I have to give it a good shake test, first I need to get everything in line. (end cap clicks) There we go. And here we're just trying to make sure nothing's shifting or moving. If it feels pretty good, then you can load it up with whatever accessories you have and take it out for a ride. Well that's just a look at the Yakima Roof Bar or Roof Rack with the FX Bars on our 2023 Nissan Rogue. Thanks for watching.
Average Customer Rating: 4.8 out of 5 stars (1646 Customer Reviews)
This aerodynamic, flush-mount roof rack lets you carry gear and cargo on your vehicle while maintaining a clean, factory look. Crossbars work with channel-mount and clamp-on accessories. Installs on your vehicle's naked roof. These custom clips and pads let you mount Yakima BaseLine towers on your vehicle with a naked roof. Clips attach to hooks in tower assemblies, and pads clip to bottoms of towers. These custom clips and pads let you mount Yakima BaseLine towers on your vehicle with a naked roof. Clips attach to hooks in tower assemblies, and pads clip to bottoms of towers.The installation was super easy, and despite a long time stuck in shipping the delivery itself was extremely fast, and the package arrived in spotless condition. The manuals were very easy to follow, and the end result is absolutely amazing. They provided a nice, flush finish and hold the racks down tight.

Great fit, holds tight to roof.
etrailer did an amazing job of having their collective together with regards to my latest order for a roof top rack. First of all, when you go to one these manufacturer websites, either thule, or Yakima, you realize just how complicated this task can be. etrailer does all of that for you. Package arrived earlier than expected and everything was correct the first time. I installed the product myself in under an hour. Done, Done, and Done.
thanks etrailer
They really didn't stay in place, and I ended up riveting them to the car so they would stay on the car.
Relatively easy to install on my VW Golf (etrailer videos are very helpful) and sooooo useful with my Yakima skybox. Not much road noise, so I can leave the rack on even when I am not using it.
I have ordered several Yakima rack parts and a front hitch for my '13 Ram truck. The sales staff was very helpful in getting me the correct parts and with timely shipping. The items arrived as predicted and are correct. They fit as they should and install was straight forward. I recommend these products and the service was excellent.
Bought as a pkg for my 2017 Golf R with Round Bars since I had a bunch of Yakima bike racks and a canoe gunwale rack for my old Yakima set up. Installation was easy with good instructions. All measurements from the Yakima site appear to be spot on.
etrailer.com shipped these out quickly and all parts arrived without damage.
I have ordered several Yakima rack parts and a front hitch for my '13 Ram truck. The sales staff was very helpful in getting me the correct parts and with timely shipping. The items arrived as predicted and are correct. They fit as they should and install was straight forward. I recommend these products and the service was excellent.
Bought kayak racks. Took a while to put together, but they are very high quality. etrailer send a wrong part (digits on the part number were reversed), but it was very easy to get this corrected and I received the correct part in less than a week. I even spoke to someone on a Saturday afternoon about the mix up who was very pleasant! They have my vote.
antastic company and wonderful service, one of the racks was the wrong size for my car so they were able to help find the right size for my Car. Absolutely great company, with fast shipping and just the products I needed for my Car!. Very helpful, and overall smooth transaction and service. I will order from this company again very soon!. shipping came in a very strong and solid box. I highly recommend buying from them!. 10/10 all the way!.
We had to wait on stock a little longer than expected BUT etrailer kept me informed of the progress. Once I received the products installation was a breeze thanks to the instructional videos.
Quality stuff. Will work as needed. Great service with etrailer!
amazing to have something that fits perfectly. a bit complex to set up the first time and takes a few minutes each time, but works great and definitely worth it!
These work well but were not as easy to put on as I expected. My car is small. I ended up having to increase the distance between the two towers by 1/4" to make them fit but now they seem great!
These fit as advertised and work just fine. The customer support, on the other hand, was outstanding.
Order was as expected, all good here!
Work great on our older Prius C
Bought the rack kit for my truck a the fit was great
fast and correct delivery
Exelent!
Great!
Ask the Experts about this Roof Rack
Do you have a question about this Roof Rack?
Yakima Accessories
Fit to this rack on your 2011 Nissan Rogue
Info for these parts were:
At etrailer.com we provide the best information available about the products we sell. We take the quality of our information seriously so that you can get the right part the first time. Let us know if anything is missing or if you have any questions.


Sierra K.
6/10/2022
This should be a snug fit. Be sure that the included tool clicks when torqueing down so that you know it is tight. See more tips in this attached install video:
Helpful Links
tv-install-yakima-roof-rack-2014-toyota-prius-c-y00408-y00146-y03536-y06135-y06179.aspx