/
Air Lift/
Air Springs/
Standard Duty/
Rear Axle Suspension EnhancementItem # AL60815
To see if this custom-fit item will work for you please tell us what vehicle you'll use it with.
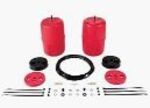
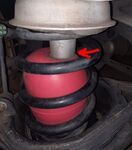
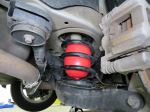
This item qualifies for Free Shipping
1,000-lb Capacity. Upgrade your vehicle's rear coil spring suspension with this kit. Molded polyurethane air springs fit inside your existing coil springs for added support when hauling heavy loads. Improves handling, braking, and overall ride.
Features:
Specs:
Heavy loads can cause the back of your vehicle to sag and add unnecessary stress to your suspension. This stress not only affects your brakes in a bad way, but your tires, headlight aim and handling suffer as well. To improve your vehicle's ability to endure heavy loads, you need to add support to your existing coil springs.
Air Lift's AirLift 1000 adjustable air springs have 1,000 pounds of load-leveling capacity and are made specifically to fit inside your rear coil spring suspension for additional load assistance. You can inflate and deflate these tough, molded polyurethane helper springs as needed, ensuring the perfect amount of support for every load, every time. Easily level your vehicle front to rear, and if you run dual air lines to the air springs at installation, then you can inflate the springs independently of one another for side-to-side leveling. AirLift 1000 is a breeze to install with standard tools and comes with an easy-to-follow instruction manual.
AirLift 1000 comes with manual inflation valves that are typically mounted on the bumper but can be installed anywhere on your vehicle for easy access. For even more convenience and control, you can add a compressor and gauge system (sold separately), which will let you monitor and automatically inflate your air springs.
Air Lift kits are designed to keep your vehicle at normal ride height. You can find the normal ride height of your vehicle by unloading it and measuring the distance between the bottom edge of your wheel well and the center of the hub. After you find and record this distance, you can regulate the amount of air that you put into your air springs to maintain normal ride height - even when you are hauling a heavy load. You will need to adjust the air pressure in your air bags according to the size of your load.
Air Lift is positive that you will benefit from their air spring suspension system - so much so that they offer a 60-day satisfaction guarantee. Install and use AirLift 1000 springs for 60 days, and if you are not satisfied at the end of this time, you can remove them from your vehicle and return them for a full product refund.
2005 - 2013 Acura MDX
2005 - 2017 Honda Odyssey
2005 - 2009 Honda Pilot
California residents: click here
Video of Air Lift AirLift 1000 Air Helper Springs for Coil Springs - Rear
Videos are provided as a guide only. Refer to manufacturer installation instructions and specs for complete information.
Speaker 1: Today on our 2013 Honda Odyssey, we're going to be installing Air Lift's AirLift 1000 Air Helper Springs, part number AL60815.These air bags are going to help support the load at the back of your vehicle. These air bags fit between your coil spring. While this doesn't increase the carrying capacity of your vehicle, it does help support loads of up to 1,000 pounds. Depending on the load that you're hauling, you can adjust the carrying capacity with various amounts of psi inflated inside your bag. This can be between 5 and 35 psi. The kit allows the air bags to be inflated independently from one another, and there's also a tee fitting included in the kit, so you can use one valve to control both and have equal inflation on both sides.Before we begin, we'll check some measurements on our vehicle while it's unloaded.
In the rear, we're measuring about 30-1/2". In the front, we're measuring about 30-1/4. And now we'll recheck our measurements with a load attached to our hitch. Measuring about 29-1/4", and in the front, we're measuring about 30-1/2, so what that means is our rear dropped about 1-1/4", and our front raised up about 1/4". So, this is going to affect how our vehicle brakes, handles, and the direction our headlights are going to point when going down the road at night.
Putting some helper springs in the back can help bring us back to that factory ride height.Now we'll take it out on our test course to load it up so we can see what our suspension looks like with no helper springs installed.Now, with our air bags installed and our trailer hooked up, loading down our vehicle, we'll recheck our measurements. Here at the rear, we're measuring 30-1/4, so we're only dropping down 1/4" from our factory ride height. And we're rechecking the front, we're measuring 30-1/2. So, we do still have our slight rise in the front, but we've leveled out the back, which will make an effect, and bring our headlights back down to true.Overall, returning our ride height closer to factory is going to bring back some of that braking performance, it's going to improve ride quality inside the vehicle, and also improve that handling. It does this because most of the braking is done in the front, so now our weight can properly distribute into the front, like it did when it was unloaded.
Handling has improved, because the ride height is now even, which makes our suspension geometry come more into its alignment when it's unloaded. This way, it'll help reduce tire wear when going down the road.We'll begin the installation by removing the wheels. You can do this with a 22 millimeter socket. After the vehicle's supported and both wheels are removed, you're going to want to place a floor jack underneath the lower control arm. Now it's safe to remove the bolt holding the lower control arm to the steering knuckle.
You'll remove this with a 17 millimeter socket.Now crack the jack slightly to lower the control arm down slowly. Now that all the tension's been relieved from our coil spring, we can safely remove it. Push down on the lower control arm. You can now set your spring aside. We'll now remove the jounce bumper with a 14 millimeter socket. You'll need a small extension so you can get up in there and remove it. We'll now set our jounce bumper aside, as we're not going to be re-installing this.Now cut out the template in your instructions. Place it on top of the coil spring seat with the hole facing slightly towards the inside, and tape it down. Now, to make it easier to drill, you can take a piece of wood and put it between your lower control arm and your brake caliper bracket. This'll hold it down and just get it out of your way to make it easier. I did take a strap as well to help support the wood because vibrations from the drilling is going to want to make it kind of wobble out of place, so this'll hold it in there for you.Now we'll drill out the hole in the location marked on the template. We're going to start with a small pilot hole, but we're eventually going to be drilling it up to a 3/4" diameter. Now place your air bag with the nozzle facing down inside your coil spring. Make sure both your upper and lower spring mounts are in place, and then set it back on top of your lower control arm. Make sure that it's rotated into the appropriate position. If you rotate it back and forth, you'll feel its seat. Now we can take our block of wood out.Now check and make sure that the nozzle on the end of your air bag isn't going to hit the hole and be rubbing. Position your jack back underneath your lower control arm, and slowly raise it back up into place, so we can reinstall our bolt. Now you can place your bolt back in. Sometimes, taking a large screwdriver can help line that hole back up for you to make it easier. Now tighten and torque your bolts to the specifications in your instructions. Now repeat the same process on the other side.Now we're going to run our lines and install our fittings. Now you can install your fittings in any locations you want just by drilling a hole. We've decided to mount ours to the hitch using a short bracket, part number 18140. You'll take your fitting, thread on a nut from the kit, get it to about the appropriate length that you want it to be. Then place on a star washer. Then slide this through the hole that you drilled. Then place on the rubber washer, followed by the flat washer, and another nut. Then snug it up with a 13 millimeter wrench and socket.Now, if you're using the tee fitting method, you'll only have one fitting. If you're going to have separate hose fittings, to be able to level each side independently, you'll repeat the same process for another hole.Now we'll install our tubing. Lift up on your air bag and remove the small covering over the inlet. We can then take our air hose. Place one of the small clamps over your hose. We want to come down just enough to where you can slide the hose on the fitting. Now we'll feed it through the bottom and up through the opening that we had drilled. Then push the hose onto the end of the air bag. After you've got it fully seated, you can install your small clamp. Push that up. You can use a pair of needle-nose to squeeze the clamp and seat it over the hose and the fitting end.After you've got that run out, we'll run our hose back to our fitting that we put in the back. We've routed it up over the suspension, trying to stay as far away as possible from the exhaust, down the underside, going on the inside of our hitch, zip tying it to the hitch, and running it down to our fittings.Once over here, we'll give ourselves a little bit of excess, and then cut the end with our hose cutter tools, so cut it nice and flush, making sure that it seats properly. Place another clamp on this end of the tubing and then press it onto the fitting that we previously installed. After it's pressed on, use a pair of needle-nose pliers to put the clamp up over the fitting ends. Now, we'll repeat this same process on the other side, routing the hose to this one. Now, if you didn't choose to use the tee method, where you'll have both the airs connected together with a tee fitting to one nozzle, you'll repeat the same process on the other side to your other fitting.Then go back and clean up all of your tubing with the zip ties provided in the kit. Make sure that when you run your line, you've cleaned everything up, that you're avoiding any moving objects such as your suspension, and any excessively hot objects such as your exhaust.Now, take the heat shield provided in the kit. Do a little preparation. Bend both tabs inward, and then bend it back outward. This way it'll use a small air gap between the heat shield and the exhaust. This'll help dissipate heat. Place your hose clamps over your heat shield and tighten them down using an 8 millimeter socket or flat-bladed screwdriver. Then cut off the excess with a pair of tin snips.We'll now air them up and check for leaks. The maximum pressure is 35 psi, so it'll air up very quickly, so be careful not to overfill it. Now spray each fitting and clamp with soapy water, and look for the presence of bubbles. If bubbles are present, you have a leak, and you'll need to correct it.You can now install the protective caps onto your air fittings, and reinstall the wheels. Make sure to torque your wheels to the manufacturer's specification. Do this in a star pattern.And that completes our installation of Air Lift's AirLift 1000 Air Helper Springs on our 2013 Honda Odyssey.
Average Customer Rating: 4.7 out of 5 stars (292 Customer Reviews)
1,000-lb Capacity. Upgrade your vehicle's rear coil spring suspension with this kit. Molded polyurethane air springs fit inside your existing coil springs for added support when hauling heavy loads. Improves handling, braking, and overall ride.I bought this product to provide a little more stability when towing our tent trailer. The product was relatively easy to install an inflated easily. The biggest issue is with the hose connections. They simply do not hold tight. I have had the hose come off twice at the air bag even though it was fully attached. Also, you need to have a pump with you as the bags do leak air and need to be pumped up a few hours of towing. I checked my installation and can't make the connections any tighter. 606598
Youll want to make sure the barbs on the connectors and air bags are perfectly clean and dry before installation. The clamps need to be installed so they are sitting right in the middle of the barbed fitting as shown in the instructions. If the clamps need to be loosened and reset, they can become slightly bent and will never be as tight as they were the first time. As far as the leaks, thatll typically happen when the tubing isnt cut at a perfect 90-degree angle. If the cut is at an angle or is the slightest bit jagged, it can leak.
--I have been very happy with the performance of these air lifts. I have them set up on a 2011 Honda Odyssey - which is notorious for sagging quite low in the back end with moderate to heavy loads or with a loaded bike rack or towing a trailer. I would not say that the process was very difficult to assemble - I just took my time and was very careful. The instructions - both written and through on-line videos were pretty good. There are two holes that need to be drilled (one each side) that are 3/4 inch in diameter. I did not have the correct tool for this and the method that I used to create these holes was far more difficult and time consuming than I had anticipated. In the end, I should have just bought the correct drilling tool. During use, you can hear the suspension "squeak" a little when a large pump is hit or doing something that compresses the suspension - but it's not a big deal or annoying to me. Overall - so far so good. 547780
I received the product in one day. Etrailer is on top of its game. Now comes the installation. Hoping the product delivers as well. 213518
The install was tricky. Not because of how the product is made but the way I wanted to get these in the spring without taking everything apart. Ive been hauling my boat with these in for a year now and the difference is incredible. The sag on the rear is barely noticeable. Theyre still holding air.
No problem with bags. We did hear noise when bags rub on springs. I lubricate the bags with silicone twice now and noise goes away. Web site indicated that everything we ordered was appropriate for our Honda Odyssey, BUT apparently the air bags were not. The carton the bags came in did not list what vehicles the bags were compatible with, so we assumed they were correct. They were not. When I contacted the company I told them we were sending them back and expected an even exchange. It took several challenges before they helped us with credit for our return. They eventually did thanks to a logical trusting lady. 395937
My reason for purchasing this product was to keep rear suspension level when towing, and it has done exactly that. I tow a small open motorcycle trailer...total weight of trailer with motorcycle is less than 900 lbs. Of course, the van itself has another 100 to 200 extra lbs. So not too heavy, but without the Air Lift 1000, rear suspension would drop 3-4 inches. Now it barely drops at all. This also help with loading and unloading the bike out the back of trailer since it keeps the rear of the trailer lower as well. The van handles as if I wasn't towing. Secondary benefit...headlights stay level and you aren't blinding oncoming traffic. Definitely recommend, and would purchase again. Excellent product. 371482
Just installed my new set of air bags (AL60815 Air Lift AirLift 1000 Air Helper Springs for Coil Springs) on my 2008 Odyssey. I purchased this model as a replacement to the previous air bags (F4179 Firestone Coil-Rite Air Helper Springs) that I purchased from etrailer four years ago. I had to replace them because this winter one of the push on fittings broke off one of the air bags. I have been using those air bags for four years towing my 2200 lbs tent trailer. The only complaint I had was that sometimes air would seep out after towing for a few hours. I suspected it was from the push on fittings. That was the reason I choose this model as they have barb fittings and spring clamps. Very positive connections and tight fits. Installation was very easy as all the holes in the tables were already done from the last install. 1. Somethings to keep in mind, if your shocks are a few years old consider changing them at the same time. 2. Remember to support the table with a jack while removing and installing the retaining bolt for the table. Failure to do that will damage the threads on the bolt and rapidly decompress the spring. 3. When drilling the hole in the table don’t rush. Centering the hole so the valve on the air bag does not force against the edge is very important. Luckily there is a template in the instructions booklet. 4. Running the air line to the passenger side bag can be done through the center cross member. I mounted my valve inside the van to keep it clean and out of the way. Using the tee to connect both bags to a single valve will facilitate inflation and ensure they are both at the same pressure. I will be ordering another set of these air bags when I replace this Odyssey with a newer model in a few years. Kit is very complete. All the parts I needed and did not have to run to the auto parts store. Didn't use the heat shield because where I ran the line it is protected from the exhaust pipe. 647265
I just arrived on my 938 mile first trip today with the new air bags. I had myself my wife 2 kids and the back loaded even had to remove 3rd row seats 2nd row middle seat was in. Total weight in the van was 1196LBS passengers and cargo. Had a hitch carrier total weight with carrier 226LBS. Total weight of 1422LBS. Over the 1340LBS max load but I removed the rear seats which weighted in at 128 LBS so I was at 1294LBS total. 46LBS under max weight. So I tested these things first trip. Van sat 1- 3/4"lower than normal ride height at 35 psi. Rear side skirt was 1" lower than the front with everything and everyone loaded. Had a friend measure. The van drove great the van took bumps on the interstate and didn't bounce all over. It made the rear stable and very little lean. Airbags made it a night and day difference in a stable ride. Besides having to remember the van doesnt hace acceleration you have to remember not to jerk the wheel cause though it helps keep the rear more planted it also gives the feel as there is no weight in the rear so sudden changes can make the rear shimmy. Turns with that weight feel solid but take more direction of the steering wheel to compensate. Overall this product is the best $ I have spent on this van for road trips. I would HIGHLY RECOMMEND if you road trip heavyweight. Air bags were set at 35psi dropped to 30.5psi by the end of the trip directions said this would happen as they were installed 2 days before the trip and had 25 miles on them. I didn't connect them together but separately was faster and I like the idea of adjustable height left to right. Took about 3hrs to install from start of getting tools ready to clean up and first test drive. That's with my 5yr old wanting to help by stealing my sockets. Easy to install as long as your the hands on type springs are NOT a joke to mess around with. I drove from Chicago IL to Fort Worth TX and kept a 70 mile hr pace with ease. Slowing for hills and sharp turns on the interstate only. I would recommend if you are adding these for loading up your Oddy to also upgrade to a better rotor and Brake Pad to help with the braking distance. Recommend EBC rotors and EBC RED Pads . Any questions asked I will try to anwser. 265126
Incredibly easy to install on my 2012 Honda odyssey, especially if you follow the provided video. Tested how my camper pulled before installing the air ride and after and the ride is so much another smoother. The van drives me comfortably even when not towing. Would give 5 stars but the little clamps provided are extremely flimsy and bent out of shape as soon as I pinched them open, I even used hose clamp pliers. Only recommendation I have is better hose clamps and use some kind of conduit or paint on the air line that is provided, there are some sharp edges under the van that will quickly run through that line. 444067
Hard to install, don't be fooled. I could have done it I figured but [for lack of time] I delivered it to my auto shop for the work. This is a high quality shop with good mechanics I trust. It took them 5 hrs to include replacing tie rod bolts on a Honda Pilot that were rusted on; had to be released. They said whole axle had to be lowered down to install these bags. The upside is these units are high quality (so far) and seem to work well. In the Honda Pilot, towing a 1575 Lance trailer, they are totally needed as the back end settles all the way down with tongue weight. I'd actually like Gen 2 of these bags to be taller too. Your SUV probably will too and if you're reading this you're on the right track to solve this problem. I'd buy these again but factor in time/expense for the install. 313648
I have waited to do a reveiw on this until I had some mileage on them. My issue was too much sag in my 2007 Honda Odyssey when loaded. I very often have three or four bikes on a hitch platform rack plus camping gear, one or two adults and two kids. That load was just too much for the stock suspension, particularily the leverage generated by a platform bike rack carrying three or four bikes.. I first tried the SumoSprings on the van. I liked the idea that this could be easily added or removed as my needs dictated. The SumoSprings improved the sag but 4 bikes plus luggage on a 2500 mile trip showed that we were still sagging too much for my liking. I took the SumoSprings out had had the air bags installed by a local garage. I used two air lines with the schraeder valves sticking out of the bottom of the bumper on one side. I change the air pressure using a bike pump. This is very quick and easy to do. I normally leave 18psi in the bags when running empty and raise to 30 to 35 psi when I am going to be carrying a load. 18 psi to 35 psi takes four or five strokes with the pump per bag. Not hard at all. So far I have carried three bikes on my platform rack plus a full load of camping gear on a number of occasions. With the bags inflated to the rated 35 psi, the van sits completely level with the camping/bike load. The ride when loaded is pretty much equal to the ride empty without the bags but keeping in mind that the van handles differently due to the weight and leverage of the bikes hanging off of the rear. Empty I settled on the 18 psi as I am most happy with the ride of the van at that pressure. This solved my issues completely. Nothing bad to say about the SumoSprings, they just were not enough support for what I needed. Shipping from etrailer was quick and easy. 93738
The service from you folks is simply fantastic. There has been one development that is negative for the airbags. The hardware, most specifically, spring clips that attach the air tubing are not stainless steel or not a high enough grade as they are rusting and one side no longer stays on very well. I live in Wisconsin so they live in a very salty environment but the clips are not really robust enough for life under a vehicle coated in salt. I will have to find replacements. Other than this issue, the bags have been fantastic
Product was easy to install on my 2016 odyssey, I ran the lines to two valves and plumbed them to mount onto the side plate of the new trailer hitch I installed for a really clean and accessible install. Be prepared with a good drill, impact gun and high quality drill bits but the online installation videos make this install a breeze. I didnt even look at the instructions provided with the kit thanks to the videos from etrailer. 274824
I installed the air lift I purchased into my 2012 Odyssey today. The install went well but I wanted to point out 2 things: First, since the under side of a 2012 rear control arm isn't exposed, it should be noted in the instructions that the air line must be secured to the airbag before reinstalling the coil spring and reconnecting the control arm bolt. Also, to avoid the exhaust pipe altogether the air tubing can be run through the lower control arms and center frame section, all etrailer would have to do is supply 2 small grommets to prevent wear. I included a picture of the installed airbag and a picture of the tubing running through the center frame section. Neil 45446
Hi, I installed the kit last summer as per the instructions. I'm not sure but I think that the template is not correct. See pictures attached. The tubing clip attached to the right ballon felt apart when I lift the car last autumn. It seem that the hole drilled in the suspension arm is not inline. I'm not sure this product is for us, the guys from the North, here in Canada with all the salty roads in winter, the extreme cold temp and all the rusty coil springs reducing probably the durability of the product. Have a nice day. 644380
Works exactly a I expected. My van is a 2000 Mazda mpv, but my springs are the right size. I installed them a year ago, and have had no trouble since. My minivan is converted into a work van for hauling all my tools, so it's heavy, really heavy. I went from cringing at the slightest bump to not even thinking about my suspension. 606073
Great product. Made a world of difference pulling our boat. 555250
Love this kit. Makes a BIG difference when Lodi,g up 4 kids and a 500lb trailer. Even unloaded I can feel less body roll. Install is as easy as the videos show. You'll need to route the hoses well, but the 'single inflation valve' they provide is great. I put mine on the rear bumper cover, pointing. Down, easy to access from the group behind the van. Glad I bought this. I wish I had one for My other van (a Kia Sedona) 528943
I recieved my hitch and Air spring kit for my 2011 Honda Odyssey VERY quickly. The communication from etrailer was fantastic. I have not yet installed it but everything appears to be in order. 501709
Great product easy installation 495239
I added the Airlift 1000 to my 2014 Honda Odyssey during the summer of 2017 in order to compensate for the tongue weight of a pop up camper in addition to a car full of kids and a huge car top carrier full of our gear. The "Air Helper Springs" provided enough lift that the vehicle was more balanced and the tail end did not sag so much. It did not bring the rear of the vehicle completely back to level, but it was enough so that I could now look out of the rear view mirror and see traffic behind my camper. That's what I was hoping for. As the winter months of 2017 and the beginning of 2018 came on I reduced the psi in the lift system down to about 10 psi and with cold months began to notice a lot of rubber against metal coil spring "squeegee" type noises whenever the van would go in and out of driveways at a angle and particularly over rough roads. This constant suspension sound was very annoying and so, I decided perhaps lubricating the rubber tubes inside the coil springs was a possible solution. I did not want to use a lubricant that would dissolve the rubber! After the calling the manufacturer, I learned that a white lithium spray would work well and solve the problem. So, following the manufacturer's recommendation, I used WD40 white lithium spray and the noisy rear suspension was instantly quiet. Success! 479243
I took my time to do it right safely. I had all the right tools to install the air bag with the help of the video. I routed air line up high away from the exhaust pipe and using the heat shield. The Type 3 Curt tow bar has flanges on the drivers side which was perfect to mount the nipple to inflate the air bag after using the “T” set up. It works well and I’m Happy with the results. 2016 Odyssey w/carrier for extra cargo. 461756
Excellent product. Our 2010 Honda Odyssey handles very well with the electric wheelchair that weighs 386 lbs in the back. Well worth the money. No problems after one year. 325820
Easy to install and maintains the air presssure. Gives my vehicle the ride I was looking for and provides excellent support when towing my boat. 307443
The air suspension functions perfectly and I rarely have to adjust the pressure. It gives my 2007 Honda Pilot the support and stability I was looking for when towing my 3k pound boat.
Had the air lift 1000 helper springs professionally installed. They worked as expected, and lifted my Odyssey about 2". Much better ride with a fully loaded van on a recent trip. 262671
Purchased this product about a year ago and am very satisfied. Great solution to level Honda minivan when pulling a pop up camper. Provides good ride with and without trailer. Easy to adjust as required. Best part of the purchase was the online video instructions that I was able to view prior to the purchase. Thanks etrailer. 262242
Great Products and Great Customer Service and Great Instructions / Videos. 221274
Everything arrived quick and in good order. Will be installing this coming weekend. Defiantly will order from etrailer again. 218201
Here within a week! Very happy! 151319
I intalled the airbags, and drove 2200 miles, no issues, adjusted the air once because were I was the temperature was very low. Outside of the no issues. On the install, I did it on a lift and two support stands, worked great. The hole in the center was the must dificult task. Use a dremil to trim all access metal. I will post pictures later Thanks, 112665
No issues, need to order the self adjusting pomp. Otherwise great product and life saver.Thanks
Review from a similar Air Lift AirLift 1000 in Vehicle Suspension
Installation was easy, and that’s really all I can comment on at this point as I am yet to use it. I’d recommend going from the top of the coil down when trying to install the folded bag. 510670
Review from a similar Air Lift AirLift 1000 in Vehicle Suspension
These installed well and seem to work well. They keep my minivan level when pulling a utility trailer, reducing instances of the tongue bottoming out when crossing aprons. 589336
Review from a similar Air Lift AirLift 1000 in Vehicle Suspension
My 2008 Nissan Quest was almost bottoming out the rear suspension when my #2300 pop-up camper was attached. These air springs solved my problem but don't seem to be a perfect fit for the inside of the springs as they don't vertically fill the cavity enough with the included spacers. They only partially correct the sag in the rear suspension. They do add enough spring rate soak up the bumps under load. I am on my second season with them now and they still hold pressure and give a confident ride. In summary, great product with only a marginal fit for my vehicle. Definitely gets the intended job done as advertised. 525820
Update 2 years later: We just traded in the van with the air springs in perfect working order. My new tow vehicle has coil over strut rear suspension so another set of air bags is not an option. I didn’t truly appreciate what a fantastic product this is until it was taken away as an option. Now I’m faced with spending more money for a product that doesn’t work as well if I need to correct my rear suspension again.
Review from a similar Air Lift AirLift 1000 in Vehicle Suspension
Great product! The only issue I had was that I bought the kit for a stock height Jeep and they were a little short for my lifted coils. Still stiffened the rear and eliminated the sag even with the fitment issues. I would recommend these for anyone with coil springs wanting to tow or haul anything heavy. 630876
Review from a similar Air Lift AirLift 1000 in Vehicle Suspension
System was ez to install. Works great! Make sure you route the hoses so they wont get pinched between the shock coils. Also route the hoses so they are securely anchored but have enough slack for suspension flexing. I tow a 8,000 lb toy hauler with about a 1200lb hitch weight. I have 6” of lift in my Ram 1500 pickup and before the bags the rear was really compressed under the load. With the bags at 30PSI the rear barely dips and drives very stable even over rough roads. Have used the system under load for over 8000 miles of high speed towing, again often over rough roads. Worked great! Only negative is that the inflate nipples and mounting rings corroded quickly. Easily replaceable with stainless parts available at any good hardware supplier. I will be changing the hoses this year as they are not hi quality and its time to change out those. I’ll use a higher quality hose this time. I also use a high end equalizer hitch to help. Both systems work well together. 541945
Review from a similar Air Lift AirLift 1000 in Vehicle Suspension
I have a 2008 Sienna and did the older install where the valves were mounted to the hitch, rather than through the car jack area. I also used wire loom 1/4" diameter throughout the install for extra protection and used metal loom clamps with self drilling screws as the install video showed for 2006 Sienna's. The install took about an hour once I figured everything out. I didn't do the tee fitting with only one valve because it was plastic, but I heard you can order a brass tee that might be more durable. However, since one line is longer than the other to my valves, I notice that it is difficult to completely sync up the psi, so I would do the tee fitting if I do on another vehicle. I didn't measure exactly, but definitely with the eye test the Air Lift system kept the back end up under a heavy load with hitch mount bike rack loaded with 4 bikes. I could also feel less sag and bounce when going over bumps and a more stable ride under load. So far so good, we'll see how all the parts last when they have to go through a few winters. But for now, works great. 220032
Review from a similar Air Lift AirLift 1000 in Vehicle Suspension
This was the easiest install I've ever done! One hour on a 06 Sienna. The video made it simple. The van drives great with only passengers so far. Roll has been reduced tons. This is the 4th time I've ordered from etrailer. The directions on all the products has been great. Videos are spot on. 227466
Review from a similar Air Lift AirLift 1000 in Vehicle Suspension
Put these on our Honda Odyssey and it makes a world of difference. Install was super easy and direct. Our pop up camper tows like a dream now. 400052
Review from a similar Air Lift AirLift 1000 in Vehicle Suspension
Finally got to test these out almost a year later as our Labor Day camping trip brought on the weight in our Sienna van. I have a cargo hitch loaded with about 150lbs and a fully loaded Thule top box, 100L cooler, 4 people. Last year the rear tires were deep in the wheel wells. This year I pumped them up to 28PSI to give room for possible heat changes on the east side of the state. Raised up the rear tire PSI by 3 and this combo provided a very stable ride. Van road almost perfectly level. They also hold their air. I have not once had a leak in this last year. I keep them pumped to 13psi for normal use and between 20-30psi for extra loads. Took about 3hrs to install with taking my time. Actually rather easy to do , hardest part is routing the air lines and protecting it from the elements,heat and movement. Get some of the extra accessories they offer for this install, they are cheaper and save time compared to driving to the hardware store. I didn't pay attention to them until after I was installing and decided I wanted some extra protection for the air lines and a few other things. I don't know how well these would do with more than lighter loads like a small trailer or fully loaded down vehicle. I think the higher end models might be worth a consideration if you have some more serious tasks at hand like heavy towing. Great addition to our van. 291962
Review from a similar Air Lift AirLift 1000 in Vehicle Suspension
I received this in just a few days and had a friend help me install it. I am VERY pleased with it! I had installed a leveling kit to the front end of my 2011 Dodge 1500 Sport, and after loading the bed with tools that I use for work, it sat down in the rear. These air bags are perfect. I put about 25lbs in to level out the truck. The truck rides better and looks great. We drilled out one of the bolt holes that secure my tag and installed the valve stem there. Works Great 107304
After having this product for a year, I can honestly say that I will never be without it! With the addition of this simple inexpensive product, other than just the looks I have noticed that my tire wear has dramatically improved! you know how cheap tires are... In the last year I have put about 40k miles on the truck. Im in the Agriculture business and see a lot of dirt roads and drive out into fields daily.I check the system air pressure any time I notice a change in my tire pressure. I havent seen any leaks and that was my main concern.Overall, I am extremely pleased with this product and believe it was worth every penny.Bottom line, if you are reading this review and are thinking about purchasing this product DO IT!
Review from a similar Air Lift AirLift 1000 in Vehicle Suspension
I wanted to stop the droop when towing my 21' trailer. Works great. Read the reviews before you start your install. There are many good tips there that are not in the instructions. When folding the flattened air bag for insertion into the spring use zip ties to hold it in the folded position. Even though the second opening the in the spring looks bigger than the bottom opening, use the bottom one as it has a better angle. When applying the air hose to the fittings soak the hose 30 seconds or so in hot water so you can seat the hose all the way onto the fitting. Removing the tire and wheel gives you better access when putting the air hose on the bag fitting. Dropping the spare tire makes routing the air hose to the back a lot simpler. 351976
After one year I am still satisfied.
Review from a similar Air Lift AirLift 1000 in Vehicle Suspension
Installed Air Helper Springs on my 2014 Ram 4X4. Would recommend anyone to first remove the rear tires/wheels and pop out the plastic inner fender wells. Makes it a lot easier installing the air line on top of the air bags. Other than that, have bought numerous products from etrailer and "ALL" have been excellent products! 139412
I use the Air Helper Springs extensively and they have been holding up great. Great products from a Great Company!
Review from a similar Air Lift AirLift 1000 in Vehicle Suspension
This product is an excellent value. I installed on my 2013 Toyota Sienna FWD in a couple of hours, using the instructional video as a reference. When I filled up the bags to 30 PSI and hitched up my pop-up trailer, there was no noticeable sag in the rear suspension. I have yet to take the rig out on a long trip, but first impressions are very good. 208150
Review from a similar Air Lift AirLift 1000 in Vehicle Suspension
It was as advertised. I particularly like the detailed instructions that clearly covered the installation. Pictures in the diagrams were clear and appropriate. The product is to be used to maintain a level ride without rear end sagging of my van. This will eliminate headlight misalighnment from luggage during family trips. 297983
Review from a similar Air Lift AirLift 1000 in Vehicle Suspension
I am very satisfied with this setup, installed quickly and easily. The van rides and handles better weather empty or full, and it really is nice to not have everyone flashing me at night when the whole family is in the car(low beams). I installed these on my Sienna AWD van, and did invert them so the air connections were at the top of the spring for better air hose routing. In doing so, I lost the shims. The best part was that I emailed AirLift customer service to see if I could purchase the shims. Let's just say I am more than impressed with their response. You dont find customer service like this, they were responsive, and sent me new spacers asap. I would highly recommend these to anyone. 54148
Review from a similar Air Lift AirLift 1000 in Vehicle Suspension
Just what I needed on my Toyota Van. This combined with my Curt Weight Distribution Hitch makes towing my Wolf Pup travel trailer all good! Nice and level now. Easy to install too. I kind of like leaving pressure in them even when not towing to reduce body roll on the van. I ran two separate air hoses on mine so pressure can’t move from one side to the other. 576417
Review from a similar Air Lift AirLift 1000 in Vehicle Suspension
I just installed my airlift 1000 kit in my 2014 Ram 1500. The installation only took about 90 minutes and only required a pair of pliers, a knife, a jack and some jack stands. I warmed the bags with my floor heater to make them more pliable and softened the air lines with hot water so they install on the nipples easier, as suggested by etrailer's tech tip videos. So far this seams to be a quality kit and is holding air. I haven't tested it under a load yet so I can't speak to that, although I am optimistic based on other reviews. Etrailer's customer support is outstanding and their shipping is quick. I couldn't be happier at this point. 153068
Review from a similar Air Lift AirLift 1000 in Vehicle Suspension
Fit well, but not that easy to install without a lift (was able to use a friend's) to access and spread the coil springs apart, insert the bags, route the tubing and secure the tubing clamps. Cable ties too short for securing to some locations, so have some long (over 10") ties available. Went with single fill valve and had no problems with leveling. Plan well ahead before cutting the tubing, because there is little to spare (not enough for separate fill valves on a Toyota Sequoia). Well worth the price - made a huge difference when towing a heavy load or with a near maximum tongue weight. 250038
Continues to perform well, no problems, but you do need to pay attention to minimum air pressure with change of seasons. Well worth the price, especially with heavy tongue weight on trailer and rear of vehicle packed to the max, like with 5 five gallon water jugs plus other equipment for a remote camping trip.
Review from a similar Air Lift AirLift 1000 in Vehicle Suspension
Shipped quick, boxed well, simple instructions. Installation was a bit more difficult than expected, but not impossible. If I could do it again, I’d remove the fender wells like the etrailer video suggests. I do recommend using zip ties to fold the bags down prior to slipping them in the coil springs. Hooked up my camper, hooked up the weight distribution bars, added air, and it significantly reduced the sag and raised the camper to a level position on my 2017 Ram Big Horn 4x4 towing a 26’ forest river camper 5750 lbs. I had no leaks after a 16 hour leak down test at 35 psi. Just a fantastic and inexpensive upgrade that drastically improves ride quality and stability. No more sweaty palms while driving! 557399
Review from a similar Air Lift AirLift 1000 in Vehicle Suspension
Customer Service, great! I called 4:45 PM and needed the airbags the next day. I paid for overnight shipping and had them by 2:00 PM the next day. Product, great! I can't comment on installation because I had mechanic install. But two days later, I drove 2,000 miles with six adults and the 2010 Grand Caravan drove better than brand new. I recommend 30 PSI for a full load, 15 for empty van. 131673
Review from a similar Air Lift AirLift 1000 in Vehicle Suspension
Been running these for a year with no problems. Just transported about 1,000lbs of stuff in my 2006 Sienna. Before I left I made sure the bags were at 35psi. Van hardly sagged at all. Great addition to a vehicle I use regularly to haul stuff and tow a tent trailer. Installation was moderately difficult. I mounted the shraeder valve next to the fuel fill-up behind the fuel door. I check it every time I change the oil. Seems to lose about 10psi over 5 months. 290500
Review from a similar Air Lift AirLift 1000 in Vehicle Suspension
First thing, Sorry if the photos are sideways! I took a couple of pics of the air bags because on the site it looks as if they are too skinny to work but NO they are the right size for your P30 Chevy Motorhome. The price was right for the complete kit as shown in the photo with the lines, bags, shields and other little bits for mounting the lines on the frame. For install, there is a set of directions and an a informational packet for those other items you may want to monitor and maintain you air bags if you so desire. The instructions are pretty good but I'll tell you that hole on the control arm at the bottom ain't that big! I put the bags in hot water to soften them up before trying the rolling and tying part and it helped. Be prepared to spend about 2 hours total to get this done but as far as being complicated, it's not. I didn't have to jack up my RV to do this either. Front suspension will now have the added support it came with back in 1987. Glad to have found this kit vs. the Firestone one that is basically the same for more $$ and many times is not in stock. Can't wait for the first trip! 376233
Ask the Experts about this Air Lift Vehicle Suspension
Do you have a question about this Vehicle Suspension?
At etrailer.com we guarantee:
Info for this part was:
At etrailer.com we provide the best information available about the products we sell. We take the quality of our information seriously so that you can get the right part the first time. Let us know if anything is missing or if you have any questions.
Thank you! Your comment has been submitted successfully. You should be able to view your question/comment here within a few days.
Error submitting comment. Please try again momentarily.