Expert Review Video:
Trailer Hitch Size:
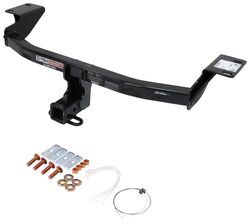
2 Inch Hitch Opening
Towing Capacity:
750 Pound Tongue Weight
5000 Pound Towing
Weight Distribution Towing Capacity:
750 Pound Tongue Weight
6000 Pound Towing
Trailer Wiring:
Features:
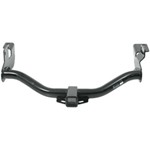
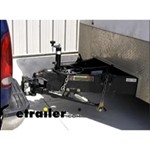
This fully welded trailer hitch receiver bolts onto your vehicle's frame with no welding required. Matte black, powder coated steel is durable and corrosion resistant and creates a rugged look.
Installation Notes:
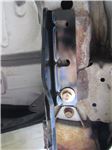
No drilling through vehicle frame required for installation
Exhaust must be temporarily lowered for installation
Underbody panel(s) and/or fascia must be temporarily loosened or removed. Trimming may be needed to reattach panel or fascia.
Fascia trimming required for installation
More Information >Trailer Hitch Size:
2 Inch Hitch Opening
Towing Capacity:
750 Pound Tongue Weight
5000 Pound Towing
Weight Distribution Towing Capacity:
750 Pound Tongue Weight
6000 Pound Towing
Trailer Wiring:
Features:
This fully welded trailer hitch receiver bolts onto your vehicle's frame with no welding required. Matte black, powder coated steel is durable and corrosion resistant and creates a rugged look.
Installation Notes:
No drilling through vehicle frame required for installation
Exhaust must be temporarily lowered for installation
Underbody panel(s) and/or fascia must be temporarily loosened or removed. Trimming may be needed to reattach panel or fascia.
Fascia trimming required for installation
More Information >Trailer Hitch Size:
2 Inch Hitch Opening
Towing Capacity:
750 Pound Tongue Weight
5000 Pound Towing
Weight Distribution Towing Capacity:
750 Pound Tongue Weight
6000 Pound Towing
Trailer Wiring:
Features:
This fully welded trailer hitch receiver bolts onto your vehicle's frame with no welding required. Powder coated steel is sturdy and corrosion resistant.
Installation Notes:
No drilling through vehicle frame required for installation
Underbody panel(s) and/or fascia must be temporarily loosened or removed. Trimming may be needed to reattach panel or fascia.
More Information >Trailer Hitch Size:
2 Inch Hitch Opening
Towing Capacity:
750 Pound Tongue Weight
5000 Pound Towing
Weight Distribution Towing Capacity:
750 Pound Tongue Weight
6000 Pound Towing
Trailer Wiring:
Features:
This fully welded trailer hitch receiver bolts onto your vehicle's frame with no welding required. Powder coated steel is sturdy and corrosion resistant.
Installation Notes:
No drilling through vehicle frame required for installation
Exhaust must be temporarily lowered for installation
Underbody panel(s) and/or fascia must be temporarily loosened or removed. Trimming may be needed to reattach panel or fascia.
Fascia trimming required for installation
More Information >Trailer Hitch Size:
2 Inch Hitch Opening
Towing Capacity:
750 Pound Tongue Weight
5000 Pound Towing
Weight Distribution Towing Capacity:
750 Pound Tongue Weight
6000 Pound Towing
Trailer Wiring:
Features:
This fully welded trailer hitch receiver bolts onto your vehicle's frame with no welding required. Powder coated steel is sturdy and corrosion resistant.
Installation Notes:
No drilling through vehicle frame required for installation
Exhaust must be temporarily lowered for installation
Underbody panel(s) and/or fascia must be temporarily loosened or removed. Trimming may be needed to reattach panel or fascia.
Fascia trimming required for installation
More Information >Trailer Hitch Size:
2 Inch Hitch Opening
Towing Capacity:
500 Pound Tongue Weight
5000 Pound Towing
Weight Distribution Towing Capacity:
500 Pound Tongue Weight
5000 Pound Towing
Trailer Wiring:
Features:
Fully welded vehicle trailer hitch is strong and durable. Draw-Tite's Tested Tough guarantee ensures that this hitch exceeds industry standards. The combination of an e-coat base and a powder coat finish provides excellent rust protection.
Installation Notes:
No drilling through vehicle frame required for installation
Exhaust must be temporarily lowered for installation
Underbody panel(s) and/or fascia must be temporarily loosened or removed. Trimming may be needed to reattach panel or fascia.
Fascia trimming required
Tech Tip:
Heat shield on Trailhawk models will need to be permanently removed for hitch installation.
More Information >Trailer Hitch Size:
2 Inch Hitch Opening
Towing Capacity:
500 Pound Tongue Weight
5000 Pound Towing
Weight Distribution Towing Capacity:
500 Pound Tongue Weight
5000 Pound Towing
Trailer Wiring:
Features:
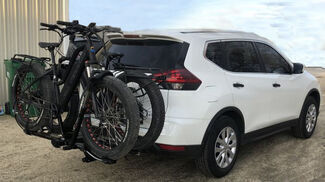
TowSmart's fully welded hitch bolts onto your vehicle. The receiver sits beneath the bumper for easy cargo access. Built from powder-coated steel, it resists rust and corrosion for lasting durability. Perfect for towing and hitch-mounted gear.
Installation Notes:
No drilling through vehicle frame required for installation
Exhaust must be temporarily lowered for installation
Underbody panel(s) and/or fascia must be temporarily loosened or removed. Trimming may be needed to reattach panel or fascia.
Fascia trimming required for installation
More Information >Trailer Hitch Size:
2 Inch Hitch Opening
Towing Capacity:
500 Pound Tongue Weight
5000 Pound Towing
Weight Distribution Towing Capacity:
500 Pound Tongue Weight
5000 Pound Towing
Trailer Wiring:
Features:
TowSmart's fully welded hitch bolts onto your vehicle. The receiver sits beneath the bumper for easy cargo access. Built from powder-coated steel, it resists rust and corrosion for lasting durability. Perfect for towing and hitch-mounted gear.
Installation Notes:
No drilling through vehicle frame required for installation
Exhaust must be temporarily lowered for installation
Underbody panel(s) and/or fascia must be temporarily loosened or removed. Trimming may be needed to reattach panel or fascia.
Fascia trimming required for installation
More Information >Trailer Hitch Size:
2 Inch Hitch Opening
Towing Capacity:
600 Pound Tongue Weight
5000 Pound Towing
Weight Distribution Towing Capacity:
600 Pound Tongue Weight
6000 Pound Towing
Trailer Wiring:
Features:
Fully welded vehicle trailer hitch is strong and durable. Draw-Tite's Tested Tough guarantee ensures that this hitch exceeds industry standards. The combination of an e-coat base and a powder coat finish provides excellent rust protection.
Installation Notes:
No drilling through vehicle frame required for installation
More Information >Trailer Hitch Size:
2 Inch Hitch Opening
Towing Capacity:
675 Pound Tongue Weight
4500 Pound Towing
Weight Distribution Towing Capacity:
675 Pound Tongue Weight
4500 Pound Towing
Trailer Wiring:
Features:
Fully welded vehicle trailer hitch is strong and durable. Draw-Tite's Tested Tough guarantee ensures that this hitch exceeds industry standards. The combination of an e-coat base and a powder coat finish provides excellent rust protection.
Installation Notes:
No drilling through vehicle frame required for installation
Requires temporary removal of bumper/fascia during installation
Installation requires permanent removal of the impact structure; hitch replaces the impact structure for support and safety
More Information >
 Filters