
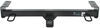
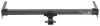
Draw-Tite Max-Frame Trailer Hitch Receiver - Custom Fit - Class III - 2"


 Arrives before Christmas
 To see if this custom-fit item will work for you please tell us what vehicle you'll use it with.
Thank you! Your comment has been submitted successfully. You should be able to view your question/comment here within a few days.
Error submitting comment. Please try again momentarily.
Built for strength and reliability, this Draw-Tite hitch features a fully welded design and no-drill installation. The rust-resistant e-coat and powder coat finish ensure lasting durability for towing trailers, campers, and hitch-mounted accessories.
Take on tougher jobs and bigger plans. Whether it's weekend gear, work equipment, or trailer towing, this hitch is built to help your vehicle do more with confidence.
Engineered for reliability, the fully welded steel construction ensures rock-solid strength mile after mile. Whether you're heading into the mountains or hitting the highway, you can count on this hitch to handle the load.
Uses factory mounting points for a secure fit with included hardware and clear instructions to guide the process, making setup as simple as possible.
The low-profile design keeps the hitch tucked up and out of the way, maintaining ground clearance while staying discreet when not in use. It's there when you need it and practically invisible when you don't.
Draw-Tites signature e-coat and black powder coat finish stand up to rain, salt, and road debris, keeping your hitch protected and looking sharp for years of reliable use.

California residents: click here

Took me about 4 hours (in 90 degrees weather :( ).
I would like to share some of my experience and hope it can help others.
1) Decided not to drill extra hole as I plan to only use for bike rack and think the existing 7 holes plus the 2 holes for the flange is robust enough.
2) Had difficulty disconnecting the 2 wire connections so just left it attached and was still able to continue working.
3) The instructions missed specifying T25 torx bit required to remove (3) screws from each wheel well.
4) torx bit attached to ratchet was able to fit between wheel and wheel well.
5) Unless something was wrong with my Husky torque wrench, I found the recommended torque to be too high. Therefore I would suggest saving money and not go out and buy (like I did) and just tighten firmly.
6) When reattaching fascia make sure to press down firmly on the back side.
7) When reversing with the bikes attached to the rack, the driver assist will interpret as an object so unless reversing VERY slowly the emergency brake will engage (you can disable this feature in the console).
Happy to finally have a receiver for my bike rack (after 6 months)!
Fits our new ID Buzz like a glove.
Do you have a question about this Trailer Hitch?
Info for this part was:
At etrailer.com we provide the best information available about the products we sell. We take the quality of our information seriously so that you can get the right part the first time. Let us know if anything is missing or if you have any questions.


Gwendolyn Y.
6/5/2025
You're amazing for getting the job done with temps in the 90s! I know I wouldn't be able to do that, I'd be sitting in front of a fan in no time. Also, thanks for sharing your step by step feedback about how you did the install. I know its going to help someone a lot when they read it. Stay awesome, Gabriel!