


Designed for use with wide, off-road tires, this setup gives you more clearance and a smooth ride. Built-in shock absorption limits rattle and bottoming out. E-Z Lube, long spindle with 4" drop lowers deck height. Fits any trailer frame width.
Features:
Specs:
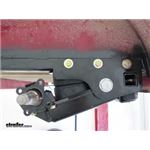
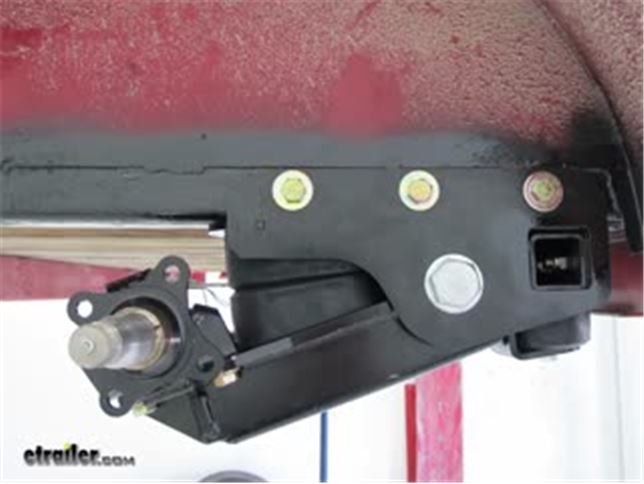
Note: This Axle-Less system requires crossbeam support. If your trailer frame doesn't have a crossmember in place, you can retrofit it with one, or you can add a support by running a piece of 2" x 3" steel tubing through the square holes cut into these units. You could also add a steel reinforcement bracket to the inside of the trailer frame.
Get more ground clearance and a more comfortable ride when you're towing with Timbren's Axle-Less trailer suspension. This suspension system provides great shock absorption to comfortably get you where you need to go and to protect your precious cargo as you travel - even on rough terrain. With 2 independently operating units, you'll get better handling when making tight turns. And because this system eliminates your axle and has drop spindles built in, you'll get a lower deck height without sacrificing clearance.
There are many suspension options for your trailer or camper. So, what makes Timbren Axle-Less different?
Axle-Less systems are a definitive upgrade over traditional leaf springs, in part because they allow you to do away with your thru-axle, allowing for maximum clearance. As you've probably noticed, having a leaf spring suspension means that your axle will always hang at least a few inches below your trailer's frame, resulting in limited ground clearance and a high deck height. This may make it difficult to navigate off-road terrain and to load items into your trailer.
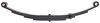
In addition, while leaf springs do a great job of supporting an even load, they may cause your trailer to bounce and rattle when it's empty or to bottom out with a heavy load. And they don't offer any type of shock absorption for a smooth ride - unless you have upgrades built in. With Timbren's Axle-Less system, gone are the days of dealing with these annoyances - this suspension is designed for a quiet, balanced ride, whether your trailer's fully loaded or empty.
A torsion axle is a step up in terms of shock absorption, and it provides more clearance than a traditional, leaf spring suspension, but that crossbeam will still hang down some. And if your torsion axle gets damaged in any way, it can't be repaired - you'll have to replace the entire thing with a setup that matches your exact trailer frame width.
With the Axle-Less system from Timbren, you won't have a low-hanging axle beam to get in the way when you want to go off-road. The drop spindles on this setup will also lower your deck height, making loading and unloading your trailer way easier. And the rubber springs and independent operation both combine to absorb shock and deliver a smooth, easy ride. In addition, the Axle-Less system can be easily maintained over time, and it will fit any trailer frame width, so you don't have to worry about potentially ordering the wrong size like you might with other systems.
Another suspension upgrade on the market is Timbren's Silent Ride. This setup is a great option to reduce bounce and rattle because it has the same AEON rubber springs as the Axle-Less system. But the Silent Ride still requires an axle, so you won't get the same ground clearance or low deck height as you will with the Axle-Less suspension.
The Timbren Axle-Less suspension is designed with you in mind. All of the parts work together so you can tow your trailer comfortably - regardless of load size.
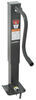
The first step in installing the Timbren Axle-Less suspension is to make sure that the mounting points for each unit are directly across from each other. The easiest way to measure this is to mark the desired mounting points on your trailer's frame. Then measure the distance between these points and the center of your trailer coupler. These measurements (A and B) need to be within 1/8" to keep your trailer frame square.
Once you have your mounting points lined up, you'll be ready to install the system. Drill 3 holes into your trailer frame at the desired mounting points. Then bolt each unit to the frame with Grade 5, 5/8" bolts (not included).
Because Timbren's Axle-Less system eliminates your trailer's thru-axle, you'll have to find another way to get the crossbeam support that keeps your trailer frame square. You have a few different options to do this depending on your application and how much fabricating you're comfortable doing.
If you're building a trailer, the best option is to begin building with the Timbren Axle-Less in mind and include a crossmember where you want to install the units on your frame. You can also retrofit an existing trailer with a crossmember.
If you don't have a crossmember where you want to install the Axle-Less system (and you don't want to add one), pick up a section of 2" x 3" steel tubing from a nearby weld shop. This tubing will serve as a support to keep your trailer square. It will hang only about an inch down from your trailer frame, providing more clearance than a thru-axle.
After you've mounted both of the units to your frame, you'll need to drill 3 holes into the steel tubing and into the built-in, square holes. Then, insert the tubing through the holes and secure it with 3 bolts (not included) on each side.
The last option is to fabricate a reinforcement bracket that can be attached to the inside of your trailer frame and to the Axle-Less suspension. It may be a little harder to fabricate a compatible bracket than to mount steel tubing, but you may get additional clearance with this method.
The following diagrams show measurements taken on the Timbren Axle-Less suspension system.
| A | B | C | D | E | F |
|---|---|---|---|---|---|
| 14-5/16" | 18-3/8" | 1-1/2" | 6-1/4" | -3/8" | 5" |
| G | H | I | J | K | L |
|---|---|---|---|---|---|
| 5-5/8" | 8" | 5-3/4" | 2-1/4" | 3-1/4" | 5-1/4" |
 Alternate Instructions
Videos are provided as a guide only. Refer to manufacturer installation instructions and specs for complete information.
Today we're going to be taking a look at, then we'll show you to install the Timbren Axle-less Trailer Suspension System. These are available in multiple configurations to fit most applications. Just check our website out for details. Today specifically we're going to be using part number ASR3500S05. This is a spindle only configuration for 3,500 pound axles. With the spindle only configuration we're going to be reusing our bearings, we're going to be reusing our brakes and our drums.
You may want to pick up some new seals if you're going to go this route. We also have the full kits available with the brakes, the drums, and everything that you'll need. The Timbren Axle-less Suspension is an excellent, excellent product. You can tell an immediate difference as soon as we start hauling our trailer with the items installed. It's much, much quieter, much smoother, you don't feel the weight in the truck nearly as much as you did with that standard suspension. You can see as we're cornering there's no transfer of weight.
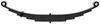
They're working independently to keep our trailer nice and level. Here's what our kit's going to look like installed. This axle-less suspension system from Timbren is kind of a solution for all that noise and everything that we typically get with our trailers; real rough ride. Now, they use 2 rubber springs essentially, they're Aeon rubber springs. We've got our larger one here in the back. This is the main body of the system, and as we load it more and more and more it constantly kind of adapts to that to give us just the ride of support that we need. To keep this constantly under tension so we don't have to ever worry about a lot of that rattling and stuff, we've got a rebound spring right here in the front.
These are designed to work with really any style of trailer frame, no matter of the thickness here. Depending on the application if you've got a really wide trailer, well then you're just going to put the 3 bolts in the side, 3 bolts up through the bottom. We're dealing with a little bit narrower angle channel here, so what we've done is we've put the square tube across the front. You could also design a bracket to go on the side, if you wanted like a gusseted bracket. There's a lot of options out there. We went with the spindle only design.
It's really heavy duty, too. You can really tell about the quality that they've put into the design of it. Going to have a black powder coat finish on all of our surfaces and this real nice thick steel fully welded around all of our points with reinforcement gussets right where we want them. You can just tell it's a really well built system. Another advantage that we're going to see with the axle-less suspension is going to be increased ground clearance. We don't have that axle that typically hangs down here lower. Even with us using the cross tube design or the cross bracing design, it's tucked up right underneath of our trailer. It's even up higher than what our cross members are here for our flooring, so really tucks it up. Then this area down here, you can see smooths off. The axle-less suspension system can also help us with getting our deck height of our trailer where we want it. These are available in both drops and lifts. One of the added benefits that we get out of this axle-less system is that we're not tying this side of the trailer to that side of the trailer with one of those through axles that are going to go right through down here where all our movement's going to actually take place. This allows these to work independently of one another. If we hit a bump on that side it doesn't transfer all the way over here and then cause this side to go too. Now, they've set this up with tow and camber adjustments aligned 00:04:02 already, so we should have great tire wear as we track down the road. However, if need be they do provide us with some nice alignment shims here if we do want to change it up a little bit, or maybe our trailer's frame wasn't exactly square. Another great thing about the Timbren Axle-less Suspension set up is that they use urethane bushings here at our pivot point. It's going to be very very long lasting. It's going to keep everything nice and tight, and we don't have to worry about lubrication. To begin our installation we need to get our factory axle out. Now if you are going to reusing hardware off of the original axle it's best to do it when it's still on the trailer. That way you're not fighting the roll. All right, now you'll notice here on the frame of our trailer, this is our rear spring perch. We've removed the front to allow room. You may have to do that on yours, and there was a couple welds here and then here that kind of stuck out on the frame rail. We've gotten rid of those. Just use a grinder, get it nice and clean. We want a nice smooth surface for this to mount up against. We're going to mock it up now just by bringing this edge up and letting it sit on our trailer. You can see the 3 holes we're going to use for attachment. Now the key to getting this set up properly, you can see we've got some plumb bobs here. Basically it's just a string with a nut tied to the end of it. We've gone off of both of our spindles here in the same location, and then we've gone from the center of our coupler in the front so we've got them at 3 locations. Now we're going to measure from that string back to this string, and then we'll measure from the front over to the other side. It's very important for us to have these within an 1/8 of an inch. What this means is that we've got the perfect triangle from the coupler back to each of our spindles. We won't have to worry about any kind of side tracking. It's going to keep our trailer running straight behind us, and it's going to make sure that we're getting proper tire wear. Adjust as necessary. We want to make sure if you're using plumb bobs that your trailer's level. After that it's just a matter of getting them lined up to where they're going to be just right. We'll measure, mock it up, measure, mock it up, and then once we have it right where we want it we can get our holes drilled. Now we want to take a punch and I'm going to mark the middle of my rear hole. Then we can start stepping up to a 1/2 inch hole diameter is what we want to end up with. We start with just an 1/8 inch and then kind of move up as we go. All right, that created a little too much movement, so we want to get this hole drilled perfectly to get that suspension out of the way and get our hole drilled out. We'll bring it up, slide our bolt through the hole there, and then put our hardware on the inside. That's going to do a good job of holding that in place while we get the rest of our holes marked. I'm going to use a jack stand again here just to apply some upward pressure. I'm going to tighten this nut down temporarily. That's going to draw it right over into position we want to make sure it's pressed up firmly all the way in the front. We don't want any kind of gaping between the top of our enhancement here and the bottom side of our trailer. Now we can use our center punch or our 1/2 inch bit here and get the center of our holes marked. You see I've already mocked up what would be the passenger side of the trailer. Anything I do on this side, I'll do the exact same thing on the other side. Now we're ready to get these pulled down and we'll get our holes drilled out. All right, now with those holes drilled out let's get our suspension back up into place here. What I want to do is just get these 3 started and I'm going to get them snugged down. This isn't a permanent mount, so we don't want to torque them all down. We've got to measure for that cross tube. We're going to be using this opening here for a 2 inch by 2 inch cross tube section that's going to give us additional strength. There's a few options on the additional strengthening process that you can check out in the instructions. That's mainly for just like the trailer that we've got here, just your simple utility trailer that just has an angle iron frame. If you see channels and things like that, typically once we're putting these on the heavy-dutier trailers there's going to be plenty of thickness in the frame. You really don't have to worry about having that cross tube. Now to figure out how long of a pipe that we're going to need here we're just going to measure inside to inside. There's going to be a couple little lips there. Right here there's a little bit of a lip. We just want our pipes to sit just inside of those, and we'll want our square tube to fit right inside of that. Now with our pipe cut to size all we'll need to do is slide it in all the way across, and we'll want to make sure that it engages our other side as well. All right, that's held in place there kind of by those little lips we saw in each end. We need to get our bolt holes here marked so we can drill our holes and install our hardware. Those should be marked so let's pull our tube back out of there, get those holes drilled, and we can put it back in. Now we can get our center punches taken care of here. Just like before we'll just step up our bit size as we go, makes it a little bit easier. Now with the tube back in we'll take our hardware, got kind of a tight squeeze here but we're just going to place that through. Place that flat washer inside of there on the bolt, then we need to get our nut started. One of these little flexible magnets is a really good way that bolts quite a ways back in there. If you've got a different method that works for you, great. My fingers won't reach in there. Maybe a pair of needle-nose you could get to work in there. These little magnets are pretty readily available and pretty handy to have, so that would be my recommendation. We'll just leave that one loosely installed. Now we're going to take our other bolt, we want to place it through both of our holes but we don't want to have it poked all the way through. What we're going to do is have that stay there as we get our spindles torqued down, as we get our brackets to our frame torqued down. Then we'll torque down our inside bolt, then we'll be able to get to this and torque this down. We'll just at that point either thread it in by hand or with a wrench, put our stuff on it and get it torqued. If we we're to leave this out completely so we could get to that back bolt, it's likely that our holes would then be slightly misaligned and it would be real difficult to get it in. Now we want to look in the instructions and find our torque specifications and we want to go through and torque everything down in the appropriate order to those specifications. I had these pretty snug when we we're doing the install just so we wouldn't have to worry about any movement or anything with the spindle. With those done we'll move up to the 3 here in the side. Once those are properly torqued we'll go to the ones that we've got inside of our tube. With everything torqued down that's really all there is to the install. I would here on this cut piece of tubing, just a little bit of black spray paint there. Just kind of seal that up, prevent any rusting there. Then, depending on your set up if you're using, if this is on a braking axle then you'll put your brakes back on your flange and then rebuild your hub per the instructions. If this is on a lighter-duty trailer and if you don't have brakes then you're just going to rebuild your idler here. Good time to replace the seals, repack the bearings, inspect those bearings, or just order a new kit to fit right on here and then you'll know you're going to be safe as you go down the road. All right, now we'll lower it down until the tires touch the ground and you'll want to be sure to use a torque wrench and get all of your lugs torqued down appropriately. That's going to complete our look at the line of the Timbren Axle-less Trailer Suspension Systems.

Do you have a question about this Trailer Axle?
Info for this part was:
At etrailer.com we provide the best information available about the products we sell. We take the quality of our information seriously so that you can get the right part the first time. Let us know if anything is missing or if you have any questions.


Thank you! Your comment has been submitted successfully. You should be able to view your question/comment here within a few days.
Error submitting comment. Please try again momentarily.