
To see if this custom-fit item will work for you please tell us what vehicle you'll use it with.
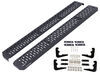
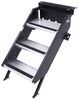
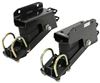
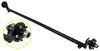
Install your Westin molded running boards; molded, lighted running boards; Sure-Grip running boards; or Grate Step running boards quickly and easily with these custom-fit brackets. Includes all necessary hardware.
Features:

California residents: click here
Videos are provided as a guide only. Refer to manufacturer installation instructions and specs for complete information.
Hello neighbor, this is Curt at etrailer, and today we're taking a look at the Custom Mounting Brackets for Westin Running Boards on your 4th Generation Toyota Tacoma. Now if you have any experience with Westin Running Boards, please leave a comment below. We love to hear your experience and share them with other neighbors just to help them make the best decision for themselves. Let's take a look at these brackets. Now I mentioned before, this is a custom mounting bracket kit for that 4th Generation Toyota Tacoma. The type of Westin Running Boards this will work with is gonna be your Sure Grip, Molded, SG 6 Series and Grate Steps Running Boards.
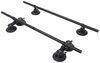
Now these custom brackets for your running boards are no drilling required, meaning there are preexisting bolt holes that these are gonna go into under the vehicle, and we're gonna show you exactly how to do that. But first, let's take a look at everything that's included in the kit. This is gonna be the hardware that'll put the brackets onto your vehicle along with the hardware that puts the running boards onto your brackets. So each side of the vehicle is gonna be consisting of six hex bolts, lock washers, washers, square head bolts, and the nuts to go with those. And what we'll end up with are these assemblies right here.
So in order to put the brackets onto the vehicle, we need our hex bolt, lock washer and washer. There's not gonna be any drilling into the vehicle required. There are some existing bolts down there that will be taking out and replacing with these along with the brackets. And as far as tools needed for this assembly, all you really need is a 13-millimeter socket and a torque wrench once the job is complete to make sure everything is tightened down correctly. Now the brackets are E-coated steel and they're finished with a powder coating.
This is gonna really help with corrosion resistance and scratch resistance as well as keeping them in a really nice sleek look. Now let's go ahead and take a look under the vehicle and see how these get mounted on. So the first thing we're going to do is take our passenger front bracket, which is easily identifiable because it's at this angle plus it has this stamping on it we've discussed before. And each bracket is gonna require two of those hex bolt assemblies that we showed you. And I've got my 13-millimeter socket wrench.
Now the first thing I'm gonna need to do is remove the existing bolts that are under here, which are located at an angle here and here. (metal clanking) On our passenger side, it's gonna go with this next set of bolts here. There's no angle to this as far as the bracket goes, so they're just gonna go on pretty directly. Now what you're also gonna find is that the next set and the next set after is really gonna be dependent on the type of vehicle and the type of running boards you get as far as which of these sets to use for your third passenger side bracket. If you have a shorter cab, this is likely the set you're gonna need to use. If you have the double cab, this side is the set that you're gonna likely use. It could also be dependent on the type of running boards you get, but these are gonna go on the same way regardless of which one of these you end up going with. And we're simply gonna need to repeat this same process over on the driver's side. Now we've got our first rear mount installed on the passenger side, but something that we noticed as we we inchesre taking the Toyota bolts out is that the Westin Install Guide is gonna let you know that you need a 13-millimeter wrench for the bolt heads, which is true of the bolts that come with the bracket kit. However, the Toyota bolts that we're removing we found out are actually 12-millimeter. So 12 millimeter, like, well, this is the 13-millimeter. You could see how loose that is. That really gave us a fight as far as getting these out. So get yourself a 12 millimeter wrench as well for the removal of the Toyota bolts. You will need the 13-millimeter however, when we install the bolts from the install kit. Now that we've got all three brackets on our passenger side mounted, again, I wanna reiterate that we're leaving them a little bit loose in here so we can maneuver those running boards how we need them once we get them out and mounted. We'll be using the square bolt assemblies to attach the running boards and once we have them situated on each side of the vehicle and everything looks the way we want it to, at that point we're gonna go ahead and torque down every bolt, which will be 12 bolts per side of the vehicle. Torque them all down to that 15 to 18-foot pounds and your running boards are installed and ready to go. Once again, this is Curt at etrailer. Thanks for stopping by.
Info for this part was:
At etrailer we provide the best information available about the products we sell. We take the quality of our information seriously so that you can get the right part the first time. Let us know if anything is missing or if you have any questions.


Thank you! Your comment has been submitted successfully. You should be able to view your question/comment here within a few days.
Error submitting comment. Please try again momentarily.